| View previous topic :: View next topic |
| Author |
Message |
BRAZO
Joined: 29 Jul 2008
Posts: 650
City/Region: Full-time Travel
State or Province: NV
C-Dory Year: 2008
C-Dory Model: 22 Cruiser
Vessel Name: Meyer Meyer
Photos: BRAZO
|
 Posted: Mon May 09, 2011 3:05 pm Post subject: Bow Hatch - making cutout smaller Posted: Mon May 09, 2011 3:05 pm Post subject: Bow Hatch - making cutout smaller |
 |
|
I need to reduce the opening size on the cutout for the bow hatch and I need some guidance.
My thought is to clamp the hatch frame upside down with the "screw" flange on the inside of the boat.
Then I would line the hatch frame with duct tape or something else??? to keep the epoxy from adhering to the frame.
Then I'd pure in thickened epoxy in-between the original cutout and the protected frame.
This would then create a new perfect opening and I'd take the frame out and install from the outside.
Question: Any thoughts on what to line the hatch frame with in order to be able to pull it out easily after the epoxy hardens? Any thoughts on why this would not be a good idea?
Thanks for your help.
_________________
2008 CD22 Twin 50hp
Full-time Travel - Sprinter4x4, International, C-DORY 22 |
|
| Back to top |
|
 |
jkidd
Joined: 23 Oct 2006
Posts: 1668
City/Region: Northern, Utah
State or Province: UT
C-Dory Year: 2007
C-Dory Model: 22 Cruiser
Vessel Name: Voyager
Photos: Voyager (JK)
|
| Posted: Mon May 09, 2011 3:49 pm Post subject: |
|
|
I think I would make a template. I would probably worry about messing up the hatch and having to buy a new one. Plywood is cheap.
_________________
Jody Kidd
KE7WNG
Northern, Utah
 |
|
| Back to top |
|
|
thataway
Joined: 02 Nov 2003
Posts: 21357
City/Region: Pensacola
State or Province: FL
C-Dory Year: 2007
C-Dory Model: 25 Cruiser
Vessel Name: thataway
Photos: Thataway
|
| Posted: Mon May 09, 2011 5:37 pm Post subject: |
|
|
The opening does not need to be "perfect"--in fact some hatch flanges have a very slight taper and this could be adverse to what you want to do.
I agree that pouring in epoxy is not the best way. Also you have no matrix support for the epoxy--and that is why I use glass stips.
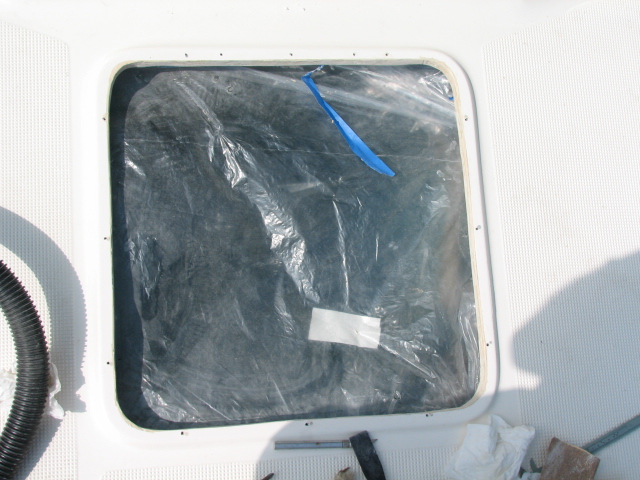
This photo is the forward hatch on the Tom Cat when it was less than a month old. Notice that I have used mostly hand tools--an exacto knife and a rasp to fair the sides of the hatch--in the photo the new holes are drilled--and about equal spaced--also the top surface needs to be fair to the hatch flange. Before several screws did not go into the glass at all.
The entire edge was under cut a small amount with a Dremmel tool and filled with thickened epoxy before the strips of glass were laid around the inside of the hatch cut out. The width of the glass strips was about the same as the depth of the deck where the hatch goes. I laid in about 3 pieces of glass all of the way around, then faired with medium density filler and epoxy--with some white pigment to make it cosmetically similar to the original polyester. None of this shows from the exterior.
_________________
Bob Austin
Thataway
Thataway (Ex Seaweed) 2007 25 C Dory May 2018 to Oct. 2021
Thisaway 2006 22' CDory November 2011 to May 2018
Caracal 18 140 Suzuki 2007 to present
Thataway TomCat 255 150 Suzukis June 2006 thru August 2011
C Pelican; 1992, 22 Cruiser, 2002 thru 2006
Frequent Sea; 2003 C D 25, 2007 thru 2009
KA6PKB
Home port: Pensacola FL |
|
| Back to top |
|
|
Ed J
Joined: 28 Sep 2010
Posts: 4
City/Region: Falmouth
State or Province: MA
C-Dory Year: 1988
C-Dory Model: 22 Cruiser
Vessel Name: Lady J
|
| Posted: Mon May 09, 2011 8:38 pm Post subject: |
|
|
I would agree with making a plywood template instead of using the hatch as a mold. Use waxed paper or heavy duty plastic wrap (Saran Wrap) as a barrier to keep epoxy from sticking to the plywood. If reducing opening by .500" or more I would consider glassing in thin marine plywood strips to fill some of the gap and undercutting the existing opening to create a keyway effect for additional strength.
Ed J
_________________
Ed J |
|
| Back to top |
|
|
BrentB
Joined: 15 Jul 2006
Posts: 4420
City/Region: Greenwood
State or Province: IN
Photos: BrentB
|
| Posted: Mon May 09, 2011 8:58 pm Post subject: |
|
|
Bob
Do you use the same tools to remove Bostic? 
_________________
Brent Barrett |
|
| Back to top |
|
|
thataway
Joined: 02 Nov 2003
Posts: 21357
City/Region: Pensacola
State or Province: FL
C-Dory Year: 2007
C-Dory Model: 25 Cruiser
Vessel Name: thataway
Photos: Thataway
|
| Posted: Tue May 10, 2011 11:26 am Post subject: |
|
|
Removal of Bostik products: Generally I peel and cut the sealants used inside of the boat (my Tom Cat had almost every fitting smeared with one of the silicone based Bostik sealants). No reason to use a rasp or sand paper etc.
I am not sure what is being used now--Bostik makes almost as many sealants/adhesives as 3 M!
This is just the marine catalogue:
http://www.bostik-us.com/files/catalogs/M26_Marine_Products_W.pdf
There are urethane, isocinate, silicone and other base products. So the removal of each type of product may be different. If it is one of the urethanes, I lke ot use a piano wire which is heated to cut thru the sealant. There are also debonding agents for silicone and urethane adhesive/sealants. |
|
| Back to top |
|
|
BrentB
Joined: 15 Jul 2006
Posts: 4420
City/Region: Greenwood
State or Province: IN
Photos: BrentB
|
| Posted: Tue May 10, 2011 12:21 pm Post subject: |
|
|
You worked hard removing the Bostic sealant form the TC.
 |
|
| Back to top |
|
|
|
 Search
 Private Messages
 Profile
 Log in
 Register
 Help
Help
