| View previous topic :: View next topic |
| Author |
Message |
bmacpiper
Joined: 03 Jun 2007
Posts: 211
City/Region: Bainbridge Island
State or Province: WA
C-Dory Year: 2007
C-Dory Model: 22 Cruiser
Vessel Name: Big Blue
|
 Posted: Sat Nov 21, 2009 1:01 am Post subject: Honda 90 Blues, reprise and fixed Posted: Sat Nov 21, 2009 1:01 am Post subject: Honda 90 Blues, reprise and fixed |
 |
|
Good evening to all,
I'm stealing the title to Richard's excellent article (at http://www.c-brats.com/viewtopic.php?t=11439&highlight=honda++blues), because I'm adding to that thread of knowledge and hope to expand the archives just a bit.
I recently purchased a 19 angler, and it has a 2004 Honda BF90 on it. I have posted several times here about rough running at lower speeds (idle to 2200 rpm), and many felt that I had clogged low speed jets. The other main symptom was that if I put the hammer down, I'd kill the engine--I had to advance a few hundred rpm at a time, and then when I hit 3000, I could go for it.
After salmon and crab seasons had passed, I finally got all the parts ordered for the carbs (gaskets, o-rings, mixture screws, float/needle, etc.) and last weekend was the date for the job.
Not knowing the history of the motor, I also ordered a complete water pump kit, which includes not only impeller, but also the complete housing, bolts, key, etc.
Lastly, I built the manometer referenced in Richard's article above. That was a real life-saver. The only thing I had missed (but that was stated in Richard's article) was that the four tubes need to be open to each other, i.e. linked with T's, or submerged in a common reservoir of oil. At first, I had all four capped with equal amounts of oil in them, and thought I must have the best balanced carbs in the world!!! Here's a picture of what I eventually did to hook them up:
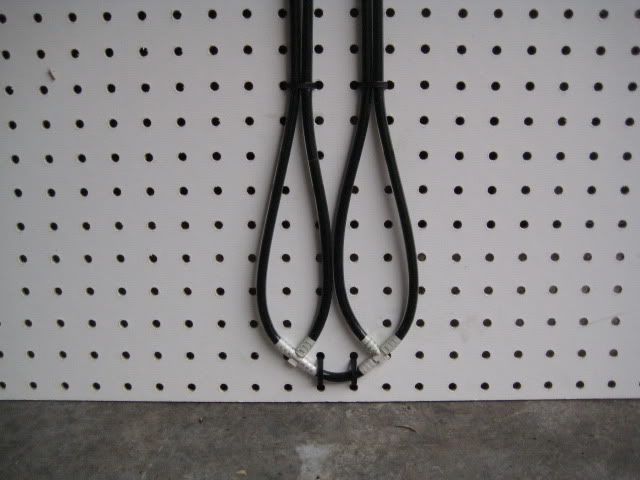
As to part numbers, I used the following parts from Dorman/Vacu-Tite! :
47406 (soft vacuum connector--had to shave these down to fit them into the intake holes, which I did by chucking them up in a drill press and taking a sanding block to them--if you can get "real" takeoff cones, I would highly recommend it--these were touchy at best)
47303 (3/16 x 3/16 straight barb, used to attach the above to the 3/16 tubing)
47311 (3/16 vacuum restrictor)
47334 (3/16 x 3/16 x 3/16 vacuum tee)
Also got 2 x 20' rolls of 5/16 OD x 3/16 ID x 20' vinyl tubing at Home Depot, and used 10' per carb on the pegboard.
As stated in Richard's article, I used 2-cycle oil for the fluid.
---------------------
The water pump was no big deal at all--about 2 hours maybe from start to finish. Also changed the lower gear oil at that time.
---------------------
When it came to the carbs, my dad flew out to help out. He was a line mechanic back in the 50s and 60s, and though I've done a lot of carbs, my experience pales (a lot) compared to his. He immediately keyed in on the acceleration problem, and started reading in the manuals I have. His strong suspicion was that the acceleration circuit was somehow not doing its job, and here again, he immediately started honing in on the dashpot that leads to the acceleration tube (sort of a brass tube that runs alongside the carbs). Sure enough, the needed gap between the dashpot cam and the throttle roller was something like 6 times wider than it should have been, and we couldn't adjust it far enough to get it in specs. We decided to leave it for the time being, and moved on to other "quick fixes".
I pulled a plug to look (with a borescope) at the valves, which were fine. However, I could see that the plug's gap was HUGE, in fact it proved to be more than double what is called for (.055 instead of .026). The other three were similar. Hard starting, anyone?
After correcting that, we decided that mixture screws were next. The limiter caps were easily removed with the use of a heat gun (though we might have melted the plastic on the throttle linkage a tad...but I won't tell you who did it). One note of advice here--the mixture screws are brass, and they have a very thin section on them just below the head. I believe this is intended to break should you decide to try to turn them hard enough to break the limiter caps, so BE CAREFUL and wait for the heat to do its work. We did break the first one, but I was able to drill two small holes in the remaining brass and fashion a tool from a paperclip that allowed me to retrieve the rest of the screw. The old mixture screws all had the red resin at the base of them, so we had found our first debris in the carbs.
We replaced the mixture screws with new ones, and fired up the motor. It ran worse than ever before. I still don't know why, but something about the application of heat made it very unhappy. We did a test run on the water, and it still ran well at the high end, and poorly on the low end. We had adjusted the mixture screws, and during that process, found that closing screw #4 had no effect on engine RPM, another strange sign.
At this point, it was time to go all-in, and so we pulled the assembly. I had been dreading this, but it actually only took about 10-15 minutes to get it out of there, and was quite simple.
We took our time on the first carb, and spent maybe 45 minutes on it. We found that the main jet was so clogged that you could barely see daylight through it (much smaller than a pinhole), but it cleaned well with carb cleaner and compressed air. I would estimate that the diameter of the hole after cleaning was four times larger than before! This was true in all four carbs.
We found that the carb float was also 1mm too low, i.e. it was closing the needle too early. This was true in all four carbs as well.
After running cleaner and air through all ports, we replaced and set the float height, replaced all o-rings, and re-assembled.
All new gaskets on the intake, carbs, etc. and back to the engine. After pumping up the bulb, the motor literally leapt to life on the first try. I almost banged my head I was so surprised!
We went through the mixture screw adjustment again, and seemed to find the sweet spot at about 2-2 1/4 turns out for each carb. We had set the idle speed to 950-1000, and this brought the dashpot adjustment right into specs. We synced the carbs with the (then faulty) manometer, and hit the water again. The motor has never been so sweet and smooth. Acceleration was immediate and smooth, and the missing/rough running was totally gone. I can still kill the motor if I put the hammer down extremely fast from idle, but I'm not sure that's out of the ordinary. If I go at any human speed, it just pulls out and runs like a Swiss watch.
Today, I fixed the manometer, and hooked it up. Even as smooth as the motor already was, I found that the carbs were more than an inch of mercury apart, and so I set about syncing them properly. When I had them all within 1/16 of mercury to each other (one pegboard hole on Richard's manometer), I checked balance at higher rpms. I found that #3 was always higher than the other three, and so I ended up setting it about 1/8 lower than the others at idle, so it is more or less even at speed.
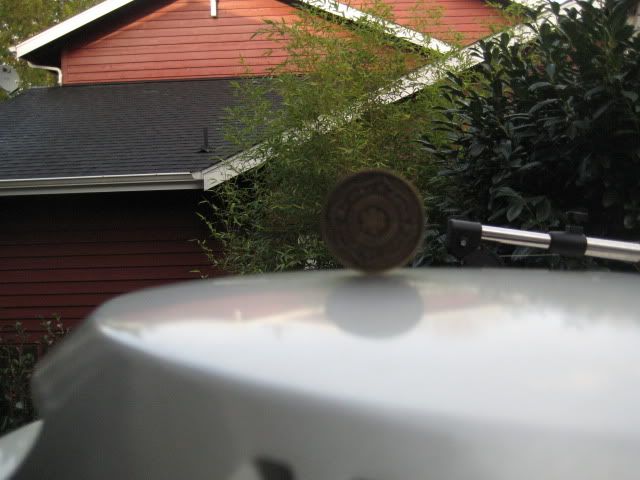
After all this, I remembered my dad talking about building a totally balanced Mercury way back in the day, and how you could balance a nickel on edge on the fender when it was running. Intrigued, I started up the motor and left it at idle. I was able to balance my fire department recruit coin on the motor, and here's a picture to prove it. You'll have to take my word for it that the motor is running. Believe me, a week ago you couldn't have balanced a cinder block on this motor at any speed.
As carbs go, these are some of the simplest I've worked on, and I would gladly tear into them again. I am now running them dry whenever I'm not sure how long it will be before I get out again, and running additives, to try to avoid the problem next time. One more thing--I had heard that when you run the carbs dry, you still need to drain the bowls. Today I tried it, and this wasn't true--when I opened the bowl drains, maybe two drops of fuel came out. Running them dry also happens to be a nice length of time to flush saltwater out of the motor when I get home, so it's perfect.
I want to tell you all (again) how grateful I am to have such a terrific resource with good people. I really don't know how we used to get ANYTHING done before the internet--I can remember calling around to 17 VW parts dealers to try to solve one silly little problem on my old beetle, and now I can find dozens of ideas in seconds. So thank you all, and hopefully this post will add some small amount that will help the next guy out of the same problem.
All the best,
Ben McCafferty
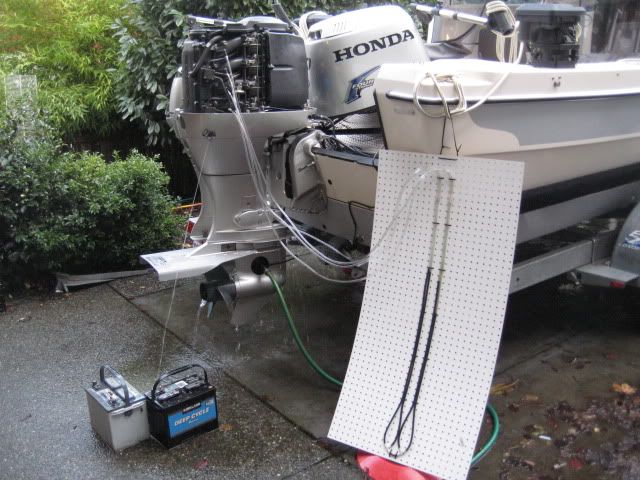
P.S. One last photo, in progress for the sync. #4 is still low, 3 is medium, 1&2 are high. Old batteries strategically placed because I get tired of wet feet...
_________________
bmc
"Do it today, you may not pass this way again!"
2005 16 Cruiser, "Natural Blue", sold 2009
2004 19 Angler, "Crush", sold 2012
2007 22 Cruiser, "Big Blue", purchased 2012 |
|
| Back to top |
|
 |
BrentB
Joined: 15 Jul 2006
Posts: 4420
City/Region: Greenwood
State or Province: IN
Photos: BrentB
|
| Posted: Sat Nov 21, 2009 10:10 am Post subject: |
|
|
Thanks, excellent description and images.
Did you change inline fuel filter or add a water/fuel (Racor type) filter setup?
_________________
Brent Barrett |
|
| Back to top |
|
|
bmacpiper
Joined: 03 Jun 2007
Posts: 211
City/Region: Bainbridge Island
State or Province: WA
C-Dory Year: 2007
C-Dory Model: 22 Cruiser
Vessel Name: Big Blue
|
| Posted: Sat Nov 21, 2009 11:34 am Post subject: |
|
|
Hi Brent,
thanks for the reminder. The fuel filter was clear but we did check it. I already had a fuel/water seperator, but replaced the element.
Hoping to get out today for crab.
Richard, meant to ask--any ideas on why #3 draws stronger at speed? Butterfly not set well? On old motos, I have seen guys lap the butterfly in for a perfect seal and opening. ???
bmc |
|
| Back to top |
|
|
bmacpiper
Joined: 03 Jun 2007
Posts: 211
City/Region: Bainbridge Island
State or Province: WA
C-Dory Year: 2007
C-Dory Model: 22 Cruiser
Vessel Name: Big Blue
|
| Posted: Sat Nov 21, 2009 7:17 pm Post subject: |
|
|
P.S. If anyone is near Seattle, and needs to borrow the manometer, you're more than welcome.
bmc |
|
| Back to top |
|
|
Almas Only
Joined: 09 Nov 2003
Posts: 364
City/Region: Richmond
State or Province: VA
C-Dory Year: 2003
C-Dory Model: 22 Cruiser
Vessel Name: Alma's Only
Photos: Alma's Only
|
| Posted: Sun Nov 22, 2009 6:50 am Post subject: |
|
|
bmc:
If the motor runs smooth at idle, I wouldn't worry about the gap between the butterflies and the carb body. That only affects idle, and very low rpm situations, and shouldn't contribute to higher rpm performance.
If you think the higher rpm vacuum difference is significant, I suppose you could simply perform your vacuum balancing at speed, and see whether the resulting idle performance is tolerable. That would avoid trying to figure out what's really happening.
Good luck
_________________
2003 CD22 Cruiser with Honda 90 |
|
| Back to top |
|
|
bmacpiper
Joined: 03 Jun 2007
Posts: 211
City/Region: Bainbridge Island
State or Province: WA
C-Dory Year: 2007
C-Dory Model: 22 Cruiser
Vessel Name: Big Blue
|
| Posted: Sun Nov 22, 2009 1:00 pm Post subject: |
|
|
| Almas Only wrote: | bmc:
If the motor runs smooth at idle, I wouldn't worry about the gap between the butterflies and the carb body. That only affects idle, and very low rpm situations, and shouldn't contribute to higher rpm performance.
If you think the higher rpm vacuum difference is significant, I suppose you could simply perform your vacuum balancing at speed, and see whether the resulting idle performance is tolerable. That would avoid trying to figure out what's really happening.
Good luck |
Thanks Almas,
That's essentially what I was trying to describe--I have 3 set low at idle, so it's just a little bit higher than the others at speed.
I'm wondering whether this may have to do with mixture, i.e. if 3 is richer than the others, would it allow its vacuum to climb at higher speeds? I have to confess that the mixture adjustment produced little result for me--I can get the motor to drop if I dial the screw in to maybe 1 1/2 turns out, then get it back to "normal" when I approach 2 turns out. But I never get a really huge change in rpm unless I start to starve the engine on any particular carb.
Ben |
|
| Back to top |
|
|
Almas Only
Joined: 09 Nov 2003
Posts: 364
City/Region: Richmond
State or Province: VA
C-Dory Year: 2003
C-Dory Model: 22 Cruiser
Vessel Name: Alma's Only
Photos: Alma's Only
|
| Posted: Sun Nov 22, 2009 9:15 pm Post subject: |
|
|
Ben:
I haven't done any experiments, but doubt that much of anything you do to mixture adjustments would have any noticable effect at high speed. The idle features on the carbs are designed to meter incredibly small quantities of fuel into a very high speed air stream resulting from the butterflies being fully closed, for all intents and purposes. The mixing that results is so through that at idle, a well balanced carb system is more fuel efficient than direct injection.
At high speed, the air stream at the idle ports is actually at a lower speed than at idle, meaning that that little if any fuel is drawn through the idle jets at high speed.
Who knows what's actually going on, but if I were to bet, based on limited information (suppose that's called a guess), I'd say that there's either some difference between the idle jets/porting/butterfly seal on #3 and #1,2 and 4, or an ignition differential.
As to the carb, a partially plugged port or jet in the idle system would cause the problem, as would any difference in the closure of the butterfly valves. Even a scratch on the butterfly, or on the matching part of the carb throat, could do the trick. If you're getting a coin to balance, I'd simply balance the carbs at speed, and take whatever idle resulted. You might still be able to balance the coin.
As to ignition, I can't tell from your post whether you replaced the plugs, or just reset the gaps. I'd be sure to replace them, but before I did, I'd swap plug #3 with any other, and see if the vacuum difference follows the plug.
Keep us posted. |
|
| Back to top |
|
|
|
|
You cannot post new topics in this forum
You cannot reply to topics in this forum
You cannot edit your posts in this forum
You cannot delete your posts in this forum
You cannot vote in polls in this forum
You cannot attach files in this forum
You cannot download files in this forum
|
|
 Search
 Private Messages
 Profile
 Log in
 Register
 Help
Help
