| View previous topic :: View next topic |
| Author |
Message |
colbysmith
Joined: 02 Oct 2011
Posts: 4551
City/Region: Madison
State or Province: WI
C-Dory Year: 2009
C-Dory Model: 25 Cruiser
Vessel Name: C-Traveler
Photos: C-Traveler and Midnight-Flyer
|
 Posted: Wed Apr 10, 2024 11:41 am Post subject: CD-25 Aft Cockpit Hatches Posted: Wed Apr 10, 2024 11:41 am Post subject: CD-25 Aft Cockpit Hatches |
 |
|
There have been a few other threads on this topic, but I'm starting a new one to bring it up to date. The hatches in the aft cockpit of the 25, at least in my 2009, are poor in design and do little to keep rain or wash water out of the bilge. After attempting to fix a leak underneath my aft cabin bulkhead that was letting water from the bilge into the cabin, I decided I would also replace the aft cockpit hatches. (Hoping the leak repair works this time.) I am going with the hatch recommended by Dr. Bob in an earlier thread: | Quote: | | Innovative Product Solutions Boat Hatch 520-625 | Polar White 12 x 26 This is about $120. This has no hinges, and uses a wedge structure on the back to give the pressure. |
Googling, I found the hatch is currently available for around $170 at several providers. However, I got lucky, and was able to bid two new ones at $120 each on ebay. They should be here sometime in the next couple of days, and I'll provide photos and descriptions here as I install them. The old hatches have a seal in the bottom frame, and then the hatch (wood/fiberglass/gelcoat) closes down on top of that. However, the seals do not appear to be sealing anymore, and any water that flows into this crevice will enter the bilge when you open the hatch, if not before! For those that have already installed these newer hatches, I'm open to any advice before I begin work installing them. I did purchase some #8 x 3/4" ss screws already. And I have plenty of 4000 sealant leftover from earlier projects. Colby |
|
| Back to top |
|
 |
thataway
Joined: 02 Nov 2003
Posts: 20814
City/Region: Pensacola
State or Province: FL
C-Dory Year: 2007
C-Dory Model: 25 Cruiser
Vessel Name: thataway
Photos: Thataway
|
| Posted: Wed Apr 10, 2024 11:24 pm Post subject: |
|
|
Colby,
When you do the cutout for the new hatch, be sure and check for rot in the balsa core--attack that before you put the new hatch in place. Also put epoxy plugs with undercutting in the way of the screws that are holding the hatch in place. Use Boat Life, Life seal (a hybrid single part silicone/urethane sealer, which is especially good for plastic to fiberglass.
We are looking forward to your photos of the repair. What are the big plans for this season? You have the reputation of the "most traveled" C Brat to uphold.
_________________
Bob Austin
Thataway
Thataway (Ex Seaweed) 2007 25 C Dory May 2018 to Oct. 2021
Thisaway 2006 22' CDory November 2011 to May 2018
Caracal 18 140 Suzuki 2007 to present
Thataway TomCat 255 150 Suzukis June 2006 thru August 2011
C Pelican; 1992, 22 Cruiser, 2002 thru 2006
Frequent Sea; 2003 C D 25, 2007 thru 2009
KA6PKB
Home port: Pensacola FL |
|
| Back to top |
|
|
colbysmith
Joined: 02 Oct 2011
Posts: 4551
City/Region: Madison
State or Province: WI
C-Dory Year: 2009
C-Dory Model: 25 Cruiser
Vessel Name: C-Traveler
Photos: C-Traveler and Midnight-Flyer
|
| Posted: Thu Apr 11, 2024 10:40 am Post subject: |
|
|
| Quote: | What are the big plans for this season? You have the reputation of the "most traveled" C Brat to uphold.
|
Good Morning Bob,
Relative to the past number of years, and after last year's hitting all the gatherings and then some, pretty tame. I'm hoping to head up to Door County for a week starting on the 19th and do some Salmon trolling. But the weather forecast right now is showing highs mid 40's and lows mid 30's. With the Webasto, I can deal with that. But I'm waiting until it gets a little closer to see what the winds will be doing. In May I'll be joining Mystery Girl and a couple others on the N. Carolina Loop. (I'm looking foward to seeing what this Dismal Swamp is everyone talks about...) And in October I'm planning to see the upper Tennessee River with Mystery Girl. We'll pick up where we left off last time at Guntersville. Other than that, no definitive plans. I might get up to Isle Royale to troll for Lake Trout, but since I've been there four times in the past six years, I may likely take a break from there. Haven't been up to the Apostle Islands in some time, so that might find a place on my calendar. Perhaps join Mystery Girl in the North Channel. Otherwise I may spend a little more time in Door County and Lake Michigan this summer. Between late January, February and March family events, along with a very good possibility of Rosanne retiring this year, C-Traveler's trailer may not see 5000 miles this year. But I'm sure my travels will pick up again in 2025. Colby |
|
| Back to top |
|
|
thataway
Joined: 02 Nov 2003
Posts: 20814
City/Region: Pensacola
State or Province: FL
C-Dory Year: 2007
C-Dory Model: 25 Cruiser
Vessel Name: thataway
Photos: Thataway
|
| Posted: Thu Apr 11, 2024 10:49 am Post subject: |
|
|
| Sounds like a more relaxing schedule. Good on Rosanne retiring!!! |
|
| Back to top |
|
|
colbysmith
Joined: 02 Oct 2011
Posts: 4551
City/Region: Madison
State or Province: WI
C-Dory Year: 2009
C-Dory Model: 25 Cruiser
Vessel Name: C-Traveler
Photos: C-Traveler and Midnight-Flyer
|
| Posted: Fri Apr 12, 2024 11:39 pm Post subject: |
|
|
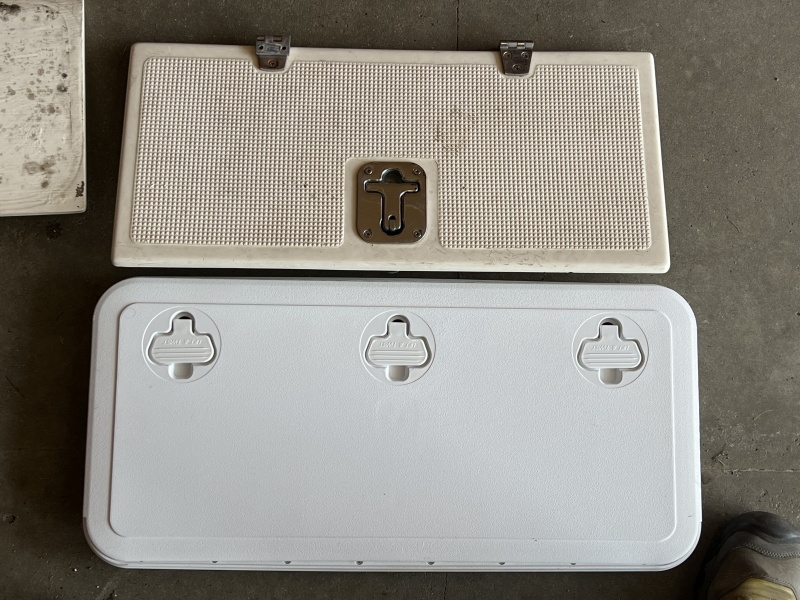
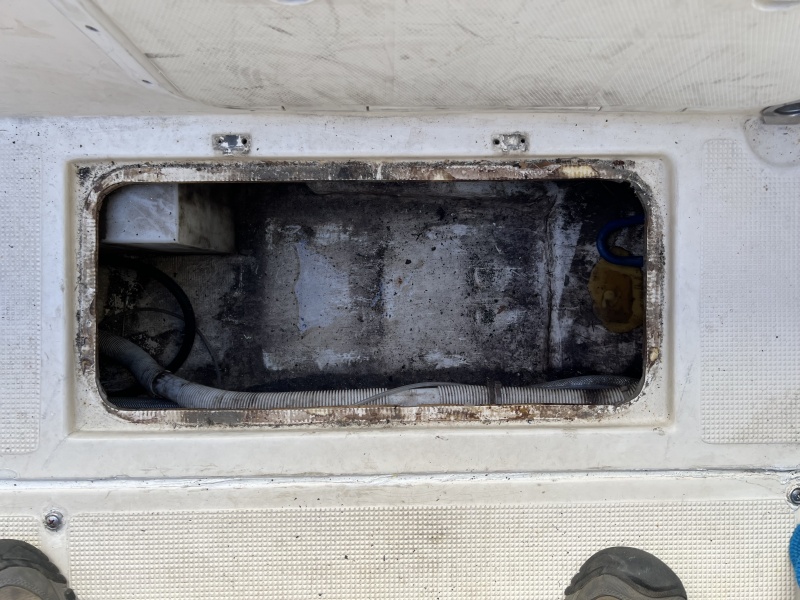
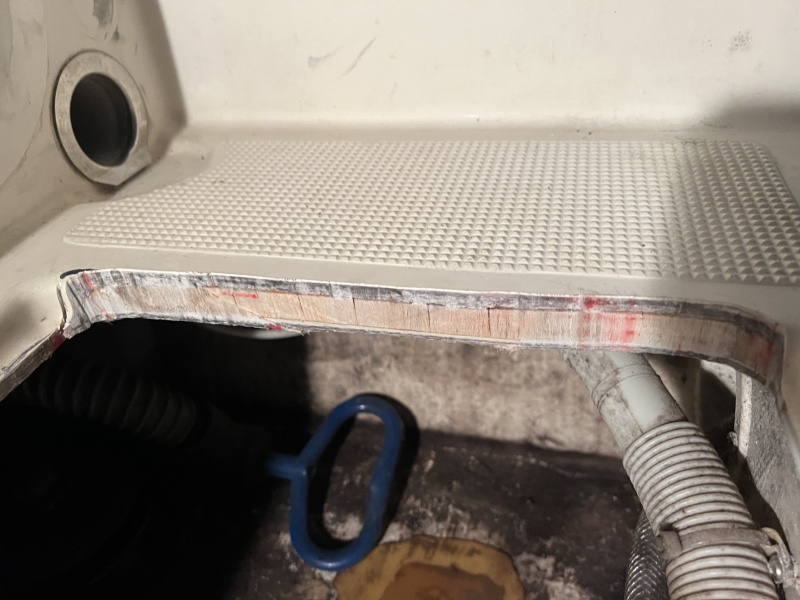
My new hatches arrived today, and I started working on pulling the old ones out. I'm primarily just going to be adding photos of the port side. The starboard side is pretty much a mirror image, so unless I see any differences I'll just show work on the port side.
These first few photos are of my original hatch and it's removal.
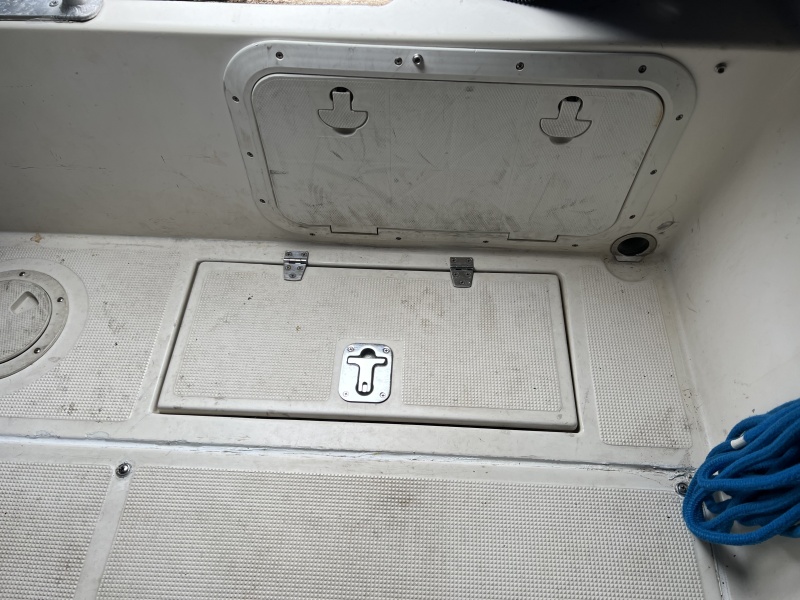
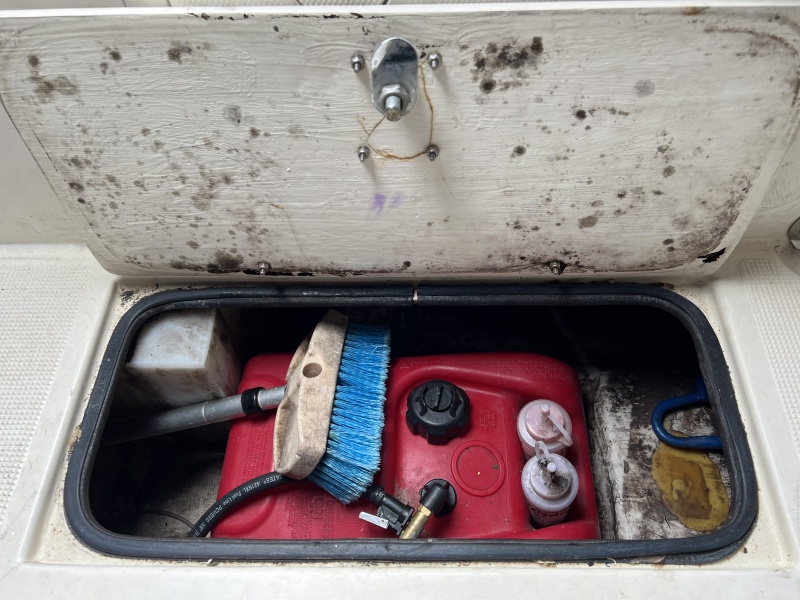
As you can see, the seal is still pretty much intact. However, the bottom of the hatch is curved a bit, and I doubt it is making contact with the seal when closed.
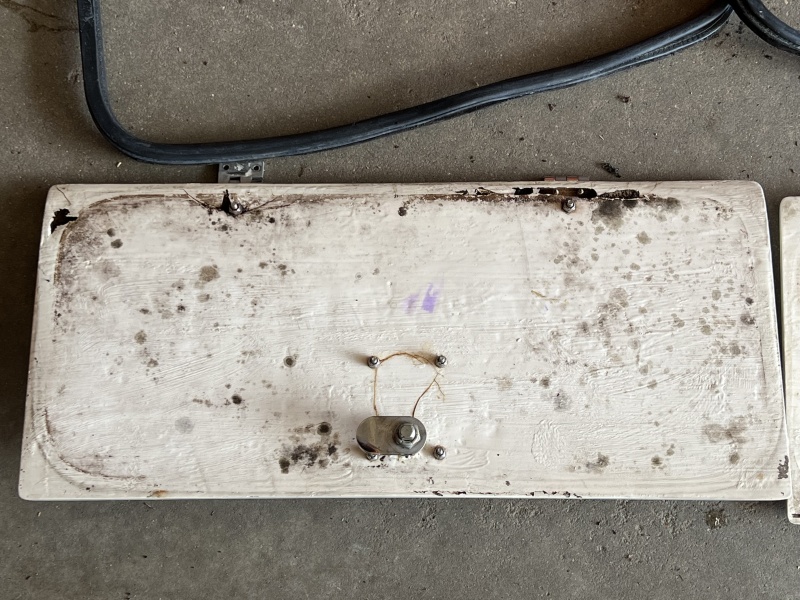
This is the bottom of that hatch. You can see where part of the fiberglass is missing and the core inside is somewhat hollowed out in that area. The next photo is a close up.
Seal removed
 [img] [img] |
|
| Back to top |
|
|
colbysmith
Joined: 02 Oct 2011
Posts: 4551
City/Region: Madison
State or Province: WI
C-Dory Year: 2009
C-Dory Model: 25 Cruiser
Vessel Name: C-Traveler
Photos: C-Traveler and Midnight-Flyer
|
| Posted: Fri Apr 12, 2024 11:54 pm Post subject: |
|
|
After removing the old hatches and seals, I then removed the bracket that the twist locks butted up against. Now I'm ready to start cutting.
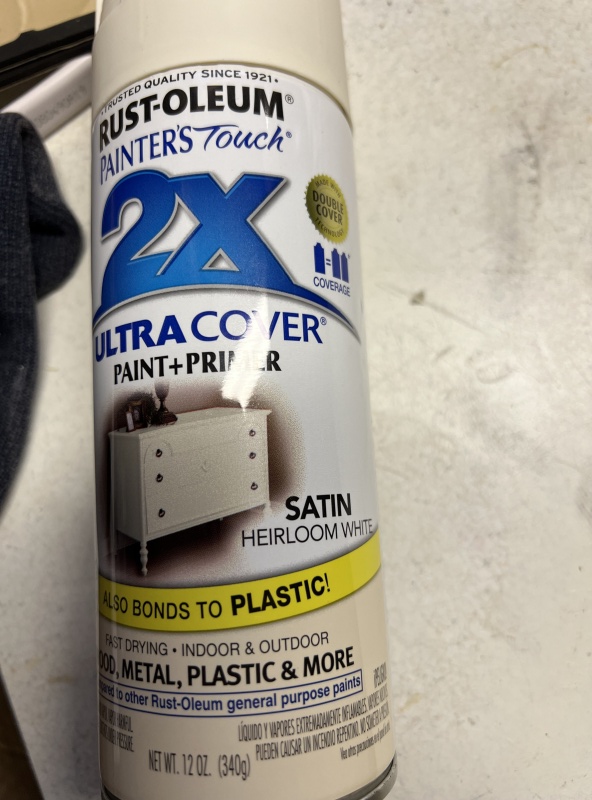
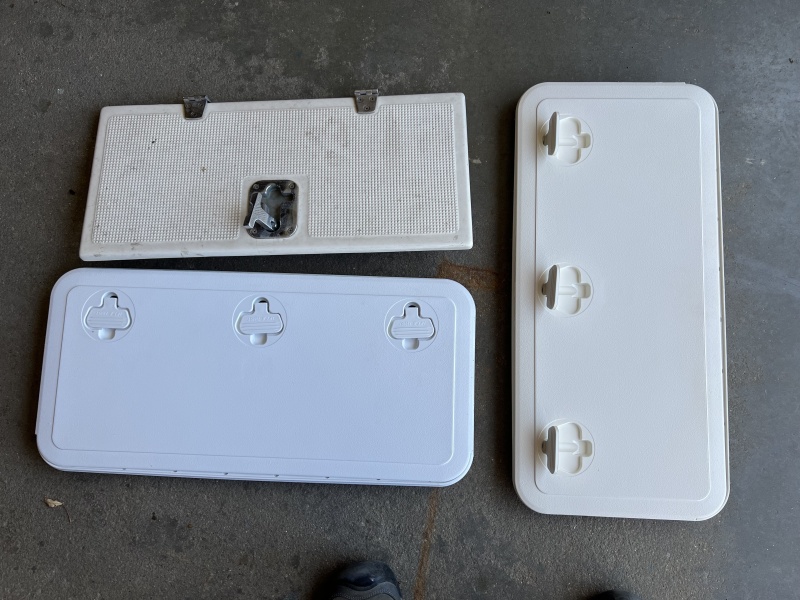
I do want to show the color difference between my old hatch, which is the color of the boat. The new hatch is Polar White. I have to decide by tomorrow if I want to go ahead and paint the new hatches with paint that matches the boat's white. (To give them time to dry/cure before installing.)
This image shows the tabs on the one edge of the hatch that butts up into the frame, to hold the door in place. The other side has the twist locks.
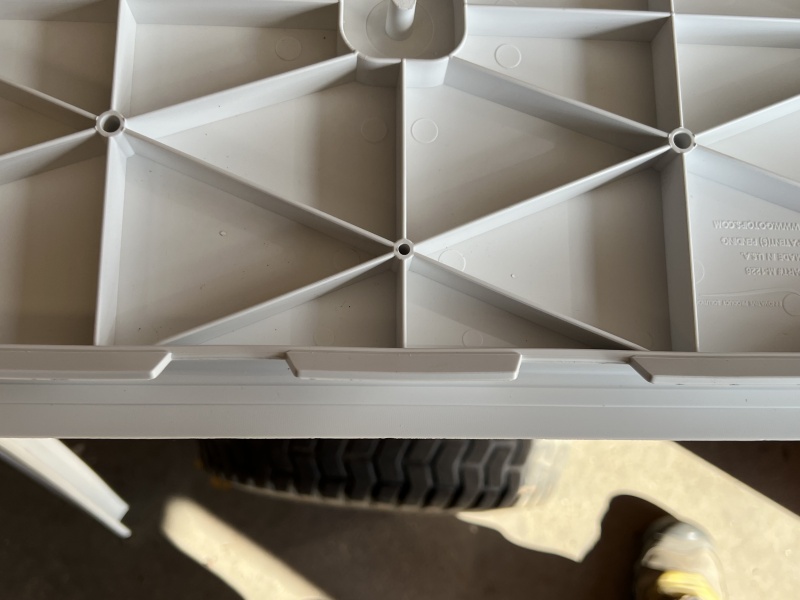
The frame seems to be bowed out some along the tabbed edge. In one of the other threads, someone asked if this was normal, as they could see the screws holding the frame down, with the hatch closed. I did clamp the frame tight around the hatch and still saw a bit of the screw hole. My plan when I install the frame is to use a straight edge to make sure the frame is square when I drill the screw pilot holes, and then again when I screw it down. Right now, my plans are to over drill the screw holes and use epoxy or auto body filler to then redrill and screw into. (For filling in like this, I've had better luck with body filler than epoxy, when screwing into. Otherwise, I may just let the 4000 protect around the screw hole. (44 holes, 22 holes per hatch) is a lot of overdrilling and epoxying, and I'm not completely convinced it would be necessary to do so with this location, or with the use of the 4000. The screws will not go thru the bottom fiberglass.
 |
|
| Back to top |
|
|
colbysmith
Joined: 02 Oct 2011
Posts: 4551
City/Region: Madison
State or Province: WI
C-Dory Year: 2009
C-Dory Model: 25 Cruiser
Vessel Name: C-Traveler
Photos: C-Traveler and Midnight-Flyer
|
| Posted: Sat Apr 13, 2024 12:08 am Post subject: |
|
|
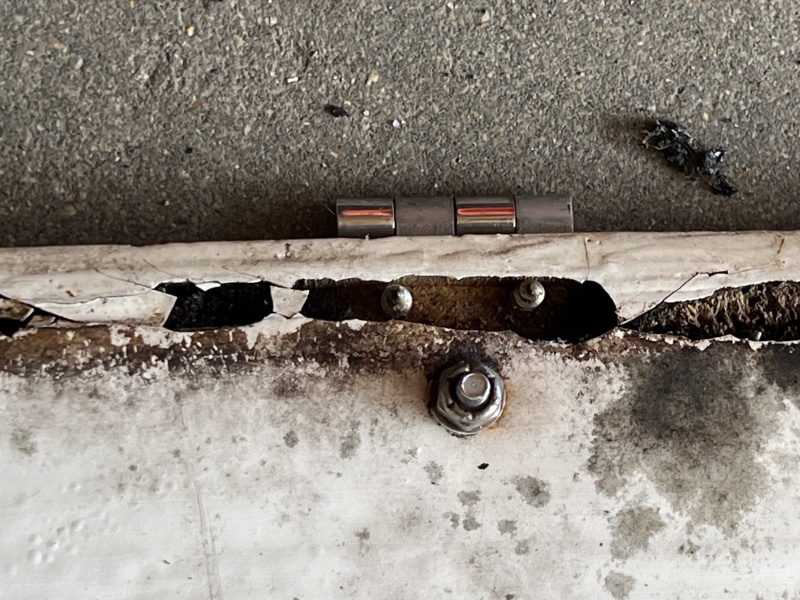
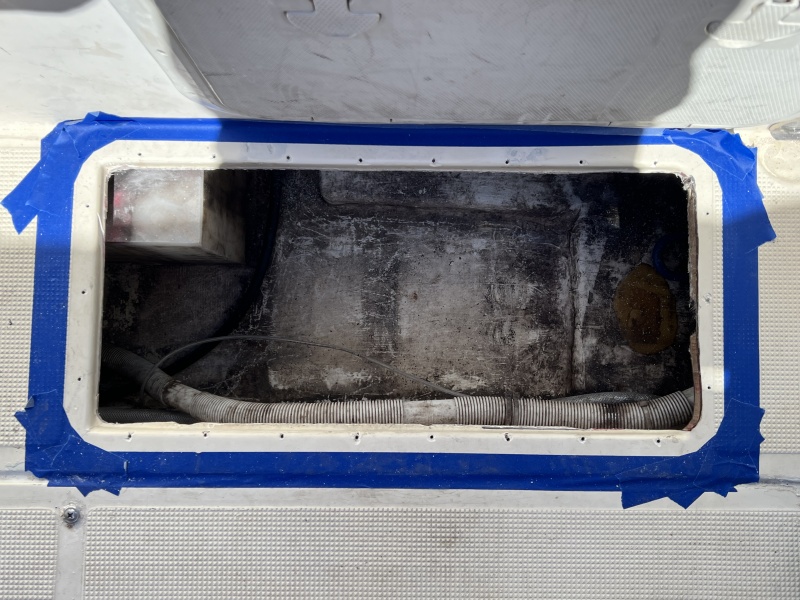
So here is the hatch opening with the old hatch and seal removed.
I made a template from thin particle board, of where I need to cut.
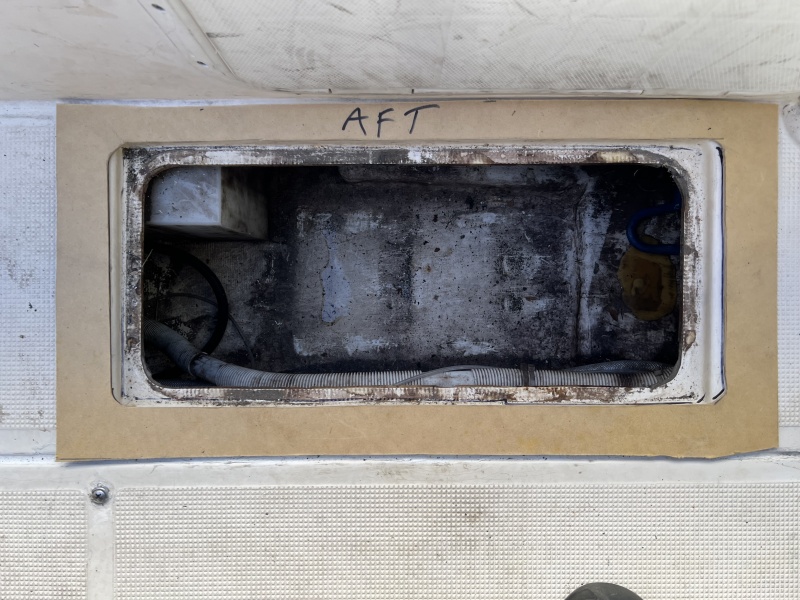
And taped it down to hold it in position.
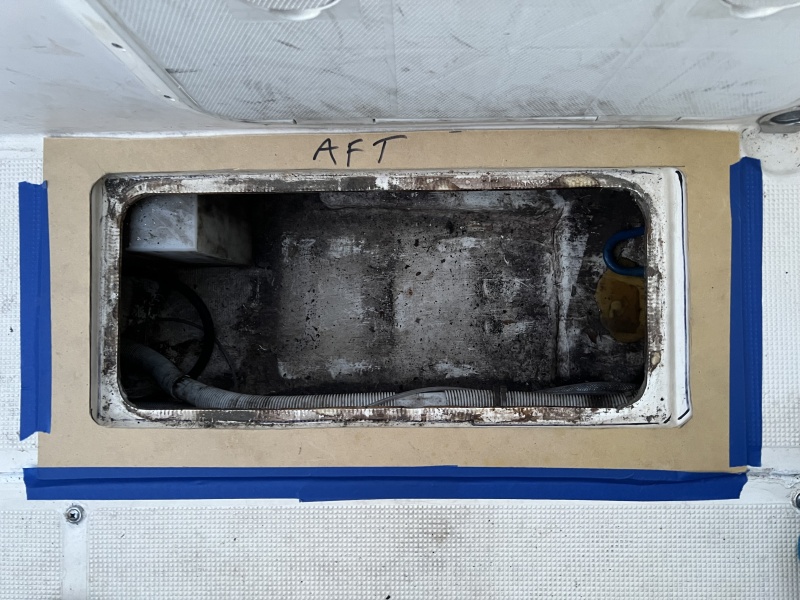
The cut is made.
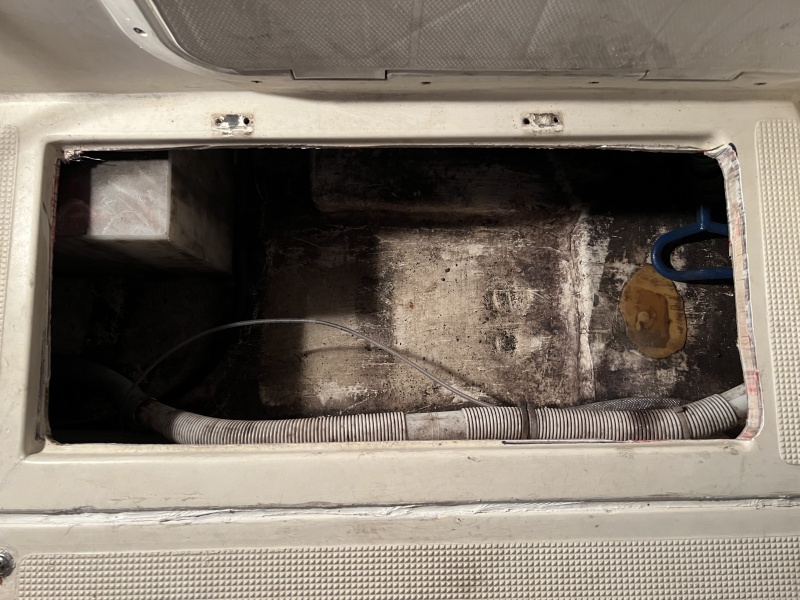
I will be cleaning out the original hinge screw holes before I install the new hatches. I'll fill those holes with marine epoxy.
Three of the sides of the hatch opening have the original fiberglass or gel coat protecting the core. You can see the core on the one end in this photo. And it is dry and solid! I think I could just leave this with the protection of the 4000, but I think I'll probably route the core out some and use auto body filler here. In fact, I might just route it out back far enough to where the frame screws will come into it.
I actually need to trim this opening up a bit more as it's just bit to tight for the frame to fit into. Tomorrow I hope to finish cutting the openings, and prepping them to install the hatches on Sunday or Monday. I'm using several tools for cutting the opening up larger. A circular saw, jig saw, and oscillating multi-tool. |
|
| Back to top |
|
|
colbysmith
Joined: 02 Oct 2011
Posts: 4551
City/Region: Madison
State or Province: WI
C-Dory Year: 2009
C-Dory Model: 25 Cruiser
Vessel Name: C-Traveler
Photos: C-Traveler and Midnight-Flyer
|
| Posted: Sat Apr 13, 2024 12:15 am Post subject: |
|
|
| These hatches are about an inch wider than the originals. I forgot to add earlier that I decided to keep the inboard edge where the original was, and cut the wider opening outboard. I decided this to make it easier to grab stuff I store along the outer edge of the bilge. I had given thought to extending inboard to make it easier to reach/remove my bilge pump or potable water pump, but those are things that aren't as frequently removed as stuff I store. |
|
| Back to top |
|
|
MannyBridge
Joined: 30 Aug 2017
Posts: 13
City/Region: Nanaimo
State or Province: BC
C-Dory Year: 2006
C-Dory Model: 25 Cruiser
Vessel Name: C-Star
|
| Posted: Sat Apr 13, 2024 9:59 am Post subject: Thank You ! |
|
|
| Thanks Colby for documenting this. Its on my list and this will help allot. |
|
| Back to top |
|
|
Flashyfish
Joined: 07 Mar 2023
Posts: 17
City/Region: Windsor
State or Province: CA
C-Dory Year: 2004
C-Dory Model: 19 Angler
Vessel Name: Kraken
|
| Posted: Sat Apr 13, 2024 7:25 pm Post subject: |
|
|
I would be interested in knowing if the spray paint stays adhered to the hatches.
I changed two on my boat and wanted to match the existing gelcoat color.
I chickened out. |
|
| Back to top |
|
|
thataway
Joined: 02 Nov 2003
Posts: 20814
City/Region: Pensacola
State or Province: FL
C-Dory Year: 2007
C-Dory Model: 25 Cruiser
Vessel Name: thataway
Photos: Thataway
|
| Posted: Sat Apr 13, 2024 7:46 pm Post subject: |
|
|
Colby, don't get in too much of a hurry, that you don't. cut back the core, and seal it--making plugs or cut out areas that the screws drive into. This will prevent cockpit floor failure down the line.
As for material to bed plastic hatches: Boat life, Life seal, or Dow 795 structural plastic/ fiberglass sealant. The pure urethanes There have been reports of 3 M 4000 failing and becoming a sticky mess after 4 to 5 years. |
|
| Back to top |
|
|
colbysmith
Joined: 02 Oct 2011
Posts: 4551
City/Region: Madison
State or Province: WI
C-Dory Year: 2009
C-Dory Model: 25 Cruiser
Vessel Name: C-Traveler
Photos: C-Traveler and Midnight-Flyer
|
| Posted: Sat Apr 13, 2024 9:06 pm Post subject: |
|
|
| Flashyfish wrote: | I would be interested in knowing if the spray paint stays adhered to the hatches.
I changed two on my boat and wanted to match the existing gelcoat color.
I chickened out. |
It should. I know it has held up well on my fiberglass bulkheads, roof and hull. The hatches are plastic I believe.
 |
|
| Back to top |
|
|
colbysmith
Joined: 02 Oct 2011
Posts: 4551
City/Region: Madison
State or Province: WI
C-Dory Year: 2009
C-Dory Model: 25 Cruiser
Vessel Name: C-Traveler
Photos: C-Traveler and Midnight-Flyer
|
| Posted: Sat Apr 13, 2024 9:09 pm Post subject: |
|
|
I did go ahead and paint the hatches today. Here you can see the old hatch, the new hatch as polar white, and then the other new hatch I painted. (I painted them both, but for comparison, showing them side by side before I painted it). It is kind of hard to see the actual color in the photos here, but the polar white hatch is next to the old hatch, while the painted hatch is beside the other two. (It's the one on the right in the picture.
 |
|
| Back to top |
|
|
colbysmith
Joined: 02 Oct 2011
Posts: 4551
City/Region: Madison
State or Province: WI
C-Dory Year: 2009
C-Dory Model: 25 Cruiser
Vessel Name: C-Traveler
Photos: C-Traveler and Midnight-Flyer
|
| Posted: Sat Apr 13, 2024 9:39 pm Post subject: |
|
|
| thataway wrote: | Colby, don't get in too much of a hurry, that you don't. cut back the core, and seal it--making plugs or cut out areas that the screws drive into. This will prevent cockpit floor failure down the line.
As for material to bed plastic hatches: Boat life, Life seal, or Dow 795 structural plastic/ fiberglass sealant. The pure urethanes There have been reports of 3 M 4000 failing and becoming a sticky mess after 4 to 5 years. |
I do hear you Bob. And while I know many preach the sealing with epoxy, (and something I frequently do with repairs or new work) I really believe sometimes it's just not necessary. As in when it's above the waterline, or when it's not really possible without doing more damage than good. In my case, the one side of the cutout that opened the core up, the wood was pretty solid. In that even with the right tools I was doing more damage to the surrounding fiberglass/gelcoat than removing wood. And the screw holes were so close to the edge of the opening, I would pretty much of had to rebuild the area to make room to "plug" the area for the screws. So, I did seal the exposed hard wood core with shellac and caulked the screw holes pretty well with the 4000. Which brings up the sealant I used to install the new hatches. And that was with 4000, since I already had it. I have used 4000 with a lot of other material, and have not had any issues with it. I guess time will tell. Anyway, I do appreciate your advice and comments Bob, and have sometimes followed them with other projects and repairs. |
|
| Back to top |
|
|
colbysmith
Joined: 02 Oct 2011
Posts: 4551
City/Region: Madison
State or Province: WI
C-Dory Year: 2009
C-Dory Model: 25 Cruiser
Vessel Name: C-Traveler
Photos: C-Traveler and Midnight-Flyer
|
| Posted: Sat Apr 13, 2024 9:50 pm Post subject: |
|
|
One thing I forgot to mention, before painting the hatches, I did wipe them down with some MEK I had nearby, just to insure the hatches were clean. Then allowed it to dry/evaporate before spraying them. Also, along with sealing the exposed floor core with shellac, I also spread some 4000 along the edge just for good measure.
After cleaning everything up, I taped around the hatches to keep the sealant (4000) from spreading out to far.
In this image, you can also see how close the screw holes are to the edge of the cutout. It would have been pretty tricky to drill a larger hole along the edge, fill it with epoxy, and then redrill it. I'm pretty confident I have enough sealant to prevent any moisture from getting into those holes. And the screws went in covered with sealant, plus I put some sealant in the holes before installing the screws.

The hatch frame is installed. I used a straight edge along the back to insure that frame was square, as it was bowed out slightly from packaging. The lids do fit tighter than I would like, but I'm hoping they loosen up a bit over time with use.
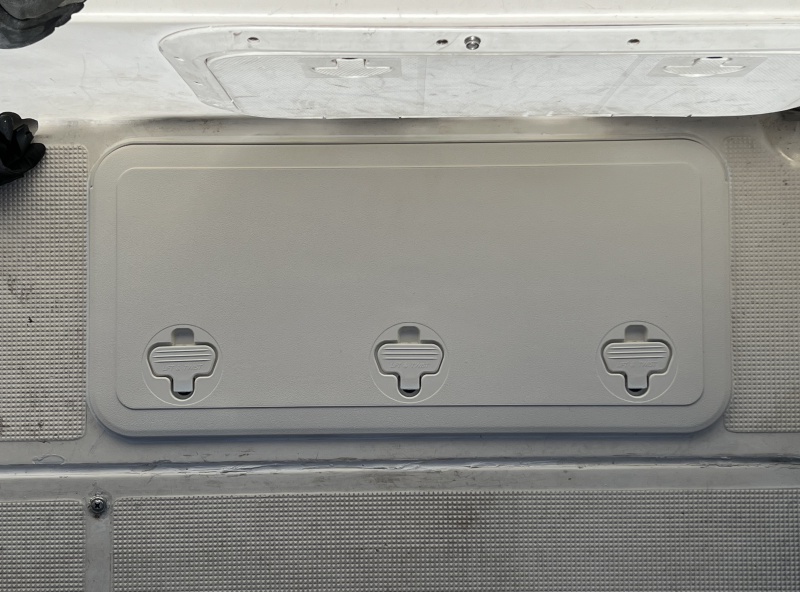
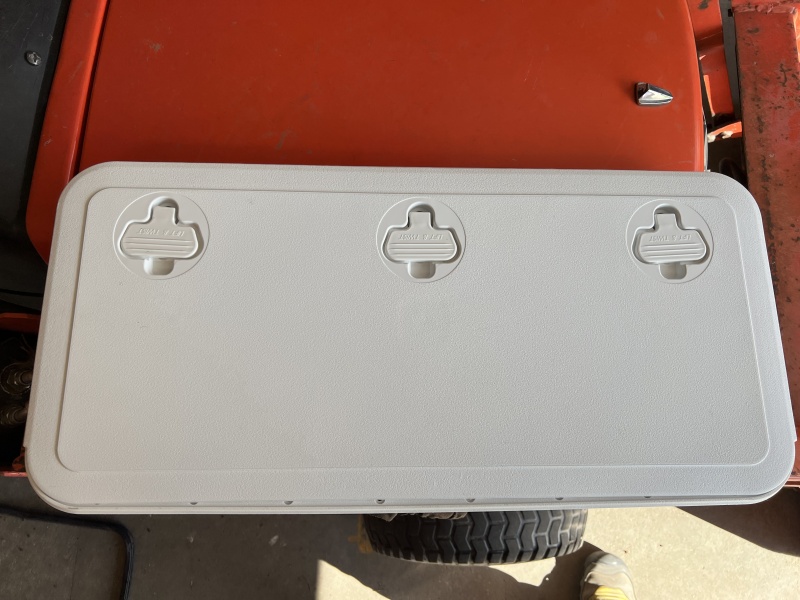
And the finished product.
The lids are not hinged, but rather use tabs in the back to hold the back in place, while the three latches hold the front in place. I would prefer hinges, but hopefully I won't manage to lose these over the side!
Colby |
|
| Back to top |
|
|
|
|
You cannot post new topics in this forum
You cannot reply to topics in this forum
You cannot edit your posts in this forum
You cannot delete your posts in this forum
You cannot vote in polls in this forum
You cannot attach files in this forum
You cannot download files in this forum
|
|
 Search
 Private Messages
 Profile
 Log in
 Register
 Help
Help
