| View previous topic :: View next topic |
| Author |
Message |
ssobol
Joined: 27 Oct 2012
Posts: 3374
City/Region: SW Michigan
State or Province: MI
C-Dory Year: 2008
C-Dory Model: 22 Cruiser
Vessel Name: SoBELLE
Photos: SoBelle
|
 Posted: Wed Jun 21, 2023 2:42 pm Post subject: Posted: Wed Jun 21, 2023 2:42 pm Post subject: |
 |
|
Another thing to consider is shading of the panel. For instance, on a sailboat the shadow of the boom moving across a solar panel will probably have a more significant effect on the power output of the panel than would be expected due to the portion of the panel that is shaded. In some cases shading 1% of a panel can reduce the output by 50-80%.
There are solar panel designs that can mitigate the power loss due to shading. |
|
| Back to top |
|
 |
jkidd
Joined: 23 Oct 2006
Posts: 1615
City/Region: Northern, Utah
State or Province: UT
C-Dory Year: 2007
C-Dory Model: 22 Cruiser
Vessel Name: Voyager
Photos: Voyager (JK)
|
| Posted: Wed Jun 21, 2023 4:31 pm Post subject: |
|
|
It comes with cables but not a charge controller. My charge controller that I use is a Victron 110/20. I lets me use the same app as the battery monitor and easily change between battery types for different applications. My National Luna Fridge /Freezer only uses one compressor for both the fridge and the freezer. It has a spooler valve to control witch side is cooling so the current draw is the same for the fridge or the freezer. it just uses more duty cycle for the freezer. When It is running it is using just over 2.5 amps
Here is the link to when I tested my fridge
http://www.c-brats.com/viewtopic.php?t=24846&highlight=
_________________
Jody Kidd
KE7WNG
Northern, Utah
 |
|
| Back to top |
|
|
DayBreak
Joined: 16 Jul 2017
Posts: 847
City/Region: Monmouth, Or.
State or Province: OR
C-Dory Year: 2018
C-Dory Model: 23 Venture
Vessel Name: DayBreak
Photos: DayBreak
|
| Posted: Wed Jun 21, 2023 10:25 pm Post subject: |
|
|
| pcg wrote: | Be careful when considering the purchase of flexible panels. This video is five years old, but is well worth watching to the end. Also, you can click on his profile to see all his videos and then search for "flexible" to see some more recent tests.
https://www.youtube.com/watch?v=onMZ_dRSFUs&t=205s |
Paul, thanks for this video. BTW, I grew up in Campbell, Ca. where the author mentions. We have been using our Renogy 100 watt flexible panel for 5 years and with no issues. They are somewhat fragile and so you do not want to sit on it etc. What is nice about them is that they are adaptable and on a C-Dory, can be attached to face the sun with infinite locations to maximize performance. If somehow we damaged ours, I would buy another!
_________________
Gary F
DayBreak, 23 Venture, 2018 - present |
|
| Back to top |
|
|
colbysmith
Joined: 02 Oct 2011
Posts: 4550
City/Region: Madison
State or Province: WI
C-Dory Year: 2009
C-Dory Model: 25 Cruiser
Vessel Name: C-Traveler
Photos: C-Traveler and Midnight-Flyer
|
| Posted: Sat Jun 24, 2023 10:44 pm Post subject: |
|
|
Ok, I'm working on a solar system with the help of a friend that has quite a bit of knowledge and experience with solar. And doing a lot of my own research and decision making on exactly what I want. I'll begin to document the process here.
I had not desired solar power before, but after spending 4 nights at Mackinac Island, where the marina was still officially closed due to construction, but some slips were allowed to be used, but with out electric power and rules against running a generator, the idea of solar began to take hold. My "toad" cable when towing hardly keeps up with the boat's freezer and refrigerator draw, and forget about putting any charge into the batteries. (It does do ok without the freezer along.) And there are a few other rare occasions where having solar would be helpful when in other locations for more than a day without electricity and restrictions on generator use.
I started out considering flexible and portable panels. But as my priorities revolved, I realized I would need something more permanent if I were to also use the solar while trailering. And then there is the issue of storage for portable panels when not in use. So that lead to my decision of going with the more solid panels.
From the beginning I figured 200 watts would be a good number to go with, and with my space desires, not really room for much more than that in a more permanent installation. Here are some pictures of my roof, and what my space limitations are.

This is a stern shot of my roof. I have my mast light folded down in this picture. The mast light is on a pole 33" tall. It's that tall to clear my kayaks when they are stored up on the roof. I need access behind the anchor light to allow it to lay flat when folded down for traveling, or not in use. The port VHF antenna mounts on the handrail just a few inches back, allowing room for the kayak rack to mount. It also folds aft when stowed for travel, and lays next to the hand rail.

This is a view with my kayak rack pvc mockup. The final rack is exactly the same, but made out of SS and uses hinged tees to mount to the hand rail. It sits high enough that will not be in the way of the solar panels. Depending upon sun angle, there may be some shadows produced on the solar panels. However, the rack is not installed when trailering, and if I'm sitting somewhere for more than a day and want solar power, the kayaks can be taken down.

This is a picture with the bikes and bike rack on the roof. Only time I used it was for the Erie Canal. I'll have to cross this bridge later, but I'm not sure there will be enough space between the bike rack cross member and the center of the roof, for the solar panels. I may end up not being able to use the bike rack with the solar panels installed.
With all this in mind, my space choice is to install two panels small enough to fit between the hand rail and the mast light, on both the port and starboard side. That still leaves me a little bit of room on the back of the roof if I decide later to put another panel there, or to store the rolled up kayaks there without the kayak roof rack. Colby |
|
| Back to top |
|
|
colbysmith
Joined: 02 Oct 2011
Posts: 4550
City/Region: Madison
State or Province: WI
C-Dory Year: 2009
C-Dory Model: 25 Cruiser
Vessel Name: C-Traveler
Photos: C-Traveler and Midnight-Flyer
|
| Posted: Sat Jun 24, 2023 11:07 pm Post subject: |
|
|
Power considerations. Using my Victron battery monitor, I checked my actual current use. I'll have to try and figure out where the leak is later, but with battery 1 (my house batteries) selected, and everything turned off I'm showing .17amps going somewhere. (With the main battery switch off, or in position 2-starter battery, I show zero amps.) My airhead toilet fan draws .08amps, refrigerator 2.5 amps, Engel freezer 2.52 amps, and one carfrano fan on high, .6 amps. That's a total of 5.82 amps. This is the most that I would have on during the day, and of course the frig and freezer cycle off and on. So if solar can produce 6 amps, then the battery isn't being drawn down. I would like to see some extra solar current then to also recharge the battery from use the night before.
Now there are many of you smarter than I when it comes to solar and electricity. But I'm hoping that 200 watts of solar panels can provide maybe 10 amps or more of current when the sun is shining.
I decided to go with two 100-watt Newpowa solar panels: https://www.amazon.com/gp/product/B09D7SMKMQ/ref=ppx_yo_dt_b_asin_title_o06_s00?ie=UTF8&psc=1
and a Victron controller:
https://www.amazon.com/gp/product/B075NPQHQK/ref=ppx_yo_dt_b_asin_title_o06_s02?ie=UTF8&psc=1
I will make my own wiring from a good deal I got from Amazon on 10Awg duplex wiring;
https://www.amazon.com/dp/B000NUYAIA?psc=1&ref=ppx_yo2ov_dt_b_product_details
Using the following took kit:
https://www.amazon.com/gp/product/B078B7N3WD/ref=ppx_yo_dt_b_asin_title_o06_s04?ie=UTF8&psc=1
Plan to initially install the panels in parallel using these connectors:
https://www.amazon.com/dp/B07DJ5PHSB?psc=1&ref=ppx_yo2ov_dt_b_product_details
And I'll put this switch in the positive wire between the panels and the controller: https://www.amazon.com/dp/B09H4WWNH4?psc=1&ref=ppx_yo2ov_dt_b_product_details
All this stuff is on order, and while the tool kit and connectors arrived today, the rest of the stuff will be here waiting for me when we get back from Door County next week. I hope to get things installed the short week after that before heading out towards Isle Royale National Park.
My plans are to mount the controller in the C-Traveler's closet, to keep the run between the controller and batteries short.
Side note. With the Duplex wire deal, I also ordered enough to rewire my main battery charger to the house batteries. The charger is located under the aft port dinette seat, while the house batteries are in the port aft bilge. However, when the factory built the boat, they ran the wires from the charger, under the cabin step, under the shower pan, and then along the starboard gunnel, and then into the wiring for the port battery at the main battery switch on the starboard side. The charger has single positive leads running for 3 batteries, but only one common ground lead. I'll run some of that new duplex wire along the port gunnel, shortening the distance and adding a separate ground wire for those batteries. - 2 group 29's in parallel.
I'll update this as I progress with this solar build. Colby |
|
| Back to top |
|
|
colbysmith
Joined: 02 Oct 2011
Posts: 4550
City/Region: Madison
State or Province: WI
C-Dory Year: 2009
C-Dory Model: 25 Cruiser
Vessel Name: C-Traveler
Photos: C-Traveler and Midnight-Flyer
|
| Posted: Sat Jun 24, 2023 11:13 pm Post subject: |
|
|
| Oh, forgot to add, I plan to make my own brackets. They will mount directly to the roof, but allow the panels to be tilted up on one end for cleaning the roof underneath, or for wiring work. And perhaps for a bit of sun aiming if the boat is stationary. Colby |
|
| Back to top |
|
|
Foggy
Joined: 01 Aug 2013
Posts: 1521
City/Region: Traverse City; Northern Lake Michigan
State or Province: MI
C-Dory Year: 2014
C-Dory Model: 26 Venture
Vessel Name: Boatless in Boating Paradise
Photos: W B Nod
|
| Posted: Sun Jun 25, 2023 7:32 am Post subject: |
|
|
To learn more about all-things-solar, I recommend a super-site:
www.oceanplanetenergy.com
Up to date info available here on:
Battery systems (Lithium v AGM)
Solar power (Solbian v Solara)
Battery charging/monitoring
Charge controllers
System design
Regional dealers
I purchased 2 Solara semi flexible panels and charge controllers
to help repower my 3 paralleled Group 31 house batteries on a
post C-Dory powerboat circa 2010. Very knowledgeable and helpful
website to check out quality top end equipment and get current information.
Aye.
_________________
"I don't want any cake" - said no one ever.
If someone tells you they don't eat cake, unfriend them. You don't need that kind of negativity in your life. |
|
| Back to top |
|
|
ssobol
Joined: 27 Oct 2012
Posts: 3374
City/Region: SW Michigan
State or Province: MI
C-Dory Year: 2008
C-Dory Model: 22 Cruiser
Vessel Name: SoBELLE
Photos: SoBelle
|
| Posted: Sun Jun 25, 2023 11:27 am Post subject: |
|
|
| colbysmith wrote: | | Power considerations. Using my Victron battery monitor, I checked my actual current use. I'll have to try and figure out where the leak is later, but with battery 1 (my house batteries) selected, and everything turned off I'm showing .17amps going somewhere. (With the main battery switch off, or in position 2-starter battery, I show zero amps.) .... |
I had the same issue with my Victron system. If you don't recalibrate it from time to time as the batteries age you can end up showing small draws or charges even though everything is off. Once the Victron decides there is a discharge (even a small one) it will use that in the calculations of remaining battery capacity again, even if there is no actual discharging taking place. There are lots of parameters in the Victron system you can adjust to increase accuracy if you know what you are doing. I replaced my Victron with the Balmar SG200 which seems to work better in this regard. |
|
| Back to top |
|
|
colbysmith
Joined: 02 Oct 2011
Posts: 4550
City/Region: Madison
State or Province: WI
C-Dory Year: 2009
C-Dory Model: 25 Cruiser
Vessel Name: C-Traveler
Photos: C-Traveler and Midnight-Flyer
|
| Posted: Sun Jun 25, 2023 11:36 am Post subject: |
|
|
| ssobol wrote: | | colbysmith wrote: | | Power considerations. Using my Victron battery monitor, I checked my actual current use. I'll have to try and figure out where the leak is later, but with battery 1 (my house batteries) selected, and everything turned off I'm showing .17amps going somewhere. (With the main battery switch off, or in position 2-starter battery, I show zero amps.) .... |
I had the same issue with my Victron system. If you don't recalibrate it from time to time as the batteries age you can end up showing small draws or charges even though everything is off. Once the Victron decides there is a discharge (even a small one) it will use that in the calculations of remaining battery capacity again, even if there is no actual discharging taking place. There are lots of parameters in the Victron system you can adjust to increase accuracy if you know what you are doing. I replaced my Victron with the Balmar SG200 which seems to work better in this regard. |
Thanks, I'll have to look into how to recalibrate it.
Regarding the switch I mentioned earlier, I decided to go with this one instead: https://www.amazon.com/gp/product/B000MMC8BU/ref=ppx_yo_dt_b_asin_title_o01_s00?ie=UTF8&psc=1
This one will actually be a little nicer than the previous one. Colby |
|
| Back to top |
|
|
smckean (Tosca)
Joined: 18 Jan 2014
Posts: 975
City/Region: Guemes Island (Anacortes)
State or Province: WA
C-Dory Year: 2005
C-Dory Model: 25 Cruiser
Vessel Name: Tosca
Photos: Tosca
|
| Posted: Sun Jun 25, 2023 3:06 pm Post subject: |
|
|
I think the easiest way to recalibrate the Victon is to disconnect the negative cable that runs from the Victon shunt to the batteries. then zero current can flow thru the Victon. Reset the Victon to zero. Reconnect the cable.
Colby, I have seen this small draw too, I've chalked it up to the VSR which always draws a small current unless you installed it with a off/on switch (using a little red wire on my BEP 710-140A).
_________________
Sandy McKean
Purchased Tosca in 2014
Re-powered to Yammi 200 in 2015 |
|
| Back to top |
|
|
colbysmith
Joined: 02 Oct 2011
Posts: 4550
City/Region: Madison
State or Province: WI
C-Dory Year: 2009
C-Dory Model: 25 Cruiser
Vessel Name: C-Traveler
Photos: C-Traveler and Midnight-Flyer
|
| Posted: Sun Jun 25, 2023 10:42 pm Post subject: |
|
|
| smckean (Tosca) wrote: | I think the easiest way to recalibrate the Victon is to disconnect the negative cable that runs from the Victon shunt to the batteries. then zero current can flow thru the Victon. Reset the Victon to zero. Reconnect the cable.
Colby, I have seen this small draw too, I've chalked it up to the VSR which always draws a small current unless you installed it with a off/on switch (using a little red wire on my BEP 710-140A). |
I kind of suspected it had something to do with the way the victron meter is set up.
Got my wiring ran today between the batteries and where the solar controller will go in the closet. I also ran some new wire to the house batteries from the main battery charger (under the port aft dinette seat). The original wire runs across the cabin under the step, under the shower, and then inside the starboard gunnel, before being hooked into the main battery switch in the starboard aft bilge compartment, where the port side house batteries connect. Then cleaned up the rest of the battery charger wiring. (All the ground wires were spliced into one main wire hooked up at the battery charger. I made a wire stud to connect them all to.) The new wire runs for the battery charger and the solar controller, to the house batteries, now run through the port gunnel, allowing for a much shorter run. Colby |
|
| Back to top |
|
|
Peter & Judy
Joined: 03 Dec 2014
Posts: 550
City/Region: Olds
State or Province: AB
C-Dory Year: 2005
C-Dory Model: 22 Cruiser
Vessel Name: Mistaya
Photos: Mistaya
|
| Posted: Mon Jun 26, 2023 9:34 pm Post subject: |
|
|
Colby,
Now that you are wiring for your new solar system you may want to consider installing a pigtail connector or two on your wires. I have done this on my system. I have two small fixed panels on the radar arch, but the main power comes from two flexible panels that I tie onto the top of our kayaks. These can be removed completely or tied on top of the roof or bimini. You may want to consider adding a flexible panel or two to your system for when you have your kayaks stored on top or to give you more power capacity when you are stuck out in poor weather, but still want your ice cream to stay frozen.
_________________
Peter & Judy Haase
Buffalo Horn Ranch
HMCB Mistaya
"Mistaya" (Grizzly Bear in Cree)
HMCB (Her Majesties Cute Boat) |
|
| Back to top |
|
|
colbysmith
Joined: 02 Oct 2011
Posts: 4550
City/Region: Madison
State or Province: WI
C-Dory Year: 2009
C-Dory Model: 25 Cruiser
Vessel Name: C-Traveler
Photos: C-Traveler and Midnight-Flyer
|
| Posted: Tue Jun 27, 2023 12:19 pm Post subject: |
|
|
| Peter & Judy wrote: | Colby,
Now that you are wiring for your new solar system you may want to consider installing a pigtail connector or two on your wires. I have done this on my system. I have two small fixed panels on the radar arch, but the main power comes from two flexible panels that I tie onto the top of our kayaks. These can be removed completely or tied on top of the roof or bimini. You may want to consider adding a flexible panel or two to your system for when you have your kayaks stored on top or to give you more power capacity when you are stuck out in poor weather, but still want your ice cream to stay frozen. |
Definitely need the ice cream to stay frozen! lol. For right now, I'm just concentrating on the two solid panels. Seeing how that goes, someday I may or may not add to the system. I can always add in pigtails then, as I'll have easy access to all the wiring. (I'm making brackets that will allow the panels to be tilted to get under them for roof cleaning, and wiring access.  ) ) |
|
| Back to top |
|
|
robhwa
Joined: 04 Dec 2013
Posts: 272
City/Region: Anderson Island
State or Province: WA
C-Dory Year: 2003
C-Dory Model: 22 Cruiser
Vessel Name: Marcia C
Photos: Problemadela
|
| Posted: Wed Jun 28, 2023 11:23 am Post subject: |
|
|
| Peter & Judy wrote: | Colby,
Now that you are wiring for your new solar system you may want to consider installing a pigtail connector or two on your wires. I have done this on my system. I have two small fixed panels on the radar arch, but the main power comes from two flexible panels that I tie onto the top of our kayaks. These can be removed completely or tied on top of the roof or bimini. You may want to consider adding a flexible panel or two to your system for when you have your kayaks stored on top or to give you more power capacity when you are stuck out in poor weather, but still want your ice cream to stay frozen. |
One thing to keep in mind if you want to increase the watts later is that some charge controllers dont work at high voltage (i.e. panels in series). For instance, the Renogy DCC50S, which integrates the solar with the alternator and even keeps the starting battery charged as well, only uses 12 volt inputs. This appears to be a down side of the panel/alternator integration, which is otherwise great. You cant just hook in series if you calculated your cables and voltage drop from smaller panels. Since you must use 12 volt panels and hook panels in parallel, your original cables might not be adequate if you expand, permanently or temporarily. Calculate your cable sizes on the basis of the load you MIGHT be using later. Also, many systems have amp limits to inputs as well, the DCC50S is 50 amps, so about 600 watts nominal.
_________________
Rob Harrison & Marcia Ciol
Anderson Island, WA
2003 22 Cruiser "Mar-C" |
|
| Back to top |
|
|
colbysmith
Joined: 02 Oct 2011
Posts: 4550
City/Region: Madison
State or Province: WI
C-Dory Year: 2009
C-Dory Model: 25 Cruiser
Vessel Name: C-Traveler
Photos: C-Traveler and Midnight-Flyer
|
| Posted: Fri Jul 07, 2023 12:13 am Post subject: |
|
|
So, two weeks later, with a week away boating in Door County, I managed to get the project completed.
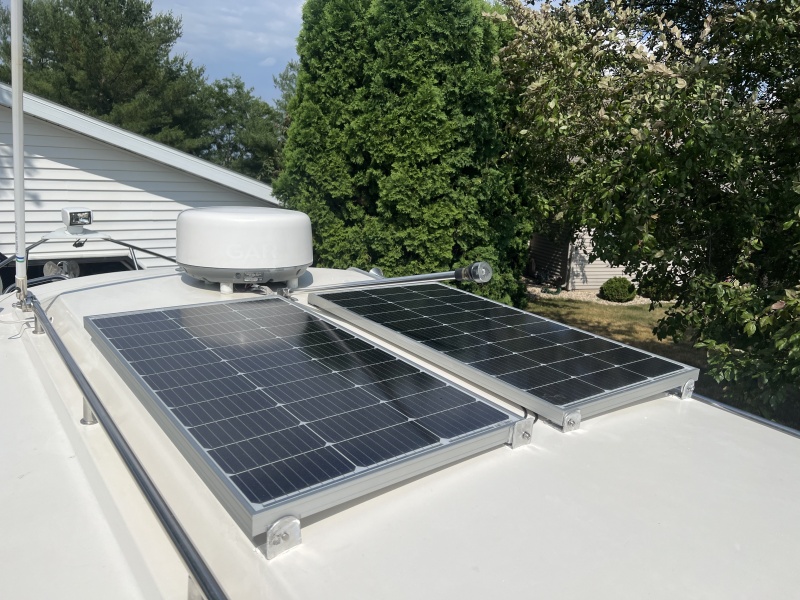
This is the completed panel installation. Nice fit on both sides of my mast light, allowing me to still fold it down (aft). And I still have some room on the back of the roof to store my un-inflated kayaks, or while no desire now, possibly another solar panel.
 [img] [img]
This is a closeup of the inner panel brackets. Because the roof is canted somewhat, these brackets place the panels closer to the roof. I initially wanted to pass the bolt through from the outside, but it was too much of a PITA to get a nut on the inside. So I put the bolt through the inside. Worked out much easier. The one roof bracket has a higher side, by accident. Forgot to cut it while making the brackets. I'll cut it or grind it off later.
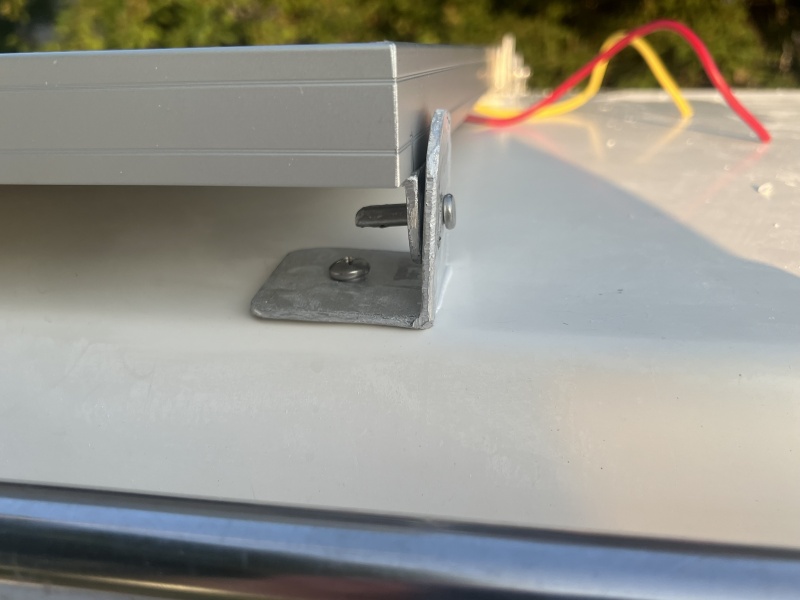
This is a close up of one of the outer edge brackets. It sits a little taller to keep the solar panel level with the other one. I have a hinch pin to keep the brackets together. I can pull the pin, and then tilt the panel up to clean the roof under it, or if I need to do any wiring work.
As you can see, the brackets are held down to the roof with a 1/4" ss machine screw. I pre-drilled the holes at the exact positions, and then over drilled with a 1/2" bit. Filled in the hole with epoxy, and the re-drilled the 1/4" final hole through the epoxy. I also spread some 4000 adhesive between the bracket and the roof.
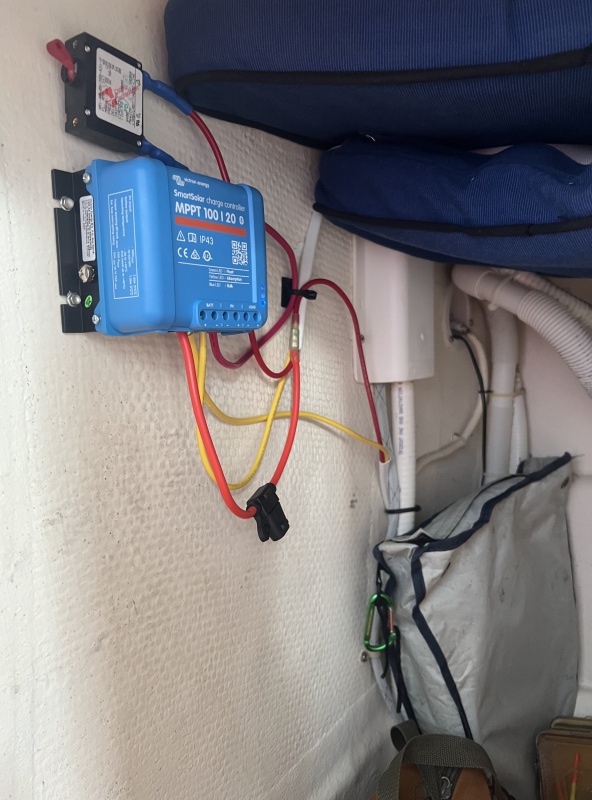
This is the solar controller and main switch. The switch is between the controller and the panels. Then there is a fuse between the controller and the battery. I located this in the closet. (Aft compartment just in front of the cabin aft bulkhead.)

This photo shows the panels both tilted up.
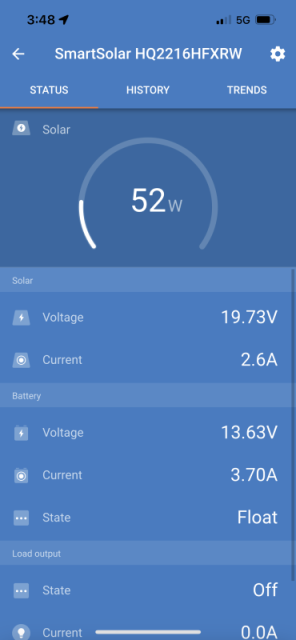
The controller works well with the Victron smart phone app. Looks like it's all working as it should.
So far I've been impressed. I've had the refrigerator going as I'm getting ready to head up to Isle Royale this week. Every day, an hour or two after sunrise, my battery is back up to 100%. It'll be interesting to see how it does with the freezer on board. Colby |
|
| Back to top |
|
|
|
|
You cannot post new topics in this forum
You cannot reply to topics in this forum
You cannot edit your posts in this forum
You cannot delete your posts in this forum
You cannot vote in polls in this forum
You cannot attach files in this forum
You cannot download files in this forum
|
|
 Search
 Private Messages
 Profile
 Log in
 Register
 Help
Help
