| View previous topic :: View next topic |
| Author |
Message |
colbysmith
Joined: 02 Oct 2011
Posts: 4548
City/Region: Madison
State or Province: WI
C-Dory Year: 2009
C-Dory Model: 25 Cruiser
Vessel Name: C-Traveler
Photos: C-Traveler and Midnight-Flyer
|
 Posted: Sat Sep 17, 2022 12:15 pm Post subject: Fuel Tank Removal CD-25 Posted: Sat Sep 17, 2022 12:15 pm Post subject: Fuel Tank Removal CD-25 |
 |
|
I've had a small leak in the cabin bulkhead, under the head, where the bulkhead attaches to the bilge hull floor. I've tried caulking the area, but have had no luck with the limited access under the head floor. I decided I would pull the cockpit floor up, remove the fuel tank, and access the leak from that side of the bulkhead.
After pulling the fuel tank, I learned that wet core rot is not the only problem we face with C-Dory's, but that my aluminum fuel tank was pitted on the bottom. I did some internet research and it looks like this is a common problem. One repair mentioned involved painting the tank with Glovit Epoxy Paint. I'm open to suggestions. C-Traveler is a 2009 model. I have to wonder how many other, particularly older CD-25's, also have pitted fuel tanks, and when does the pitting start leaking fuel?
I have stopped the leaking between the bilge and cabin by applying fiberglass matting and resin along the base of the cabin bulkhead on the bilge side. I am also planning to install a bilge sucker system I built, from a link to plans that C-Otter Tom posted about a few years ago. But the problem with the fuel tank will continue to exist with water that remains in the bilge while the boat is in the water. On the trailer I pull the bilge drain plug and park the boat bow high.
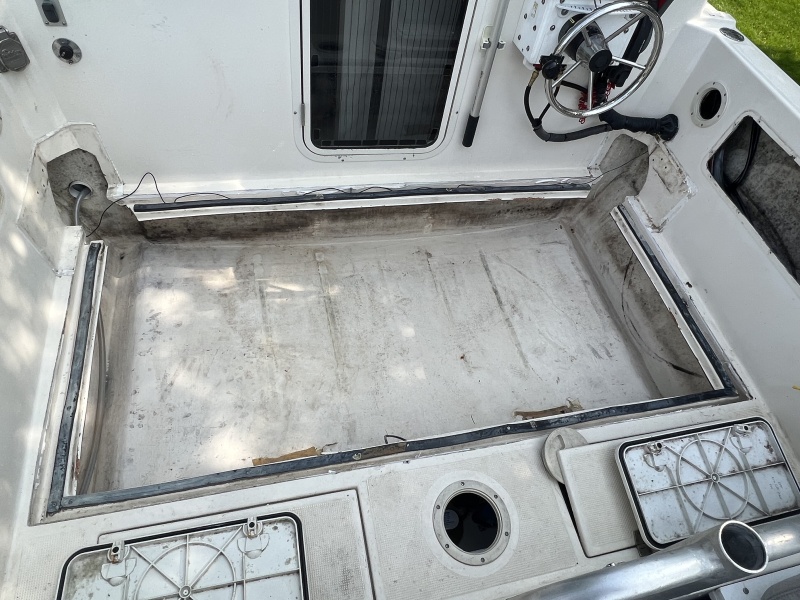
This photo is of the cockpit with the steps removed. To remove them I went in through the small access plate to remove the screws holding a metal bracket between the steps and sidewall. I also removed the side boxes to have better access.
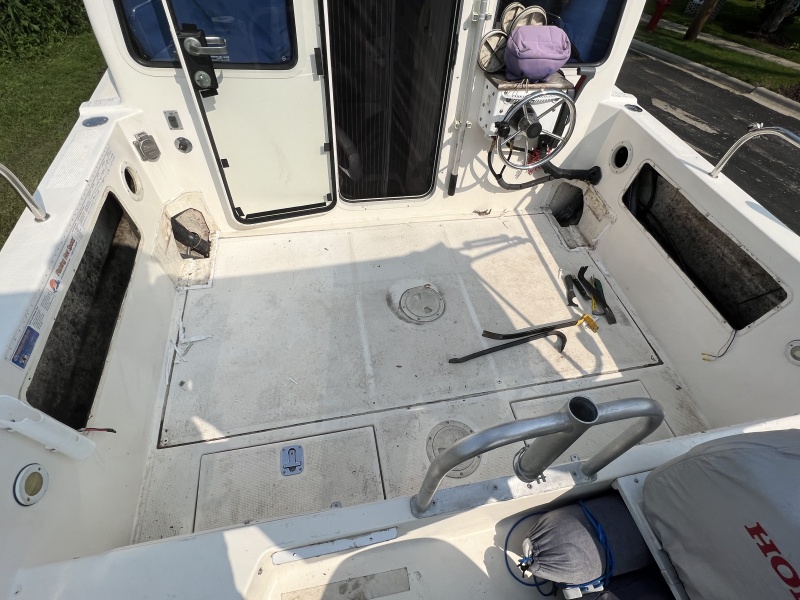
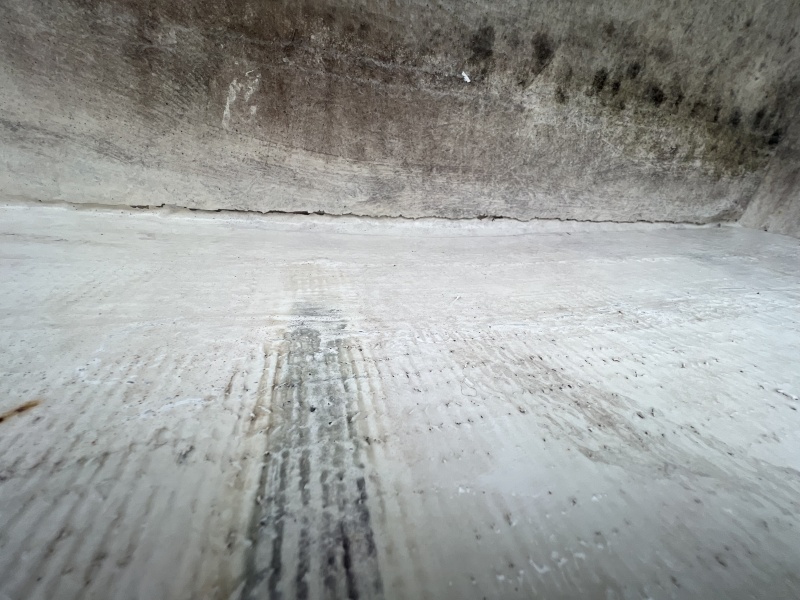
To remove the cockpit floor, I used a utility knife to cut through the sealant (I used 4000 UV last time I had the floor up). Then used pry bars to help leverage breaking the cockpit floor free. If you look directly behind the fuel tank, there are two blocks that are fiberglassed to the hull to keep the tank from sliding backwards. The tank is pushed up against the cabin bulkhead. These blocks must be removed so you can slide the tank back, and then slide the tank to one side or the other, so it will clear the side of the floor opening. I was able to chisel the bottom of the blocks free from the hull. The real pain was getting the fuel fill and vent hoses off. I removed those first. I am replacing with new hoses. The vent hose is 5/8" and pretty easy to find. The fill hose is 2", and not so easy to find. Great Lakes Skipper has both, and my total bill for all four hoses is just over $100 with shipping. The 2" hose was 27" long on each side, and the 5/8" was 24". This photo is with the cockpit floor removed.
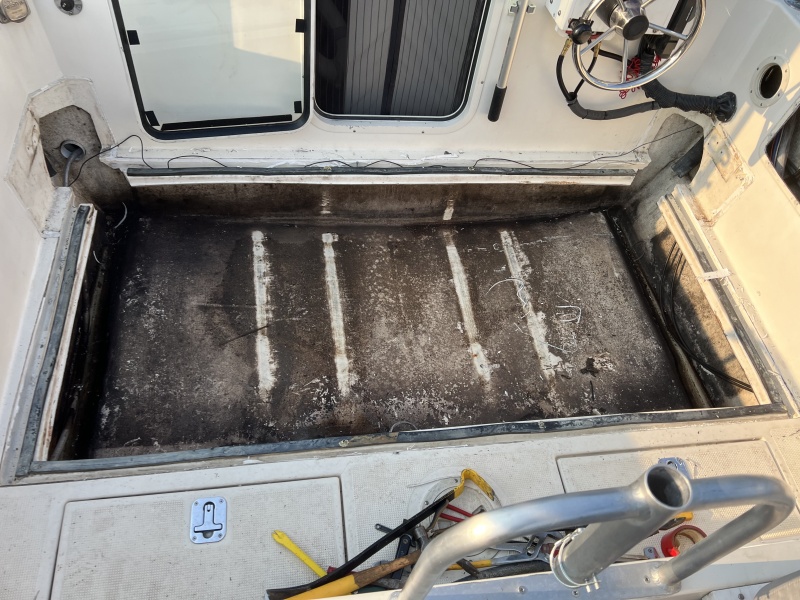
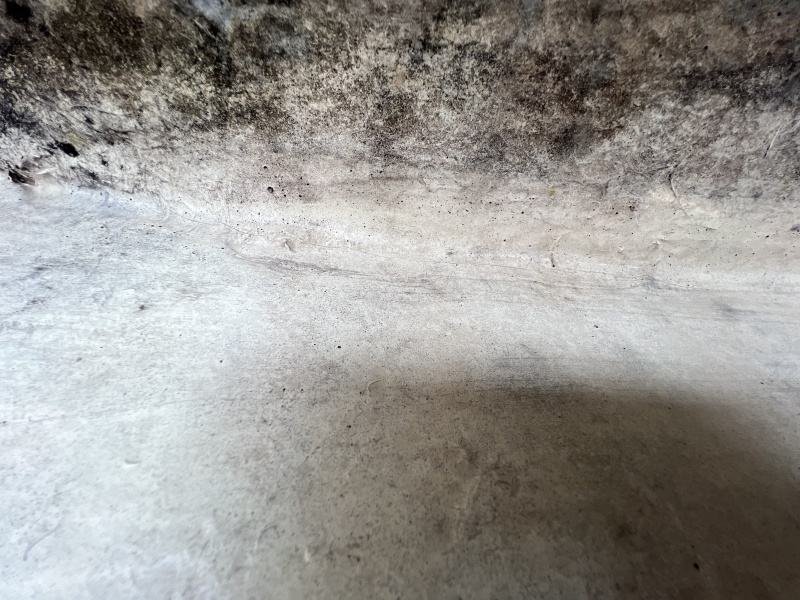
Once I removed the fuel tank, you can see the mold/mildew along the bottom of the bilge. The white strips are where the fuel tank has spacers taped to the bottom of it.
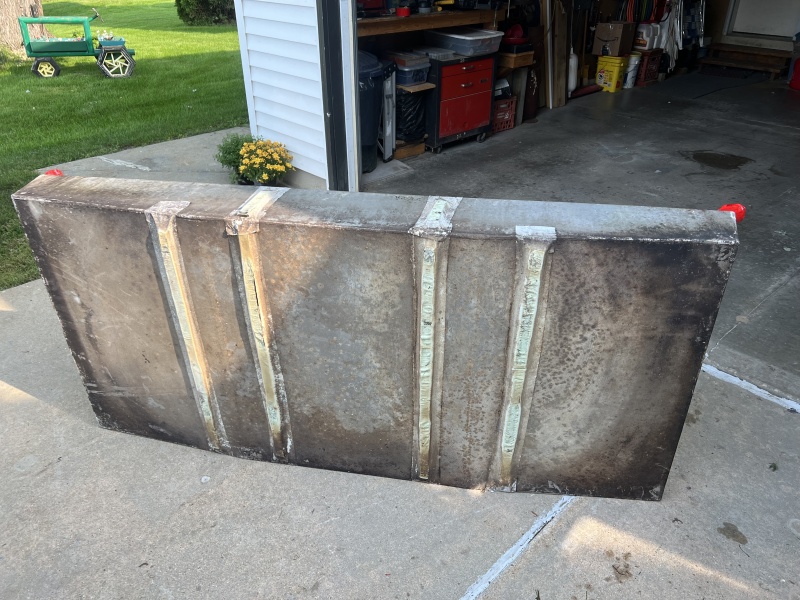
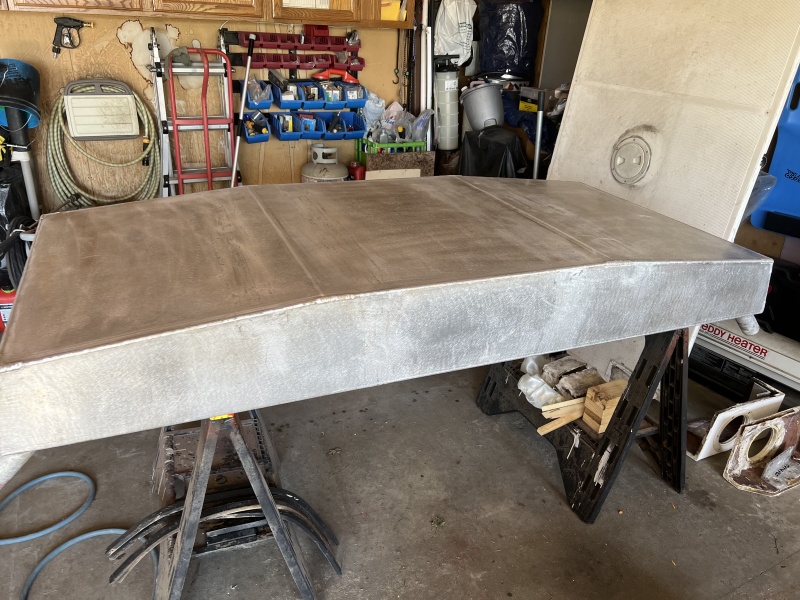
The fuel tank is now out, and sitting up on edge. I pressure washed the top of it a few years ago when I pulled the cockpit floor. But still some new grime.
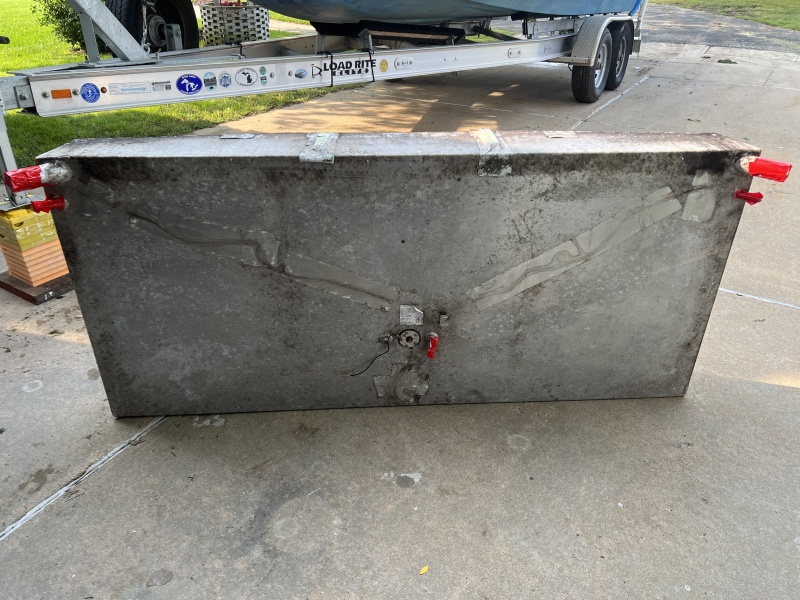
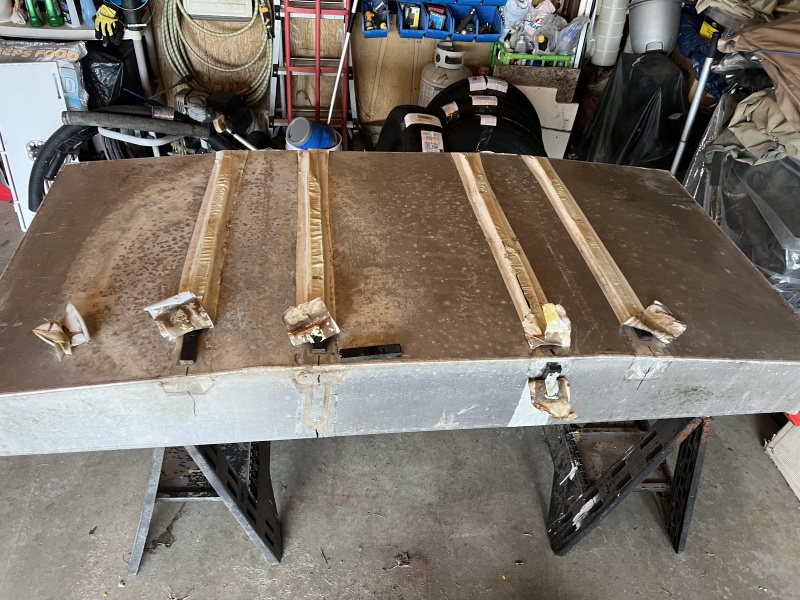
The bottom of the tank (before pressure washing) has spacers taped to it so it does not sit directly on the hull/bilge floor. There are also some spacers along the front edge so it doesn't sit flush against the cabin bulkhead. You can also see the pitting along the tanks bottom in this photo.
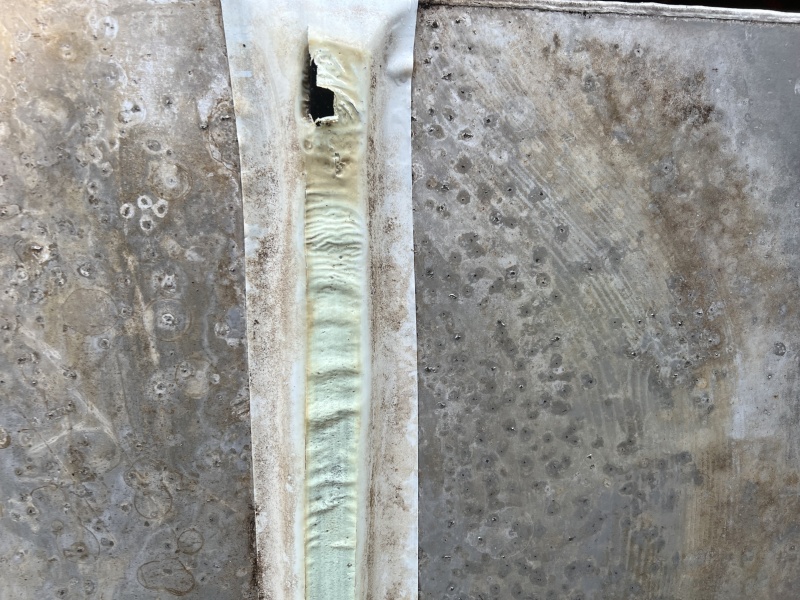
Here's a close up of the tank bottom. Better view of the pitting.
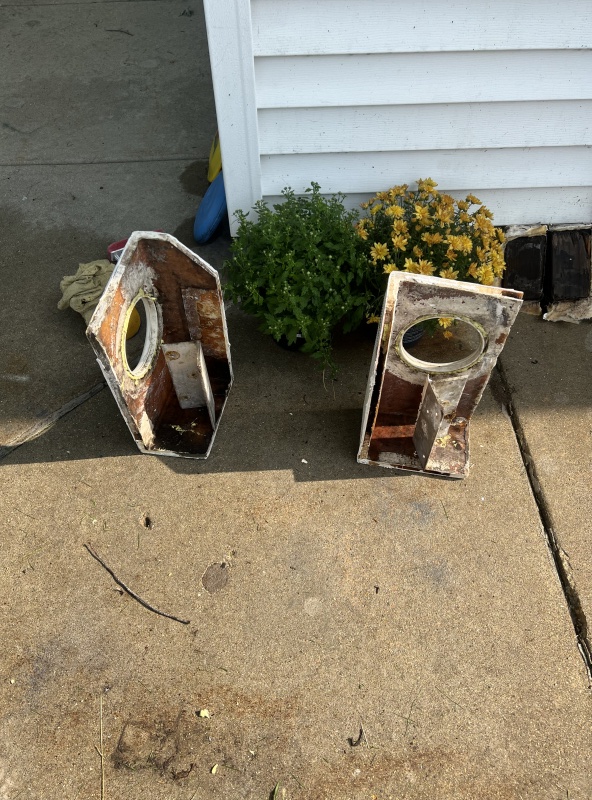
Here are the steps. You can see that there is core rot along the edge. I repaired these half ass last time I had them off, with the use of spray foam and some fiberglass. This time I'll take time to grind them out better, place some new wood in place, and then a better job of fiberglassing.
Bilge pressure washed, all nice and clean.
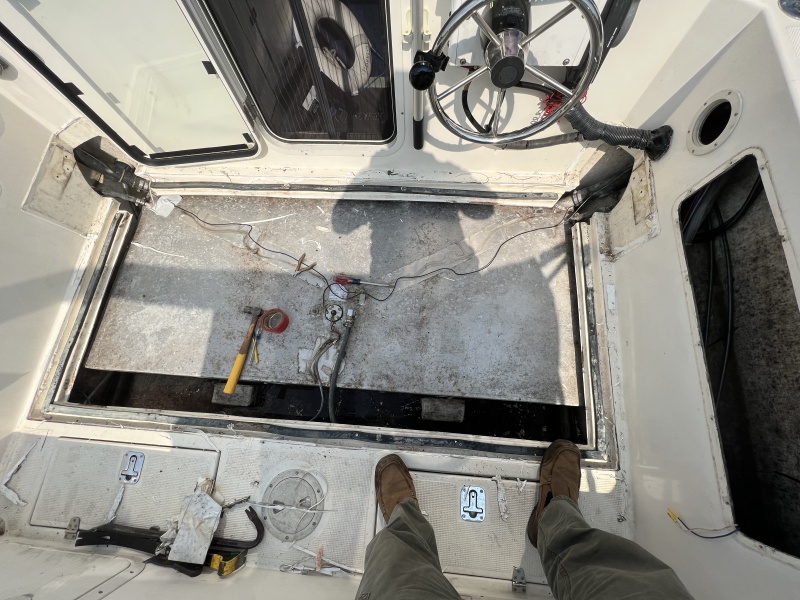
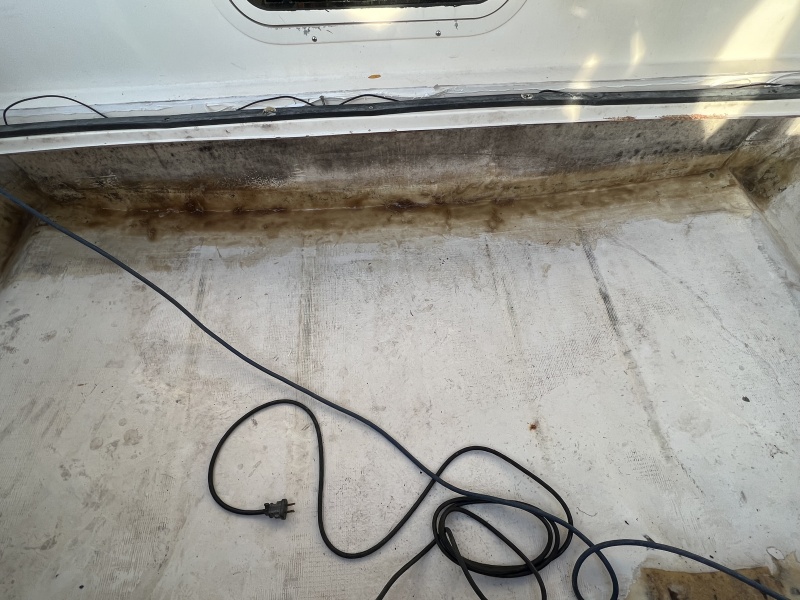
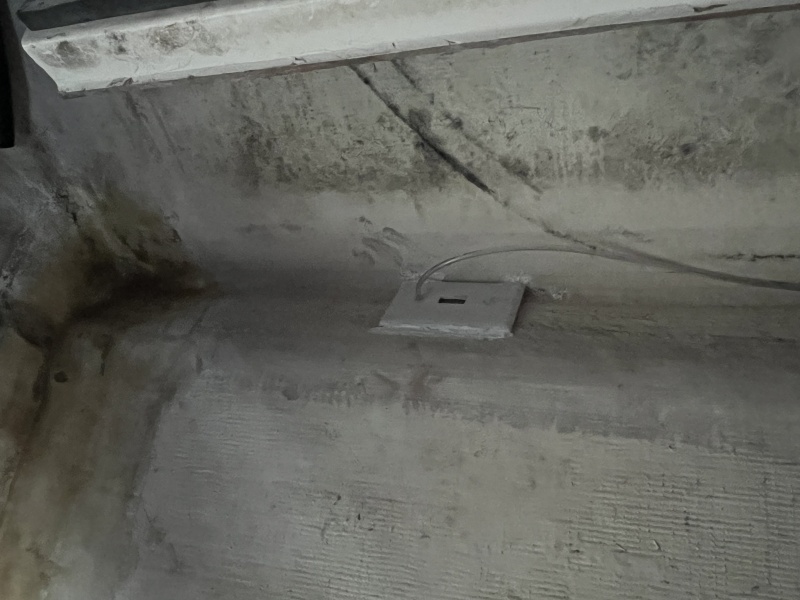
Some closeups of the area that appeared to be leaking into the cabin.
Hard to see in this one unless you can zoom in, but there is a small hairline crack along the base of the bulkhead.
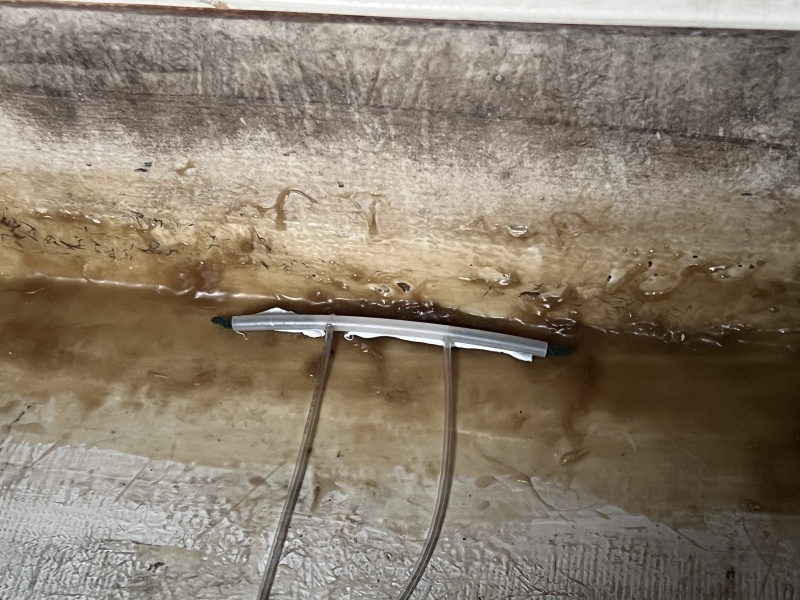
Fiberglass matting and resin used along bulkhead to hull area to repair leak. I filled the bilge with about 3" of water. All good now, no leak!
 |
|
| Back to top |
|
 |
thataway
Joined: 02 Nov 2003
Posts: 20810
City/Region: Pensacola
State or Province: FL
C-Dory Year: 2007
C-Dory Model: 25 Cruiser
Vessel Name: thataway
Photos: Thataway
|
| Posted: Sat Sep 17, 2022 3:19 pm Post subject: |
|
|
Both a good and big job, Colby! There have been a number of the 25's which have leaking from under the aft cabin bulkhead, I am aware of several with some core rot in the lower part of that bulkhead. The only thing I would have done different would have been to use fiberglass tape and epoxy, mainly because this gives a better secondary bond. The boats all should have had mat, tape (cloth) mat/tape done before the gas tank was put in. Some do. All should have the mat/ tape on the cabin side. (I suspect that some don't all of the way around the hull part of this bulkhead,
If the boats have gotten salt water in the bilge, then they are likely to have pitting of the tank...It is good to see that the tank was properly elevated on strips of ???. It should be a plastic or fiberglass. It should never be a material which contains carbon (ie any "rubber" compound). Unfortunately the tanks were not made with a corrosion resistant aluminum alloy.
At this point (I assume the fuel tank is empty and had been purged of any gasoline.). The strips of material on the under side should be removed, and then the entire tank cleaned on the outside. Ideally it should be totally bright and all oxides removed. This is where there may be an issue with the depth of pitting. Ideally the pits should all also be clean of any oxide. I would start with sandpaper by hand to get a feel for what is going on. If you are really lucky, the sandpaper will be enough... However a wire brush may be necessary. If the pits are deep--then a new tank. I am surprised at the relatively few numbers of new tanks which have been fitted.
After the tank is bright, you need to clean with either denatured alcohol or acetone, and then etch it. Then coat with a two part epoxy.
See this edition of Epoxyworks. Do not be tempted to use polyester or vinyl ester resins. They will not have the adhesive properties required.
After all of this is done and dry, I would put strips under the tanks as before, and adhere them with 5200. I would coat the entire tank. With some luck the tank will last for many years.
However, if there was corrosion inside the tank, then I probably would considering a new tank. You may still get away with many years of the epoxy coating on the outside. With the boats which have the removable floor, I would take a chance. With the boats where the floor has to be cut out (earlier than 2004 ?) then I would go with the new tank.
As always, Colby has done a great job and documented it well with photos. I am looking forward to seeing what he finds after cleaning and light sanding.
_________________
Bob Austin
Thataway
Thataway (Ex Seaweed) 2007 25 C Dory May 2018 to Oct. 2021
Thisaway 2006 22' CDory November 2011 to May 2018
Caracal 18 140 Suzuki 2007 to present
Thataway TomCat 255 150 Suzukis June 2006 thru August 2011
C Pelican; 1992, 22 Cruiser, 2002 thru 2006
Frequent Sea; 2003 C D 25, 2007 thru 2009
KA6PKB
Home port: Pensacola FL |
|
| Back to top |
|
|
colbysmith
Joined: 02 Oct 2011
Posts: 4548
City/Region: Madison
State or Province: WI
C-Dory Year: 2009
C-Dory Model: 25 Cruiser
Vessel Name: C-Traveler
Photos: C-Traveler and Midnight-Flyer
|
| Posted: Sat Sep 17, 2022 5:07 pm Post subject: |
|
|
Im actually thinking now of using some of the fiberglass matting and resin (I still have plenty left over.). Everything else Bob said about sanding and cleaning will be done. I dont think the pitting is very deep. I did empty all the fuel out of the tank before I pulled it. (Im very happy with my setting of the new fuel gauge sender and pick up tube. Gauge indications were 15 gals left. Before removing the tank I pumped out 17 gals until nothing more would come out. When I got the tank out I turned it upside down on end and might have got another 2 qts out of it!  ). My thought with the fiberglass matting and resin is just to use it on the bottom of the tank as thats the only pitting. The fiberglass should adhere to the sanded and clean tank and then protect it from further degradation. Colby ). My thought with the fiberglass matting and resin is just to use it on the bottom of the tank as thats the only pitting. The fiberglass should adhere to the sanded and clean tank and then protect it from further degradation. Colby |
|
| Back to top |
|
|
thataway
Joined: 02 Nov 2003
Posts: 20810
City/Region: Pensacola
State or Province: FL
C-Dory Year: 2007
C-Dory Model: 25 Cruiser
Vessel Name: thataway
Photos: Thataway
|
| Posted: Sat Sep 17, 2022 7:08 pm Post subject: |
|
|
I strongly suggest that you do NOT use polyester resin and mat on the bottom of the tank. The epoxy will adhere much better and increase the longevity of the tank. . Do not skip any of the cleaning steps. There is a very good reason that is what is recommended.
It is also important to put the spacers under the fuel tank--I don't know what was used in your boat, but if you have to use your mat and resin, then you can make some new battens to go under the tank. I suspect that the old were fiberglass with polyester resin.
I have been working with polyester resin for over 70 years, and epoxy resin over 60 years.
Be sure that all fumes are out of the tank before working on it! |
|
| Back to top |
|
|
colbysmith
Joined: 02 Oct 2011
Posts: 4548
City/Region: Madison
State or Province: WI
C-Dory Year: 2009
C-Dory Model: 25 Cruiser
Vessel Name: C-Traveler
Photos: C-Traveler and Midnight-Flyer
|
| Posted: Sat Sep 17, 2022 8:27 pm Post subject: |
|
|
Thanks again Bob for the advice.
| Quote: | | It should never be a material which contains carbon (ie any "rubber" compound). |
Why is that? The material that was used as spacers appears to be some form of hard rubber. Flexible, but not squishable. I could make some spacers out of wood that is then fiberglassed to the bilge floor if you think that would be better. However I did not see any problem from the original spacers taped to the tank. I can reattach them with 4000UV, as I should have enough even with needing to recaulk the cockpit floor. (I ordered 7 10oz tubes. I believe I used around 6 last time I removed the floor.)
An afterthought came to mind a bit ago, and that is, if I did use the fiberglass resin, I'm not sure if it would eventually crack or not. The tank does bend a little. I know that from sitting on the top of it while it was in the boat. I assume that the bottom may also bend a little depending upon fuel load. And I'm sure the epoxy paint would be easier to apply. Unfortunately the Glovit is expensive, about $70 for two quarts. (I think, as they list it in weight instead of gallons.) Is there any other epoxy paint you would recommend?
I absolutely agree with proper prep to have anything remain adhered to the aluminum.
At this point, I only plan to work on the bottom of the tank. The sides and top look fine. I don't have a borescope to look inside the tank, but I'm pretty sure the only pitting/corrosion is on the bottom outside of the tank. Colby |
|
| Back to top |
|
|
thataway
Joined: 02 Nov 2003
Posts: 20810
City/Region: Pensacola
State or Province: FL
C-Dory Year: 2007
C-Dory Model: 25 Cruiser
Vessel Name: thataway
Photos: Thataway
|
| Posted: Sat Sep 17, 2022 10:15 pm Post subject: |
|
|
You should be able to get a good look in the tank thru the fuel level sender. It is probably OK. but it only takes a couple of minutes to look,
I hope that rubber was not used, The carbon will accelerate any corrosion, with any water trapped there. Carbon, is cathodic to aluminum and will cause galvanic corrosion. Do not use any material which will trap moisture.
Yes 4000 would be OK for the adhesive to the tank after the epoxy
From the link I posted: (There is a nice graph showing the results)
| Quote: | | Given that G/flex adhesion to just abraded aluminum is greater than the bond to aluminum using 105 Resin/206 Hardener when abraded and treated with 860 Aluminum Etch, it would seem to make the 860 Etch Kit obsolete. |
A quart of G Flex epoxy is about $130 to $140. (Probably equal to a dinner and a show.). (or 30 gallons of fuel on the water). You will have enough left over for a bunch of projects, or better yet at least coat the rest of the tank. Then it is fixed.
If you wanted to go cheaper (I don't believe it will give as good protection, with out an outer paint) you can use Total Boat Aluminum Etch wash, and the Total boat 'Aluminum epoxy primer. When I replaced the fuel tanks in the Cal 46, I used an etch, then a two part epoxy primer, (2 coats) and then two coats of two part urethane red paint sprayed on, Today I would go with the G flex. It has good bonding and is quite flexible. |
|
| Back to top |
|
|
colbysmith
Joined: 02 Oct 2011
Posts: 4548
City/Region: Madison
State or Province: WI
C-Dory Year: 2009
C-Dory Model: 25 Cruiser
Vessel Name: C-Traveler
Photos: C-Traveler and Midnight-Flyer
|
| Posted: Sat Sep 17, 2022 10:48 pm Post subject: |
|
|
| Quote: | | I hope that rubber was not used, The carbon will accelerate any corrosion, with any water trapped there. Carbon, is cathodic to aluminum and will cause galvanic corrosion. Do not use any material which will trap moisture. |
I'm not really sure what the material is. It's black, hard, but bends. I will likely reuse it though as there are no signs of corrosion where it was taped on. (I'll know for sure as I get at sanding and prepping the tank, tomorrow.)
I wasn't sure if 32 oz would be enough to cover the bottom of the tank. Sounds like you believe it would be. Amazon has two 16 oz bottles (resin and hardner) for $85.60.
https://www.amazon.com/gp/product/B002PKLO80/ref=sw_img_1?smid=ATVPDKIKX0DER&psc=1
I think I'll order it now as it shows to be delivered on Tuesday. (Prime). That'll give me time to get the tank prepped. Colby |
|
| Back to top |
|
|
olsurfdog
Joined: 13 Nov 2009
Posts: 179
City/Region: Carmel Valley
State or Province: CA
C-Dory Year: 1989
C-Dory Model: 22 Cruiser
Vessel Name: Summer
|
| Posted: Sun Sep 18, 2022 3:03 pm Post subject: |
|
|
Colby
Good, it sounds like your doing as Dr Bob suggested. I too have a lot of years working with and using both epoxy and polyester resins, first in the surfboard industry and also experience with boat repair. Epoxy has a much better adhesive qualities and is truly waterproof. As always his advice is solid. He has mentioned the problem of rubber in contact with aluminum in the past. Ive no experience with that so its good to learn. GFlex is great on aluminum as it can move with the aluminum. When in doubt check with West Systems they have lots of good info and instructions on their website.
Your documentation of this project is great and will be of great use to others in the future. This is such a great website and group of C-Dory enthusiasts!
_________________
Michael
______
I am where I am
Because I was where I was |
|
| Back to top |
|
|
colbysmith
Joined: 02 Oct 2011
Posts: 4548
City/Region: Madison
State or Province: WI
C-Dory Year: 2009
C-Dory Model: 25 Cruiser
Vessel Name: C-Traveler
Photos: C-Traveler and Midnight-Flyer
|
| Posted: Mon Sep 19, 2022 10:13 pm Post subject: |
|
|
Time for an update. I've been working on not just the fuel tank, but a bilge sucker system as well. I finished installing my bilge sucker today, and got the tank sanded. I used a 6" pneumatic orbital sander first with 40 grit sandpaper, then finished with 60 grit. I did hand sand around the edges. Sanded the bottom and all four sides of the tank. I did lightly sand the top of the tank, mostly just to remove some dirt and a little bit of corrosion. (Just the white dust...) I then wiped the tank down with Acetone. I will wipe it down one more time just before putting the G/Flex epoxy on. That should arrive tomorrow, and I'll likely do that job on Wednesday. I did pull the fuel gauge sender unit, and looked into the tank. Can't see much through a 2" hole, but what I did see, the insides of the tank looked fine. I plan to put the epoxy on the bottom and all four sides, but leave the top alone.
There was pitting and corrosion under where the spacer strips were taped on. I'm sure the tape trapped some water, and I'm pretty sure the spacers are some form of rubber. I don't understand if rubber causes corrosion with the aluminum, why the fuel hoses don't create a problem?
I will likely reuse the spacer strips, since I will have epoxy on the tank when I put them back on. I'll also use the 4000 UV to adhere them on.
Colby
These first two photos show the spacer strips a little better. The tape left quite a bit of residue.

Fuel tank is sanded and wiped down with acetone, ready for the epoxy. I'll be using the G/Flex 650.
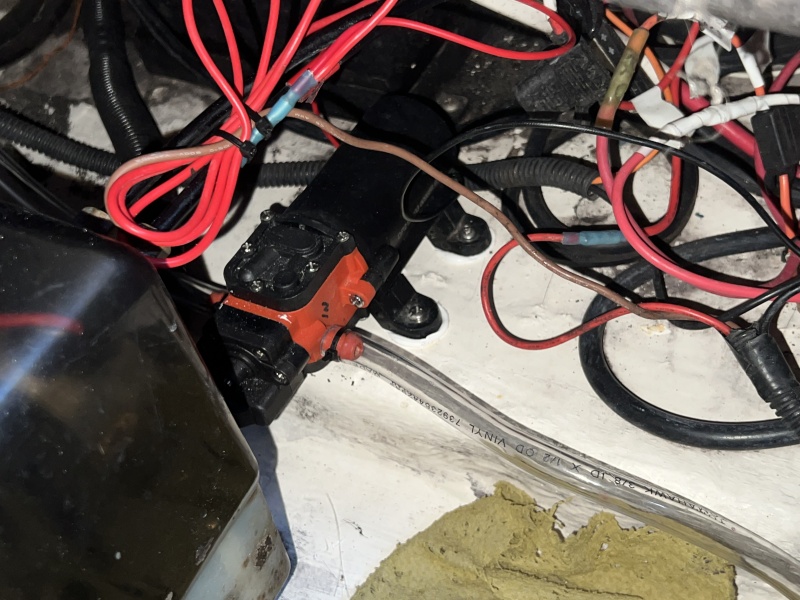
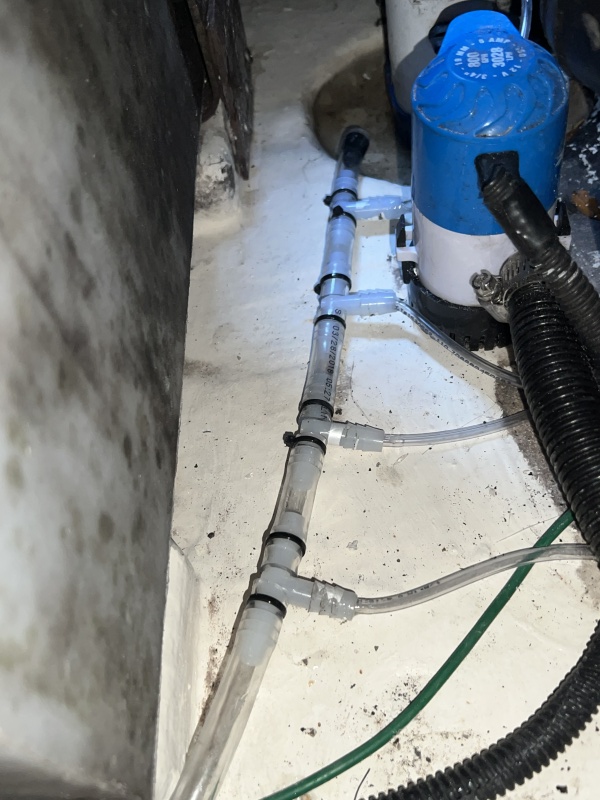
This is one of my bilge sucker pickups. I used some old switch plates and tacked some 3M Green pads under them. Then glued in some 1/8" ID tubing. I placed one each in each chine towards the front of the bilge. Then I used some 1/4" hard plastic tubing to make a sucker for the front of the bilge. I just placed a small cut off of the scotch pad in each end of the straw to act as a strainer. Again gluing the 1/8" tubing into it. The tubing then runs back to the manifold, made out of 3/8" tubing. That attaches to the pump, which is mounted in the back compartment in front of my battery tray and electrical panel. I wired it in with a secondary / backup bilge pump I installed previously. The discharge hose runs out into the splash well with all the engine wiring and hoses. (The suckers are tacked in with 4000UV)
 |
|
| Back to top |
|
|
ssobol
Joined: 27 Oct 2012
Posts: 3373
City/Region: SW Michigan
State or Province: MI
C-Dory Year: 2008
C-Dory Model: 22 Cruiser
Vessel Name: SoBELLE
Photos: SoBelle
|
| Posted: Tue Sep 20, 2022 1:16 pm Post subject: |
|
|
| On your bilge sucker setup, how do you clean the strainer? It seems to me that the crap that typically accumulates in a bilge will clog them up sooner or later. |
|
| Back to top |
|
|
forrest
Joined: 02 Nov 2003
Posts: 381
City/Region: Chehalis
State or Province: WA
C-Dory Year: 2007
C-Dory Model: 26 Venture
Vessel Name: Long Story
Photos: Long Story
|
| Posted: Tue Sep 20, 2022 1:45 pm Post subject: |
|
|
| I had fuel tank pitting on my 26. I had the pits on the tank welded up, then I had Line-x coat the entire surface of both tanks. So far the fix looks to be in excellent shape. |
|
| Back to top |
|
|
colbysmith
Joined: 02 Oct 2011
Posts: 4548
City/Region: Madison
State or Province: WI
C-Dory Year: 2009
C-Dory Model: 25 Cruiser
Vessel Name: C-Traveler
Photos: C-Traveler and Midnight-Flyer
|
| Posted: Tue Sep 20, 2022 1:47 pm Post subject: |
|
|
| I have no way to clean the scotch pads I used other than to reverse flow. I suspect over time they will become clogged and useless. But this is the part of the bilge where water collects and no room for a bilge pump due to the fuel tank. Its basically an inaccessible area once the fuel tank is back in. Once they no longer work its back to just putting my weight in the stern and running the regular pumps. |
|
| Back to top |
|
|
thataway
Joined: 02 Nov 2003
Posts: 20810
City/Region: Pensacola
State or Province: FL
C-Dory Year: 2007
C-Dory Model: 25 Cruiser
Vessel Name: thataway
Photos: Thataway
|
| Posted: Tue Sep 20, 2022 2:59 pm Post subject: |
|
|
| Quote: | | Sanded the bottom and all four sides of the tank. |
Are the bottom of the pits shinny and corrosion free?
| Quote: | | I don't understand if rubber causes corrosion with the aluminum, why the fuel hoses don't create a problem? |
Do you lay the fuel hoses under the tank, and in contact with bilge water? |
|
| Back to top |
|
|
colbysmith
Joined: 02 Oct 2011
Posts: 4548
City/Region: Madison
State or Province: WI
C-Dory Year: 2009
C-Dory Model: 25 Cruiser
Vessel Name: C-Traveler
Photos: C-Traveler and Midnight-Flyer
|
| Posted: Tue Sep 20, 2022 5:16 pm Post subject: |
|
|
| Quote: | | Are the bottom of the pits shinny and corrosion free? |
Hi Bob, Unfortunately, I'm not sure. Without grinding the aluminum down to the depth of the pits, I don't think there is anyway to get to the bottom of them, other than perhaps reaming them out. I'm not sure that would be a good idea. I did use a tire depth gauge on the wider pits, and it showed less than 1/32".
The fuel hose isn't in the water. I thought maybe it was the rubber compound that caused the corrosion. Guess I'm not understanding that very well. Colby |
|
| Back to top |
|
|
thataway
Joined: 02 Nov 2003
Posts: 20810
City/Region: Pensacola
State or Province: FL
C-Dory Year: 2007
C-Dory Model: 25 Cruiser
Vessel Name: thataway
Photos: Thataway
|
| Posted: Tue Sep 20, 2022 7:08 pm Post subject: |
|
|
| Quote: | | I don't think there is anyway to get to the bottom of them, other than perhaps reaming them out. I'm not sure that would be a good idea. I did use a tire depth gauge on the wider pits, and it showed less than 1/32". |
There are micrometers which will measure the depth accurately. If close to 1/32, I would be concerned.
Fine wire brush will get into these pits and make them clean enough to assure good bonding with the G Flex. You are not really removing any aluminum, just the oxide on the surface with the fine wire brush.
| Quote: | | The fuel hose isn't in the water. I thought maybe it was the rubber compound that caused the corrosion. Guess I'm not understanding that very well. Colby |
The rubber has to be in direct contact with the aluminum, and the carbon in the rubber (or any compound) is what is the conductor to cause the damage to the aluminum. If your spacers are containing rubber / carbon then there is a chance that you will have problems under the strips. This comes primarily from David Pasco, but is repeated by many knowledgable boat builders. Often graphite is added to materials to make them black. It is a complicated issue, for example with neoprene, does it contain carbon or not. Pure neoprene should not..but. |
|
| Back to top |
|
|
|
|
You cannot post new topics in this forum
You cannot reply to topics in this forum
You cannot edit your posts in this forum
You cannot delete your posts in this forum
You cannot vote in polls in this forum
You cannot attach files in this forum
You cannot download files in this forum
|
|
 Search
 Private Messages
 Profile
 Log in
 Register
 Help
Help
