| View previous topic :: View next topic |
| Author |
Message |
thataway
Joined: 02 Nov 2003
Posts: 20808
City/Region: Pensacola
State or Province: FL
C-Dory Year: 2007
C-Dory Model: 25 Cruiser
Vessel Name: thataway
Photos: Thataway
|
 Posted: Tue Apr 13, 2021 5:01 pm Post subject: Posted: Tue Apr 13, 2021 5:01 pm Post subject: |
 |
|
Yes, to both. I don't have time / health issues or I would do a layup to see. I do have the 1708 and 6 oz, but no balsa. As understand you are using 2 layers of 3/4"--and this may be thicker than the single layer of 1 1/2???
I always used grinders 8" 1 1/2 hp Craftsman was my go to machine, when we were boat building or doing restorations. I can no longer handle that bruit. The professionals I know here use almost exclusively air tools-they are lighter and easier to use. I do have a couple of air grinders/sanders (both straight and orbital), but you need a really good air source of high pressure and volume.
_________________
Bob Austin
Thataway
Thataway (Ex Seaweed) 2007 25 C Dory May 2018 to Oct. 2021
Thisaway 2006 22' CDory November 2011 to May 2018
Caracal 18 140 Suzuki 2007 to present
Thataway TomCat 255 150 Suzukis June 2006 thru August 2011
C Pelican; 1992, 22 Cruiser, 2002 thru 2006
Frequent Sea; 2003 C D 25, 2007 thru 2009
KA6PKB
Home port: Pensacola FL |
|
| Back to top |
|
 |
clayhubler
Joined: 03 Aug 2019
Posts: 280
City/Region: La Center
State or Province: WA
C-Dory Year: 2003
C-Dory Model: 22 Cruiser
Vessel Name: Hammerhead
Photos: Hammerhead
|
| Posted: Sat Apr 17, 2021 2:37 am Post subject: |
|
|
Made a test panel. I think it went well. I took one layer of 3/4 balsa and rolled a thin layer of epoxy onto the top. Let is soak about 30-45 min. Very few bubbles formed in the epoxy. Then, wet out a layer of 1708 and put a thin layer of lightly thickened epoxy on top of the balsa with a notched spreader, and then rolled the 1708 onto the balsa. Looks like it is going together as it should. I decided to only apply one layer of 1708 at a time, I feel the 1708 is hard to get the air out.
There are micro bubbles in the layup, but nothing large, and no epoxy starved areas. I don't know what to do about the micro bubbles. They look so small that I don't think they are going to weaken the laminate or be a problem in any way.
I'm going to bed before this cures, so hopefully it will continue to cure without any surprises.
Pictures in the album:
http://www.c-brats.com/modules.php?set_albumName=Core-rot-repair&id=20210416_211839&op=modload&name=gallery&file=index&include=view_photo.php
_________________
Clay on Hammerhead
 |
|
| Back to top |
|
|
thataway
Joined: 02 Nov 2003
Posts: 20808
City/Region: Pensacola
State or Province: FL
C-Dory Year: 2007
C-Dory Model: 25 Cruiser
Vessel Name: thataway
Photos: Thataway
|
| Posted: Sun Apr 18, 2021 3:38 pm Post subject: |
|
|
I do not see any issue with these micro bubbles. Yes, any roving is difficult to get epoxy into. We used to use 24oz roving--and that was very difficult. The 1708 is much better. But if you come closer to "level" with the 6 oz cloth on top, that would be fine also. I probably would feather in the edges in any cases and the cloth would be easier for that. (Grind a bevel on the "good" laminate, and then cover that with the cloth or 1708 and then grind that fair.)
Of course waiting between layers does complicate the issue, by having to prep before the next layer (layers).
Great documentation. |
|
| Back to top |
|
|
clayhubler
Joined: 03 Aug 2019
Posts: 280
City/Region: La Center
State or Province: WA
C-Dory Year: 2003
C-Dory Model: 22 Cruiser
Vessel Name: Hammerhead
Photos: Hammerhead
|
| Posted: Mon Apr 19, 2021 2:25 am Post subject: |
|
|
The test panel turned out fine, no issues arose during the cure.
 |
|
| Back to top |
|
|
clayhubler
Joined: 03 Aug 2019
Posts: 280
City/Region: La Center
State or Province: WA
C-Dory Year: 2003
C-Dory Model: 22 Cruiser
Vessel Name: Hammerhead
Photos: Hammerhead
|
| Posted: Mon Apr 19, 2021 2:41 am Post subject: |
|
|
| Quote: | | The professionals I know here use almost exclusively air tools-they are lighter and easier to use |
I purchased a 90 degree air die grinder for this project, and I absolutely love it. I have been using a 4 1/2" angle grinder with a 24 and 36 grit sanding disc. That works well but can do damage if your not paying attention. I already had 2 air die grinders, but they are the straight type, and I actually haven't even used them since I got the 90 degree one. I have been using 2" and 3" roloc sanding discs with it, as well as a 'paint stripper' spongy disc that works when you don't need quite so much... And flapper wheels of different sizes. Rotary files infrequently, but sometimes very helpful. I also bought some sanding drums but have not found them very useful so far. My electric die grinder has seen little use. Also have found the 4x24 and 3x18 belt sanders good for finishing and grinding on the floor. 36 grit sanding belts.
Also, my 3m respirator and 2097 filter cartridges have been a necessity. I got safety goggles for the eyes, too much in the air for safety glasses. When they fog up I hold the shopvac up to them, I always have it running when doing this work. |
|
| Back to top |
|
|
clayhubler
Joined: 03 Aug 2019
Posts: 280
City/Region: La Center
State or Province: WA
C-Dory Year: 2003
C-Dory Model: 22 Cruiser
Vessel Name: Hammerhead
Photos: Hammerhead
|
| Posted: Mon Apr 19, 2021 3:07 am Post subject: |
|
|
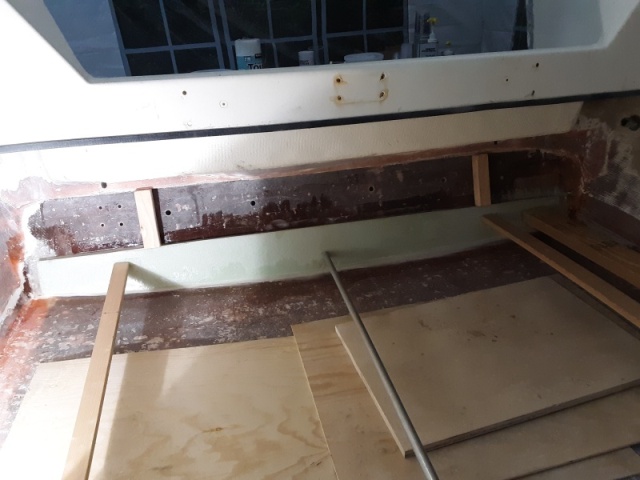
Okay, really got some stuff done today: All glasswork inside the cabin is done!
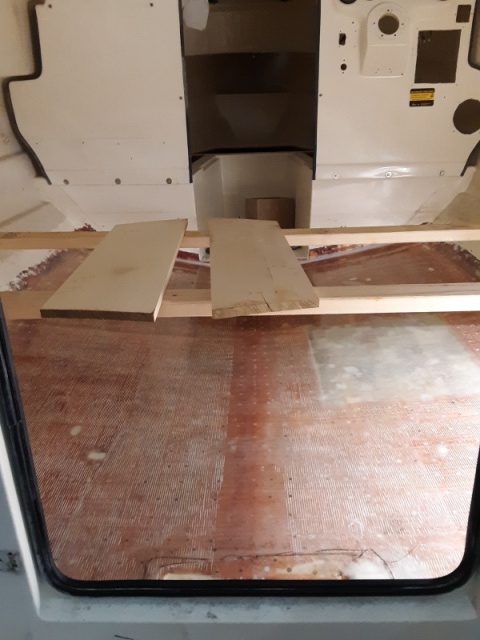
There is one layer of 6oz glass cloth over the entire sole. But, I cut my two pieces for the floor a foot too wide each, so the area where the aisle is there is two layers overlapping. Also, added reinforcement to both bulkheads by putting a fillet and glass on the bulkhead to floor joint. 2" 6oz tape over the fillet, and then 4" 6oz tape over that. I felt this would help tie the floor into the bulkheads, and give it a little more strength. I also put 2" tape followed by 4" tape along each side where the floor and hull meet, just because I could. I also added a lot of glass tape to the sump area.
I feel that this may have been overkill, but I want a rock solid hull that I can depend on. The aft bulkhead in particular was showing stress cracks at the bottom where is was bonded to the hull.
This took pretty much all day. Some final fairing this morning, then a lot of prep work, cutting glass, make scaffold, get everything ready. I had the wife mixing epoxy for me, which was a huge help, and this took 4 hours from the time we mixed the first batch till it was pretty much done. The scaffold was absolutely necessary. It's been about two hours now and I am going to go roll another coat of epoxy over it before it blushes. I am super pleased with how this turned out, it went way better than expected and I am super happy to have this part done. Next up will be the cockpit and transom. I feel that I gained some good experience here, but the cockpit is going to be a lot of work...
Lots more pics in the album:
http://www.c-brats.com/modules.php?set_albumName=Core-rot-repair&id=20210418_163802&op=modload&name=gallery&file=index&include=view_photo.php |
|
| Back to top |
|
|
thataway
Joined: 02 Nov 2003
Posts: 20808
City/Region: Pensacola
State or Province: FL
C-Dory Year: 2007
C-Dory Model: 25 Cruiser
Vessel Name: thataway
Photos: Thataway
|
| Posted: Mon Apr 19, 2021 12:27 pm Post subject: |
|
|
| Nicely done. Yes, there is always a learning curve with this type of work. |
|
| Back to top |
|
|
Robert H. Wilkinson
Joined: 26 Jan 2011
Posts: 1234
City/Region: Port Ryerse
State or Province: ON
Vessel Name: Romakeme IV
Photos: Romakeme IV
|
| Posted: Tue Apr 20, 2021 8:58 am Post subject: |
|
|
| clayhubler wrote: |
I purchased a 90 degree air die grinder for this project, and I absolutely love it. |
We have been using these extensively in auto body for about the last 20 years. I found the 2" discs easiest to use. Because of the angle gearing they will not last as long as the straight die grinders. I have one of the straight ones(Mac tools) that is 30 years old and has hundreds of hours use. The angle ones I replaced about every 2 years. Use air tool oil every time - but only about 2 drops. If you use too much it will spray out get on your work and affect adhesion. It also greatly increases tool life expectancy if you have an air drier.
We also use the 3M masks with those pink filters. Some guys get a reaction from the latex if using them for long periods.
You are doing an excellent job. I have enjoyed following your documentation, except some days I get tired just knowing how much work this is!
Regards,
Rob
_________________
Talk to me and I will listen-- but if its not about boats or fishing all I will hear is bla,bla,bla,yada,yada,zzzzzzzz |
|
| Back to top |
|
|
clayhubler
Joined: 03 Aug 2019
Posts: 280
City/Region: La Center
State or Province: WA
C-Dory Year: 2003
C-Dory Model: 22 Cruiser
Vessel Name: Hammerhead
Photos: Hammerhead
|
| Posted: Tue Apr 20, 2021 2:07 pm Post subject: |
|
|
| Thank you, Rob. I really hope that I do not wear out any of these tools, because that would mean I did a lot more grinding than I want to think about! |
|
| Back to top |
|
|
clayhubler
Joined: 03 Aug 2019
Posts: 280
City/Region: La Center
State or Province: WA
C-Dory Year: 2003
C-Dory Model: 22 Cruiser
Vessel Name: Hammerhead
Photos: Hammerhead
|
| Posted: Tue Apr 20, 2021 2:24 pm Post subject: |
|
|
I want to try my hand a making a mold and then making a part with a compound curve, so I was hoping for some info about chopped strand mat and epoxy.
I know that polyester resin dissolves the binder in csm and allows it to conform, but I thought there are csms that are compatible with epoxy, too. My understanding is they are only compatible, and that the binder is not really dissolved, and the layup may be more difficult and not wet out fully. If anybody could advise on this it would be appreciated.
I also think I read somewhere about being able to epoxy over polyester, but you should not try to apply polyester over epoxy???
And I believe there are laminating resins and finishing resins??? Laminating resins will not fully cure by themselves.
If I could use the epoxy I already have (west system) it would simplify this, I think. I know the polyester is a lot less expensive. I think the factory uses polyester.
If anybody has any info to add or if anything I said is incorrect I would love to hear about it!
Thanks all |
|
| Back to top |
|
|
thataway
Joined: 02 Nov 2003
Posts: 20808
City/Region: Pensacola
State or Province: FL
C-Dory Year: 2007
C-Dory Model: 25 Cruiser
Vessel Name: thataway
Photos: Thataway
|
| Posted: Tue Apr 20, 2021 10:37 pm Post subject: |
|
|
Here is the definitive information on epoxy and mat. This is from West Systems "Epoxy works":
| Quote: | Can WEST SYSTEM® epoxy be used to wet out chopped strand mat? The answer is yes. The fiberglass strand in mat wets out with epoxy, but the binder holding things together does not dissolve. (It does get put into suspension and is sealed in the cured epoxy.) This undissolved binder causes the wet-out mat to remain a bit stiff compared to wet out with a styrene-based resin. For gently curving or flat projects like cabin soles or plywood decks, mat and epoxy should work fine. The fabric does not wet out perfectly clear with epoxy. Wet-out clarity of mat with epoxy varies somewhat with different suppliers, but none of them wet out as clear as a good 4 oz or 6 oz fiberglass cloth.
The texture of the chopped strand mat is quite rough given its random fibers (many of which come loose when epoxy is applied). Mat requires a number of coats of epoxy to fill the profile at the surface. 879 Release Fabric can be applied over the freshly wet-out mat to compress the fibers and minimize the need for many of the buildup coats. Using release fabric in this way will result in a much smoother surface, and if you are going to allow the epoxy to cure before continuing, the surface is ready for buildup coats of epoxy or fairing putty after the release fabric is removed.
4 mil plastic sheeting can also be used over the still uncured epoxy and mat to compress the fibers. Trapped air bubbles can be removed by piercing or slitting the plastic over the bubble before the epoxy begins to cure. If the plastic was clean when it was applied, you can pull the plastic after the epoxy cures to a hard gel and apply epoxy fairing putty or buildup coats of epoxy later the same day. If you allow the epoxy to cure hard before pulling the plastic, be sure to sand the surface completely dull before applying more epoxy.
When choosing chopped strand mat to be used with epoxy, look for mat that is soft and pliable. Some forms are quite stiff and may cause problems wetting out with epoxy. Stiff mat is often older stock and the fibers may take more time to wet out with epoxy.
|
It answers most of your questions. The vinyl ester resin is often used these days as a first few layers of laminate to help prevent blistering. It is less permeable to water than is Polyester resin. Vinyl Ester is also a better adhesive on secondary bonding. Polyester is poor in secondary bonding and Epoxy is best.
I have never molded anything (except flat surfaces like table tops and trays) with epoxy--I have always used polyester for molding using CSM (and cloth) . I use epoxy for repair because if its better secondary bonding. Some people use polyester--I have seen several of these repairs fail.
Laminating resin does not have wax in it--you can get it to cure by applying it against the waxed surface of a mold, by covering with occlusive material, or spraying with PVA (which is what I have used). Finish resin has wax which floats to the surface and occludes the air (oxygen)
With carbon fibers and some other exotics boats are manufactured with epoxies. (Think the multi million dollar America's cup or Around the World solo racing boats.) For the most part most other production boats are polyester.
What are you molding? You will have to have a 'non stick" surface that you are laying up against. You can highly wax with molding wax or spray wax, There are tapes which are used specifically for epoxy molds (like table tops etc--"Tuck tape", house sheathing tape or Epoxy molding tape.). You are going to have to make the mold--and either cover it with tape or release sheeting or use something like HDPE (Starboard type of material) with epoxy mold release sprayed over it.
With any mold, you have to have the surface perfect, and then waxed--that way the item you are molding will have a perfect finish. The finish can be sanded and painted--or even gel coated. A vinyl Ester resin gel coat is available. Or..you can use polyester gel coat over epoxy--either by using several techniques, or a tie coat. All of this depends on what you are molding and what the external appearance needs to be.
If it were going to be subject to stresses and out in the elements, etc I might consider spraying polyester gel coat and then laying up polyester resin or vinyl ester resin. |
|
| Back to top |
|
|
clayhubler
Joined: 03 Aug 2019
Posts: 280
City/Region: La Center
State or Province: WA
C-Dory Year: 2003
C-Dory Model: 22 Cruiser
Vessel Name: Hammerhead
Photos: Hammerhead
|
| Posted: Wed Apr 21, 2021 5:42 pm Post subject: |
|
|
| thataway wrote: |
What are you molding? |
The boat is totally stripped right now, so I'm going to take the time to set it up with anything and everything I want, which includes propane in the port lazarette. I found two 5lb bottles that will fit in there with a slight modification, they are a little too tall. I want to make a couple of round molded drop down pockets, or holsters for the tanks, almost like large cupholders. I don't really know what to call them. Help keep the tanks in place. There is room above the fuel tank from what I can tell, I only need a couple inches. There are easier ways to do this, but I think this would be a neat project and good experience learning about polyester and making molds. The finish doesn't have to be great. I was thinking about turning the shape that would become the mold on the wood lathe and then epoxy coating it, sanding, waxing, ect. There will be sharpish corners, so I think I may have trouble getting the csm to lay over the corner with epoxy. I'm going to give this a try.
So, if I use laminating resin, I can use a surfacing agent (wax) or PVA to get it to full cure. Or I can use a finishing resin, since the part is small, and make it all at once, and it should cure. Correct? The pva can also be used as a mold release agent?
Thank you Dr. Bob for your help and advice.
I'm very excited to get this boat back on the water, it has been beautiful lately. I'm going to take some time off work soon, so I can get this finished up in time for our florida keys trip in july. |
|
| Back to top |
|
|
thataway
Joined: 02 Nov 2003
Posts: 20808
City/Region: Pensacola
State or Province: FL
C-Dory Year: 2007
C-Dory Model: 25 Cruiser
Vessel Name: thataway
Photos: Thataway
|
| Posted: Wed Apr 21, 2021 6:22 pm Post subject: |
|
|
Yes you can use an occlusive agent to allow the laminating resin to fully cure. You can work CSM into corners, but I probably would use cloth if you go with epoxy. You might use PVC pipe for the mold--if the size is close. That could be waxed and then be one surface. If not you can bend a formica type of laminate, or masonite (finished surface) is used to make mold parts. I suspect that you could use acrylics or the HDPE if heated and pre-molded into the shape.
The current technique for making large molds (and small, if you have the tool) is to use a computerized router and made the mold out of foam and using a 5 axis computer driven router. Put the coating over the foam, PVA and then make the mold directly. |
|
| Back to top |
|
|
clayhubler
Joined: 03 Aug 2019
Posts: 280
City/Region: La Center
State or Province: WA
C-Dory Year: 2003
C-Dory Model: 22 Cruiser
Vessel Name: Hammerhead
Photos: Hammerhead
|
| Posted: Mon May 03, 2021 1:48 am Post subject: |
|
|
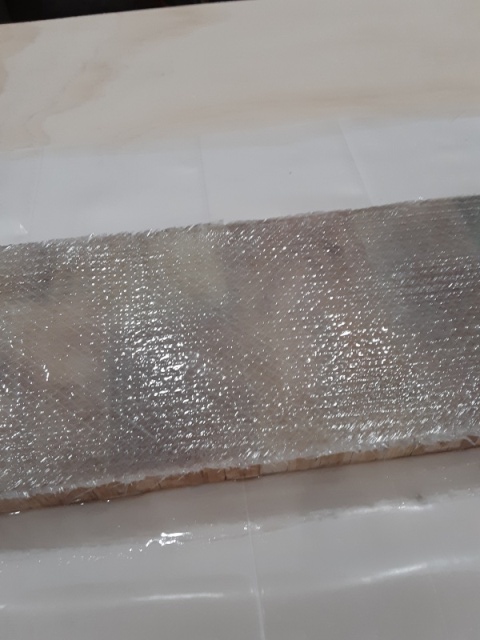
Yesterday I made solid glass panel out of 1708 and today I epoxied it to the lower part of the transom instead of balsa. There are so many holes that get drilled in this part of the transom that I will just feel better knowing that there is no wood there. So the screws for the transducer, trim tabs, and the drain plug will all be into solid glass. In case you are wondering, yes, this did use a lot of glass and epoxy. Much more that I thought.
But, I'm happy with it. I am going to be working on the boat hot and heavy for a while, so hope to splash this thing sometime in june. I have some of the thick panel left over and when I do the balsa I am going cut in 4 pieces of the solid glass where the lower bolt mounting holes for the engines go so there will be no potential for water intrusion there either. Anything that is going to be below the water line and have a penetration is going to be solid.
Here is pic of the piece bonded into the boat. More pics are in the album with captions:
http://www.c-brats.com/modules.php?set_albumName=Core-rot-repair&id=20210501_124903&op=modload&name=gallery&file=index&include=view_photo.php
 |
|
| Back to top |
|
|
thataway
Joined: 02 Nov 2003
Posts: 20808
City/Region: Pensacola
State or Province: FL
C-Dory Year: 2007
C-Dory Model: 25 Cruiser
Vessel Name: thataway
Photos: Thataway
|
| Posted: Mon May 03, 2021 9:26 pm Post subject: |
|
|
| You will have the strongest and best Buil C Dory. Probably last over 100 years! Thanks again for the updates. |
|
| Back to top |
|
|
|
|
You cannot post new topics in this forum
You cannot reply to topics in this forum
You cannot edit your posts in this forum
You cannot delete your posts in this forum
You cannot vote in polls in this forum
You cannot attach files in this forum
You cannot download files in this forum
|
|
 Search
 Private Messages
 Profile
 Log in
 Register
 Help
Help
