| View previous topic :: View next topic |
| Author |
Message |
Major Tom
Joined: 04 Jul 2016
Posts: 80
City/Region: Saratoga Springs
State or Province: NY
C-Dory Year: 2005
C-Dory Model: 22 Cruiser
Photos: Major Tom
|
 Posted: Mon May 14, 2018 10:42 pm Post subject: Is this a shift rod seal on Honda 90... easy replacement? Posted: Mon May 14, 2018 10:42 pm Post subject: Is this a shift rod seal on Honda 90... easy replacement? |
 |
|
I was changing the impeller/water pump today (first time, pretty easy), and noticed the shift rod seal is really gone. ( Very surprised I haven't got water intrusion into the gear case yet!)
There are 2 photos of it in my Album (click Major Tom on the left)
1. There are 2 potential parts I found online, pretty sure it's the "Water Seal" part #91254-ZY3-003. Am I right? And on the diagram it appears that I need 2... anyone know if that's correct?
2. Anyone know how to replace it? I'm guessing I just pry it out and slide the new one(s) down. But I read somewhere online that it can be tricky and there's a catch or clamp inside, so it's not that simple...? Not sure if I'm up for dismantling the gear case itself.
It's a 2005 Honda BF90A5 XRTA.
Many thanks!
PS I've read everything about posting pics but still can't seem to do it! Paste the photo url from my album, highlight it and click Img. Still doesn't work...? What am I missing?
_________________
Tom Whitten
2005 C-Dory 22 Cruiser/90HP Honda
1993 Sea Ray 230 Sundancer (sold)
1987 Checkmate Enticer (sold)
1986 Sea Nymph (sold) |
|
| Back to top |
|
 |
Major Tom
Joined: 04 Jul 2016
Posts: 80
City/Region: Saratoga Springs
State or Province: NY
C-Dory Year: 2005
C-Dory Model: 22 Cruiser
Photos: Major Tom
|
| Posted: Mon May 14, 2018 11:27 pm Post subject: |
|
|
Ahhh.... the "Disable code for this topic" is always ON by default. 
here are the pics...
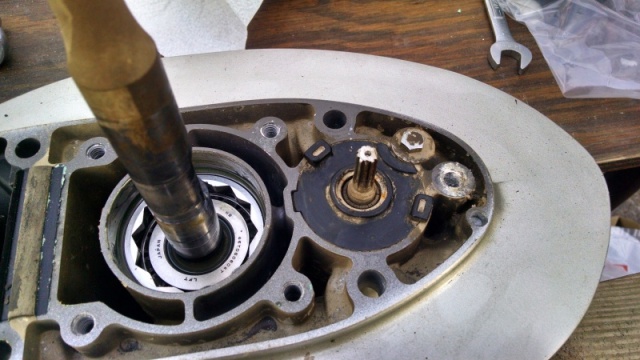
here's a wide shot, the shift rod is toward the right, the small rod:
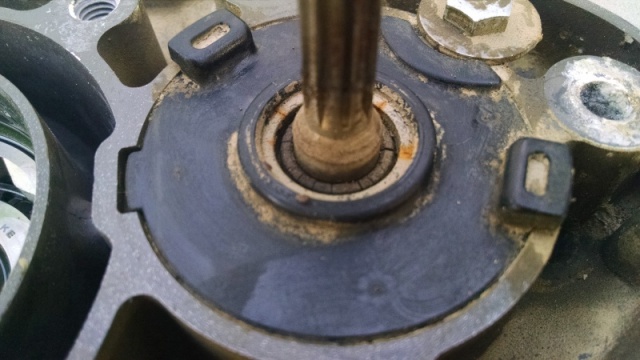
Closeup of the cracked seal:
 |
|
| Back to top |
|
|
Almas Only
Joined: 09 Nov 2003
Posts: 362
City/Region: Richmond
State or Province: VA
C-Dory Year: 2003
C-Dory Model: 22 Cruiser
Vessel Name: Alma's Only
Photos: Alma's Only
|
| Posted: Tue May 15, 2018 7:25 am Post subject: |
|
|
Looks like you've got the right part number. My 2003 has a different one, and only uses a single seal. They changed to two seals sometime around there, and apparently changed the part number too, since the exploded diagram at boats.net shows two for 2005 models with the part number you have. Here's what I suggest: buy two, since they're cheap. If you need both, use them. If you only need one, you've got the part on hand for the next time. Or, just pull the housing before ordering the part, and see how many you need. Pulling the housing and seal is simple.
First, put a clean rag over the main drive shaft opening to keep anything from entering the visible bearing at the top of the lower unit.
Then, scrape and vacuum all loose material from the top of the black plastic shift cover and wipe the shift shaft, remove the single retaining bolt and washer, and gently pry the cover up using a screwdriver under the two pry lugs. Hold the shift shaft in place, and lift the cover up over the shaft so you can remove the seal(s) with gentle pushing up from the underside and/or gently prying using a screwdriver, or better yet, a seal puller available for next to nothing at any auto parts store. BE CAREFUL PRYING ON THE PLASTIC COVER, AND BE SURE TO NOTICE THE ORIENTATION OF THE SEALS (FACE OR SPRING SIDE UP), WRITE IT DOWN, AND INSTALL THE NEW SEAL(S) IN THE SAME ORIENTATION. Put it back together, and you're good to go.
_________________
2003 CD22 Cruiser with Honda 90 |
|
| Back to top |
|
|
srbaum
Joined: 30 Aug 2010
Posts: 887
City/Region: Portsmouth
State or Province: VA
C-Dory Year: 2007
C-Dory Model: 26 Venture
Vessel Name: Osprey
Photos: Osprey
|
| Posted: Tue May 15, 2018 8:38 am Post subject: |
|
|
Major Tom,
Concur with Dave Paxton's comments. I just did my lower unit seals two months ago, due to milky color, noted when I drained the oil. In addition to the shifter seal (don't forget to also get a new o'ring for the shift seal housing), it is also a good time to replace the seals (two), below the water pump housing. Also do an inspection of the prop seal as well. Once I had the parts in hand, it only took about 1 hour of work from start to finish, to change all of my lower unit seals.
The key to easy assembly of parts and the lower unit remounting, is grease on everything. I have found a grease that is synthetic and can be applied to everything, without fear of rot of rubber products, like petroleum based grease. The grease is available at most auto supply shops and is manufactured by Omni and called Green Grease (it is a true waterproof grease). Green Grease was recently given the highest ratings by Practical Sailor (a consumer report magazine).
_________________
Steve Baum
Homeport of Portsmouth, VA
OSPREY (Ex Mister Sea) 2000 22 C-Dory 2010 - Sold 3/19
OSPREY (Ex ADITI) 2007 26 Cape Cruiser 2018 |
|
| Back to top |
|
|
Major Tom
Joined: 04 Jul 2016
Posts: 80
City/Region: Saratoga Springs
State or Province: NY
C-Dory Year: 2005
C-Dory Model: 22 Cruiser
Photos: Major Tom
|
| Posted: Tue May 15, 2018 9:01 am Post subject: |
|
|
Thank you both, that's exactly what I was looking for. And yeah, I was going to order the 2 seals anyway, and that's a good idea to get the o ring for the housing and seals for under the water pump... and the prop.
Yes, Green Grease is amazing!
Again, many thanks... the C-Brats always come through! |
|
| Back to top |
|
|
Almas Only
Joined: 09 Nov 2003
Posts: 362
City/Region: Richmond
State or Province: VA
C-Dory Year: 2003
C-Dory Model: 22 Cruiser
Vessel Name: Alma's Only
Photos: Alma's Only
|
| Posted: Tue May 15, 2018 9:11 am Post subject: |
|
|
Steve: Thanks for mentioning the o-ring. I came back on to include that, and see that you'd already done so.
David |
|
| Back to top |
|
|
Major Tom
Joined: 04 Jul 2016
Posts: 80
City/Region: Saratoga Springs
State or Province: NY
C-Dory Year: 2005
C-Dory Model: 22 Cruiser
Photos: Major Tom
|
| Posted: Tue May 15, 2018 9:37 am Post subject: |
|
|
BTW, any trick to pulling the 2 seals under the water pump housing? As usual, I can't seem to find any info on that specific process for this engine.
It looks like there's a nut above the seals, I think it's the part in the pic with the printing etched into it. I'm guessing it's finger tight and I just grab it, or gently use pliers? But it also looks like i might need a special tool for that outer ring that looks like a box wrench... which I believe holds the bearings in place?
I'd put everything back together yesterday so I can't just take a look, I should have left it apart! |
|
| Back to top |
|
|
Almas Only
Joined: 09 Nov 2003
Posts: 362
City/Region: Richmond
State or Province: VA
C-Dory Year: 2003
C-Dory Model: 22 Cruiser
Vessel Name: Alma's Only
Photos: Alma's Only
|
| Posted: Tue May 15, 2018 10:48 pm Post subject: |
|
|
Tom, that thing in the photo with etching is a bearing, and it's the last thing you want to mess with.
The water pump seals to the lower unit housing, just above the bearing, via an o-ring, and to the shaft via two stacked seals. You can find them on boats.net |
|
| Back to top |
|
|
Major Tom
Joined: 04 Jul 2016
Posts: 80
City/Region: Saratoga Springs
State or Province: NY
C-Dory Year: 2005
C-Dory Model: 22 Cruiser
Photos: Major Tom
|
| Posted: Wed May 16, 2018 9:12 am Post subject: |
|
|
Thanks. Yes, I've been looking at the diagrams on boats.net. But I guess what has me still scratching my head are those 2 seals and o ring for the drive shaft, as shown here, parts 32 and 36:
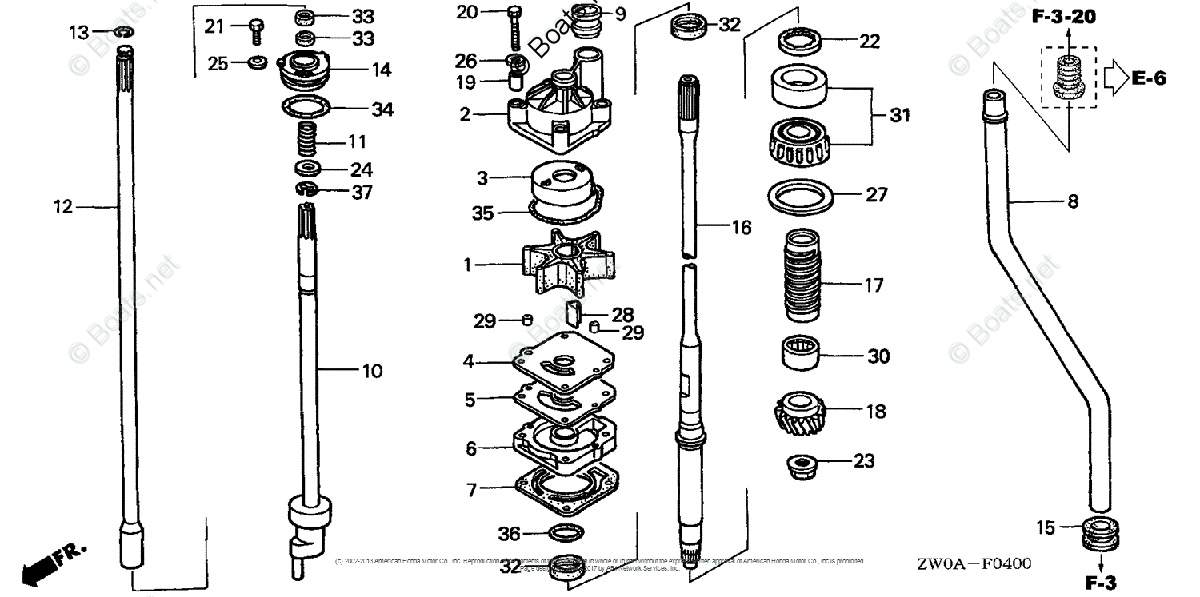
The photo in my post above, was taken right after I lifted the old water pump out. I didn't see 2 seals or o ring anywhere... and not stuck to the bottom of the old pump housing either, or inside. So that's why I'm scratching my head on this. And apparently they're not visible in my pic either. So where are they? Hmmm.
I replace gear oil in Spring and in Fall and haven't had any water intrusion into the gear case, so they have to be there. Well, I'm waiting on delivery of all the lower case seals, so when I get them I'll open it back up and try to figure out where the heck those seals are.
Thanks! |
|
| Back to top |
|
|
Major Tom
Joined: 04 Jul 2016
Posts: 80
City/Region: Saratoga Springs
State or Province: NY
C-Dory Year: 2005
C-Dory Model: 22 Cruiser
Photos: Major Tom
|
| Posted: Wed May 16, 2018 9:53 am Post subject: |
|
|
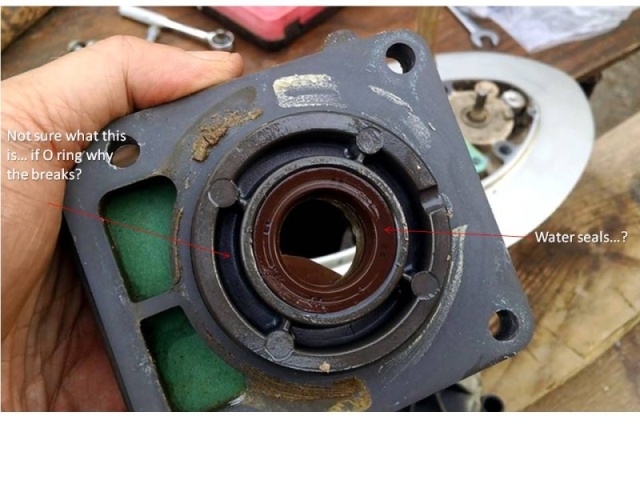
OK, I feel dumb.  Just checked the video I shot when disassembling... on the bottom of the housing (part 6, which is not included in the water pump kit) I see a red ring which I think is the water seal. Not sure about the O ring, there's a black rubber-looking ring, but if that's the O ring I don't see why there would be those 4 visible breaks, near the 4 round castings. Maybe that metal ring pulls out and the o ring is underneath. Oh well, I'll pull it apart when I get the seals but at least I have a much better idea now. Thanks again for the help. Just checked the video I shot when disassembling... on the bottom of the housing (part 6, which is not included in the water pump kit) I see a red ring which I think is the water seal. Not sure about the O ring, there's a black rubber-looking ring, but if that's the O ring I don't see why there would be those 4 visible breaks, near the 4 round castings. Maybe that metal ring pulls out and the o ring is underneath. Oh well, I'll pull it apart when I get the seals but at least I have a much better idea now. Thanks again for the help.
 |
|
| Back to top |
|
|
Almas Only
Joined: 09 Nov 2003
Posts: 362
City/Region: Richmond
State or Province: VA
C-Dory Year: 2003
C-Dory Model: 22 Cruiser
Vessel Name: Alma's Only
Photos: Alma's Only
|
| Posted: Wed May 16, 2018 12:06 pm Post subject: |
|
|
| You'll see the o-ring when you take the water pump off. It seals between the outer diameter of the cylindrical shoulder on the bottom of the water pump, and the housing for the lower unit. You can't see it in the photo, but if you tilt the pump 45 degrees, you can't miss it. The surface you're mistaking it for is actually metal, and part of the water pump casting. Hang in there. |
|
| Back to top |
|
|
Major Tom
Joined: 04 Jul 2016
Posts: 80
City/Region: Saratoga Springs
State or Province: NY
C-Dory Year: 2005
C-Dory Model: 22 Cruiser
Photos: Major Tom
|
| Posted: Wed May 16, 2018 12:12 pm Post subject: |
|
|
Thanks Almas, really appreciate the help! OK, that must be the O ring that came with the impeller/pump kit and I installed that. It fit around the outer edge of the pump, in a groove for the o ring. I'm sure it will all make sense when I pull it apart to do the other seals. Thanks!
One of these days I should spring for the $85 Shop Manual! |
|
| Back to top |
|
|
journey on
Joined: 03 Mar 2005
Posts: 3598
City/Region: Valley Centre
State or Province: CA
C-Dory Year: 2005
C-Dory Model: 25 Cruiser
Vessel Name: journey on
Photos: Journey On
|
| Posted: Wed May 16, 2018 1:10 pm Post subject: |
|
|
Wow, you're doing all this without a shop manual?
The $85 dollars (thereabouts) I spent on the Honda 150 shop manual was the best investment since I married Judy. It has complete drawings on every assembly and the proper way to do it. Honda outboard Shop Manual.
Boris |
|
| Back to top |
|
|
Major Tom
Joined: 04 Jul 2016
Posts: 80
City/Region: Saratoga Springs
State or Province: NY
C-Dory Year: 2005
C-Dory Model: 22 Cruiser
Photos: Major Tom
|
| Posted: Wed May 16, 2018 1:21 pm Post subject: |
|
|
| Yeah... surprisingly I haven't really needed the shop manual yet... until now. I've been working on engines since I was 10 so I just start taking things apart! The internet also has a ton of great info, of course. But this latest endeavor has me thinking it's time! |
|
| Back to top |
|
|
Major Tom
Joined: 04 Jul 2016
Posts: 80
City/Region: Saratoga Springs
State or Province: NY
C-Dory Year: 2005
C-Dory Model: 22 Cruiser
Photos: Major Tom
|
| Posted: Wed May 23, 2018 2:28 pm Post subject: |
|
|
In case it helps someone, I finally got the seals delivered, installed them on the drive shaft on the shift rod... very easy job. Couldn't get the shift rod holder off, the black plastic circular part you pry off, in the pic. There's an O Ring under there I wanted to replace while I was at it.
Tried PB blaster (carefully so it didn't go into case), tapping, tried to rotate it a hair... all no avail. I was afraid I'd break it and I didn't have the part, so I'm going to order that...it's part # 24343-ZW1-B01, item 14 in the diagram.
So if you do this you probably want to order that part too.
Thanks again for the help! |
|
| Back to top |
|
|
|
 Search
 Private Messages
 Profile
 Log in
 Register
 Help
Help
