| View previous topic :: View next topic |
| Author |
Message |
Marco Flamingo
Joined: 09 Jul 2015
Posts: 1155
City/Region: Seattle
State or Province: WA
C-Dory Year: 2004
C-Dory Model: 16 Cruiser
Vessel Name: Limpet
Photos: Limpet
|
 Posted: Wed Aug 31, 2016 7:21 pm Post subject: CD 16 ground tackle update Posted: Wed Aug 31, 2016 7:21 pm Post subject: CD 16 ground tackle update |
 |
|
After spending a lot of nights on the hook this summer, I've changed my ground tackle. My lightweight Danforth style Guardian anchor is now my backup. Reason being is that without a length of chain I had difficulty getting it to set. I would have liked to keep the weight out of the bow, but I went with the smallest Vulcan anchor (9#). It fits perfectly on the stock bow roller and is self launching.
I have also replaced my rode. I originally went with sinking line (basic leaded crab pot line) with a length of stainless steel wire spliced in for abrasion resistance. I really want to avoid any chain, as it won't work with my manual launching system. Chain is the go-to solution for most boats and I loved it on my big boats when I had a winch. But manually hauling in chain is different than pushing the winch button.
What I found out was that the leaded crab line gave negative buoyancy, but just barely. And the length of SS wire might be good for abrasion resistance, but it wasn't heavy enough to help set the anchor. Even with the Vulcan, I had to let out about 10:1 to get it to set and then usually bring some rode back in so that I could reduce swinging into the beach. When I got the anchor to set, I was concerned as to what it might do on the reverse tide. Light ground tackle makes for light sleeping.
My new setup is a leaded line that is generally used as the sink line on the bottom of a seine net or similar. Instead of a thin thread of lead inside of 5/16" polypro rope like a crab pot line, this has chunks of pencil lead inside of a 1/2" 8-plate rope. I had a big spool of it from another project and thought a long time about trying it. I don't remember the exact specs, but it's classified by pounds per fathom. My @140 feet of leaded anchor line weighs about 30#. It stores on a plastic reel intended to be used for large extension cords.
The anchor rode is spliced directly to a D shackle on the anchor. No abrasion resistance, so I'll have to stay away from coral heads. I think I can do that. And I'll have to inspect it regularly. Now I just have to see how it works. Pictures when I find my camera.
Mark |
|
| Back to top |
|
 |
spuncopper
Joined: 02 Sep 2012
Posts: 196
City/Region: Camden/ Lake Wateree
State or Province: SC
C-Dory Year: 2007
C-Dory Model: 16 Cruiser
Vessel Name: Sock Monkey
Photos: Sock Monkey
|
| Posted: Thu Sep 01, 2016 10:02 am Post subject: CD 16 ground tackle |
|
|
Hey Marco Flamingo,
The forward bulkhead on my 2007 CD 16 Cruiser is 3/4 inch plywood with a very thin coat of what appears to be epoxy paint on both sides. It is held in place with four small S/S (?) clips and glassed in. I cut a 11-3/4" X 10-3/4" access opening through the bulkhead to convert the area forward of it into a "chain locker" for my ground tackle.
After removing the sprayed in floatation foam (less than 2.5 cu. feet), I made a removable pvc lumber shelf to provide a smoother platform for the anchor rode and chain. It holds 150' of 3/8", three strand nylon anchor line and 10' of 3/16" anchor chain.
The bitter end is secured with a 1/4" shackle through a piece of 1-1/2" X 1-1/2" X 3/16" X 4" aluminum angle through bolted to a 1-1/2 X 3/16" X 4" aluminum backing plate.
The access opening is closed with a piece of 3/16" aluminum plate cut to 12-3/4" X 11-3/4". This was screwed to the bulkhead with 16 number 8 X 1" S/S wood screws. I used Locktite Marine Adhesive Sealant all the way around the access plate and dipped each screw in it prior to installation.
I installed a Whitecap Hinged Rope/Chain Pipe bedded with the Locktite sealant. I used Locktite Marine Epoxy to seal where I hole sawed through the deck. I installed a Marine Anchor Lock just behind the Anchor roller. My winter project is to replace the foam floatation under the bunk, just aft of the fiberglass bow strength member that that also makes up the bunk support
At present I'm using a Danforth type #9 anchor. I usually anchor in a two point moor to prevent swinging. My stern anchor is the same as the bow and I use a "Y" bridle made up of 1/2" braided poly and 10' of 3/16 anchor chain. The "Y" bridle also serves as a towing bridle, thus the reason I choose the 1/2" braided Poly since it floats.
I do enjoy your threads and constantly learn.
Spuncopper |
|
| Back to top |
|
|
Jackie
Joined: 18 Oct 2015
Posts: 98
City/Region: Ketchikan
State or Province: AK
C-Dory Year: 2008
C-Dory Model: 16 Cruiser
Vessel Name: Lil' Bit
Photos: Lil Bit
|
| Posted: Thu Sep 01, 2016 4:10 pm Post subject: |
|
|
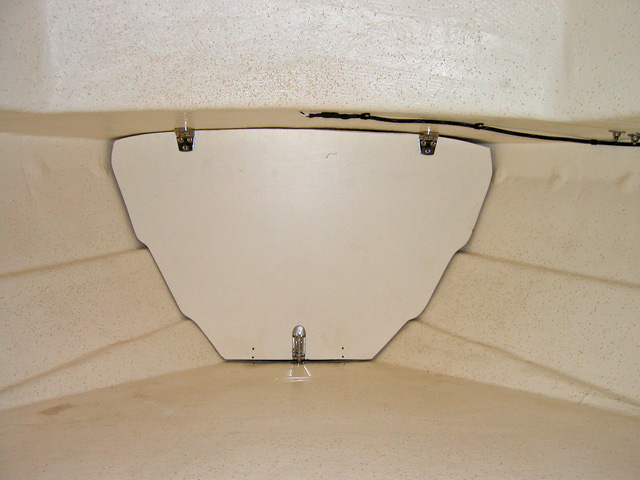
Good write-up, Spuncopper; I can visualize just what you did. Along with the Limpet's album, I love to peruse the modifications in Oldgrowth's album, C-Voyager. It is another 16 and has a similar anchor set up to what you describe, except he didn't make a platform within the space to hold the line, he put in a bucket. Just like you, he put the cover back on so that the set up is hidden and held in place. Here are two shots, but he has many more in the album.
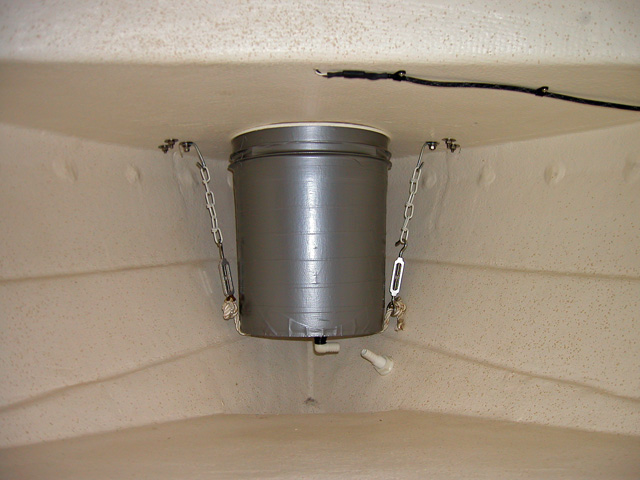
In the first shot you can see where his drain line connects. Did you put a drain in yours? It sounds like you sealed up the opening you made, so is there a place for any water that comes up with the anchor line to escape? It probably isn't much so might not even matter. I can't remember if the space in my old 22 had drain or not.
I like your and C-Voyagers approachs a lot, but what I like about Mark's is that by keeping the anchor storage low he saved most of the foam flotation. If I get my side gas tanks in I'll be removing quite a bit of foam and it seems imprudent to go about removing all of it! When you said you were going to replace the foam below the vee-berth platform, did you mean you were going to move what you took out for the anchor locker down to that space? If so, be sure to post photos!
Jackie |
|
| Back to top |
|
|
spuncopper
Joined: 02 Sep 2012
Posts: 196
City/Region: Camden/ Lake Wateree
State or Province: SC
C-Dory Year: 2007
C-Dory Model: 16 Cruiser
Vessel Name: Sock Monkey
Photos: Sock Monkey
|
| Posted: Thu Sep 01, 2016 9:18 pm Post subject: CD 16 ground tackle |
|
|
Hey Jackie,
The foam in my boat was sprayed in and it didn't fill the space completely. I had to use a sheetrock handsaw, a hacksaw blade and scraper to get it all out. It didn't even fill a 30 gallon trash bag.
As far as a drain I'm planning on installing one when I go to secure the foam under the bunk. I wasn't able to get up under it to do so earlier due to surgery on my neck and I didn't have a lot of mobility to crawl up under there then. Cutting the foam out took several days as I had to work for short periods of time. Left a little rust colored DNA in there, too.
Thanks for the pictures of the other 16's anchor installation, it's great to share ideas.
Spuncopper |
|
| Back to top |
|
|
Marco Flamingo
Joined: 09 Jul 2015
Posts: 1155
City/Region: Seattle
State or Province: WA
C-Dory Year: 2004
C-Dory Model: 16 Cruiser
Vessel Name: Limpet
Photos: Limpet
|
| Posted: Fri Sep 02, 2016 11:43 am Post subject: |
|
|
My front bulkhead was like Sea Voyager. You can see the screw holes on the bottom of the bulkhead where the original el brackets were attached to the V berth. The top hinges cover the upper el bracket holes (with the original upward screws into the underside of the deck piercing the balsa core. Grrrrrr). I decided that I did not need quick access to that area so I caulked the panel back in place, sprayed it with the insulating coating, and painted it.
So far, my pulley system has caused no problems and I don't need access. The wet anchor rode comes aboard, goes down through the forepeak area, and out under the V berth. The rode is wet, but I have a rubber deck grate that takes care of up to an inch of water aboard. I occasionally get some eel grass or acid kelp all the way into the cockpit, but I'm willing to put up with some housekeeping for the convenience of not having to go on deck to drop or retrieve the anchor.
One of my reasons for sealing up that area was to help with sound insulation. The smaller the unsupported hull area, the less noise aboard. That little bulkhead, and the V berth, are the only things that keep the entire front of the CD 16 from being a giant drum. I was surprised at the noise when I got my 16 (my first glass power boat). It reminded me of portaging an aluminum canoe and running into a tree. Like having my head inside a bucket.
The wham slap might not bother some, but I wasn't used to it and didn't want to get used to it. I sealed the forward EPS blocks back into place with spray foam to make a solid block of foam in the bow, put the bulkhead in place and shot more foam in, and then used a lot of caulk to secure the bulkhead in place. I also climbed under the V berth, prior to installing the gas tank, and put a big bead of foam in the crease between the hull and the V berth panel. It's basically wasted space, it helped add some flotation low in the boat, and it quieted the slapping when on plane.
I also foamed into place the other EPS blocks behind the cockpit panels for the same reasons. It shortened the undampened hull area by several feet. I have still less overall flotation (bummer), but the unsupported panel areas are now dampened by foam injected around the EPS blocks. Originally, they were just loose. I probably used about two cans. These were the larger cans that fit on a foam gun and allow multiple uses.
If you use a can from the hardware store, you have to immediately clean it with acetone after each use or else do all of your foam work at one time. If you need to foam in remote places (likely), you can buy a length of clear vinyl tubing, like aquarium air hose, that fits on the can. Feed the hose into the area, spray while slowly removing the hose, and the foam expands to fill the void. You may need to cut a new length several times. It takes some practice and you don't really get to "practice" with spray foam.
Ooops. I got off topic.
Mark |
|
| Back to top |
|
|
AstoriaDave
Joined: 31 Oct 2005
Posts: 994
City/Region: Astoria
State or Province: OR
|
| Posted: Fri Sep 02, 2016 4:14 pm Post subject: |
|
|
Mark,
Off topic or on topic, I read everything you post: authoritative, fact-based, and every area where I have similar expertise, your analysis and advice jives with mine. Plus minimal nonboating BS. You are in the "must read" clique, for me, anyway.
Keep it up.
_________________
Dave Kruger
Astoria, OR |
|
| Back to top |
|
|
|
|
You cannot post new topics in this forum
You cannot reply to topics in this forum
You cannot edit your posts in this forum
You cannot delete your posts in this forum
You cannot vote in polls in this forum
You cannot attach files in this forum
You cannot download files in this forum
|
|
 Search
 Private Messages
 Profile
 Log in
 Register
 Help
Help
