| View previous topic :: View next topic |
| Author |
Message |
journey on
Joined: 03 Mar 2005
Posts: 3595
City/Region: Valley Centre
State or Province: CA
C-Dory Year: 2005
C-Dory Model: 25 Cruiser
Vessel Name: journey on
Photos: Journey On
|
 Posted: Fri Jan 01, 2021 8:41 pm Post subject: Posted: Fri Jan 01, 2021 8:41 pm Post subject: |
 |
|
Sandy, I replaced the original 600 vertical windlass with a 700. Here's the topic I wrote (with pictures): Lewmar 700 installation. The hole in the deck is to fit the motor/gearbox through, plus room for the rode.
The original winch failed because of grit from the rode which worked it's way down into the gearbox. I learned this after I took the 600 apart. I recommend the horizontal windlass. They have upgraded the seal in the 700 vertical though.
Boris |
|
| Back to top |
|
 |
smckean (Tosca)
Joined: 18 Jan 2014
Posts: 975
City/Region: Guemes Island (Anacortes)
State or Province: WA
C-Dory Year: 2005
C-Dory Model: 25 Cruiser
Vessel Name: Tosca
Photos: Tosca
|
| Posted: Fri Jan 01, 2021 9:38 pm Post subject: |
|
|
Thanks Boris,
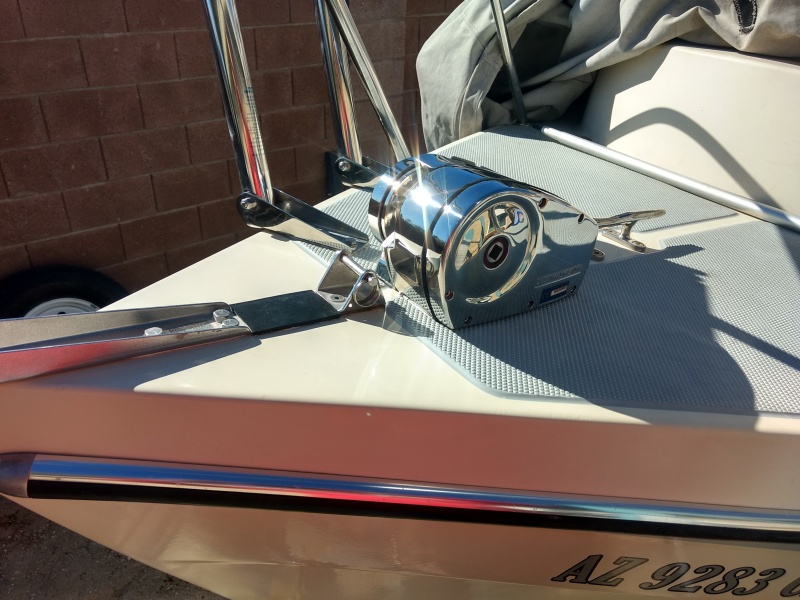
Yes, I am aware of these considerations. My interest was in vertical vs horizontal. Desert Dory is installing a horizontal unit where the motor does not go thru the deck. I have a vertical model where the motor does go thru the deck. I was curious about Desert's installation where his horizontal unit requires a 3" hole for the chain to pass thru into the chain locker.
My question is now probably moot since I have now checked my windlass installation, and the chain locker hole is 2.5" for the vertical model (hole for motor is 4.5"). Why Lewmar went from a 2.5" chain locker hole to 3.0" hole is still unknown to me, but the difference is not as big as I had guessed.
P.S. Boris, it was your post you reference above (especially the photos on the interior of the motor/gearbox) that first got me to think about replacing my vertical unit with a horizontal  . .
_________________
Sandy McKean
Purchased Tosca in 2014
Re-powered to Yammi 200 in 2015 |
|
| Back to top |
|
|
Desert Dory
Joined: 09 Sep 2006
Posts: 180
City/Region: Tucson
State or Province: AZ
C-Dory Year: 1989
C-Dory Model: 22 Cruiser
Vessel Name: Desert Dory
Photos: Desert Dory
|
| Posted: Fri Jan 01, 2021 10:14 pm Post subject: |
|
|
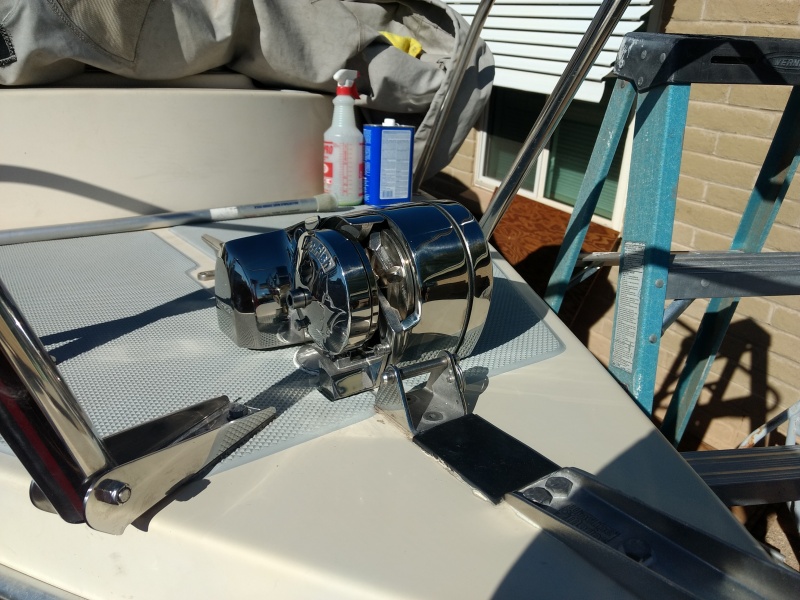
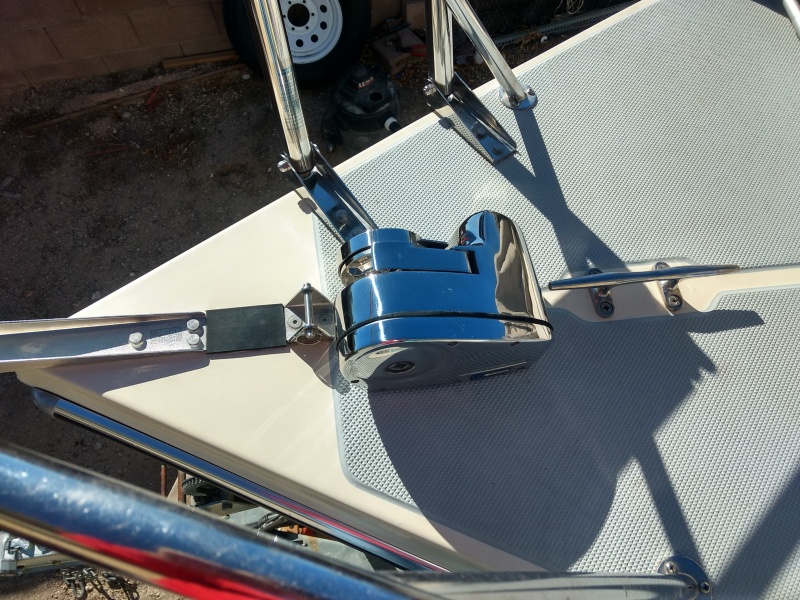
I'm not really sure why they have you cut a 3" hole. Maybe for some wiggle room for the rode to go off to the sides? No idea.
Having said that, the supplied gasket has a 3" by roughly 1.5" elongated opening for that hole. I suppose I could have used a jig saw and cut the opening to that size but I figure if the instructions say to cut it a 3" diameter hole there might be a reason to do so.
Either way, you're cutting a big hole in your deck.
EDIT: Correct! Mine is a horizontal unit. Everything up top. |
|
| Back to top |
|
|
thataway
Joined: 02 Nov 2003
Posts: 20803
City/Region: Pensacola
State or Province: FL
C-Dory Year: 2007
C-Dory Model: 25 Cruiser
Vessel Name: thataway
Photos: Thataway
|
| Posted: Sat Jan 02, 2021 1:22 pm Post subject: |
|
|
The 3" hole is for convince and speed for commercial build. I have done some windlass installations with just the elongated cut out. Since that is the gasket and base of the winch, it does not really make sense to do the 3" hole. Drill a couple of 1 or 1.25" holes and then connect them. Use the gasket to mark the cuts.
_________________
Bob Austin
Thataway
Thataway (Ex Seaweed) 2007 25 C Dory May 2018 to Oct. 2021
Thisaway 2006 22' CDory November 2011 to May 2018
Caracal 18 140 Suzuki 2007 to present
Thataway TomCat 255 150 Suzukis June 2006 thru August 2011
C Pelican; 1992, 22 Cruiser, 2002 thru 2006
Frequent Sea; 2003 C D 25, 2007 thru 2009
KA6PKB
Home port: Pensacola FL |
|
| Back to top |
|
|
Desert Dory
Joined: 09 Sep 2006
Posts: 180
City/Region: Tucson
State or Province: AZ
C-Dory Year: 1989
C-Dory Model: 22 Cruiser
Vessel Name: Desert Dory
Photos: Desert Dory
|
| Posted: Sat Jan 02, 2021 3:25 pm Post subject: |
|
|
| thataway wrote: | | The 3" hole is for convince and speed for commercial build. I have done some windlass installations with just the elongated cut out. Since that is the gasket and base of the winch, it does not really make sense to do the 3" hole. Drill a couple of 1 or 1.25" holes and then connect them. Use the gasket to mark the cuts. |
So, now you tell me... 
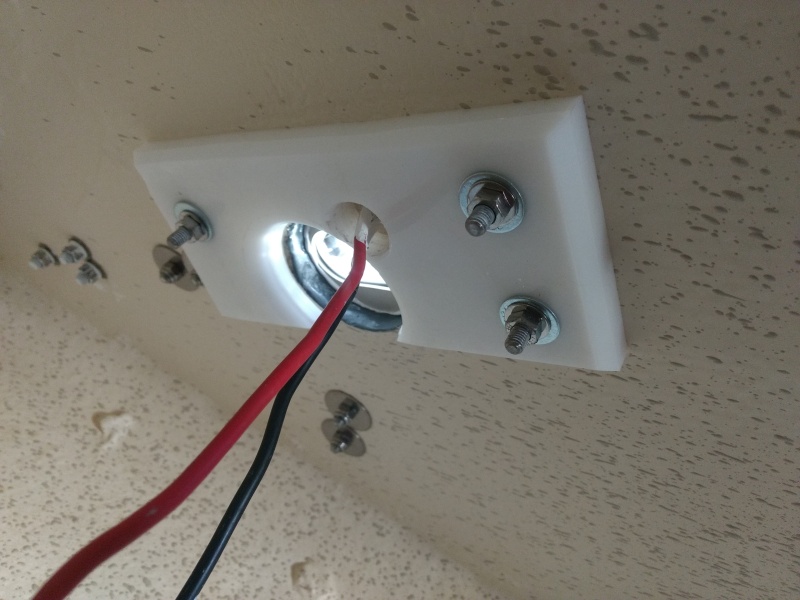
Anyhow, it's on there now. On to the wiring!
 |
|
| Back to top |
|
|
smckean (Tosca)
Joined: 18 Jan 2014
Posts: 975
City/Region: Guemes Island (Anacortes)
State or Province: WA
C-Dory Year: 2005
C-Dory Model: 25 Cruiser
Vessel Name: Tosca
Photos: Tosca
|
| Posted: Sat Jan 02, 2021 4:19 pm Post subject: |
|
|
Desert,
Looks great. I'm jealous. I'd love to have a horizontal unit. Seems more robust than the vertical units too.
My guess is that Lewmar says 3" hole just because it is probably easier for most installers to drill with a single tool and a single hole cut saw bit rather than multiple steps. Easier and I presume there is no real disadvantage in having a 3" round hole vs a 3" x 1.5" hole as long as it is well sealed. |
|
| Back to top |
|
|
colbysmith
Joined: 02 Oct 2011
Posts: 4545
City/Region: Madison
State or Province: WI
C-Dory Year: 2009
C-Dory Model: 25 Cruiser
Vessel Name: C-Traveler
Photos: C-Traveler and Midnight-Flyer
|
| Posted: Sat Jan 02, 2021 8:49 pm Post subject: |
|
|
| Nice job. Almost wish I would have done that when I installed mine last summer. I just drilled the holes, undercut them and sealed them with fiberglass. Then set the windlass down with some caulking right over the non skid. Didn't use a backing plate, as the deck seemed plenty solid enough. Did use large fender washers however under the nuts. Colby |
|
| Back to top |
|
|
hardee
Joined: 30 Oct 2006
Posts: 12632
City/Region: Sequim
State or Province: WA
C-Dory Year: 2005
C-Dory Model: 22 Cruiser
Vessel Name: Sleepy-C
Photos: SleepyC
|
| Posted: Sun Jan 03, 2021 3:41 am Post subject: |
|
|
That look great. Nice backing.
Harvey
SleepyC 
_________________
Though in our sleep we are not conscious of our activity or surroundings, we should not, in our wakefulness, be unconscious of our sleep. |
|
| Back to top |
|
|
gulfcoast john
Joined: 14 Dec 2012
Posts: 989
City/Region: PENSACOLA
State or Province: FL
C-Dory Year: 2010
C-Dory Model: 255 Tomcat
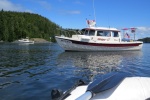
Vessel Name: Cat O' Mine
Photos: CAT O' MINE
|
| Posted: Fri Jan 08, 2021 5:39 pm Post subject: |
|
|
A surprising number of you (342) have noticed that Ive been organizing the Cat O Mine album for the first time ever. This is one miserable frigid dark boring pandemic winter, but Ive learned how to make and title a sub-album, so its not a total loss.
Bottom paint job for $318!
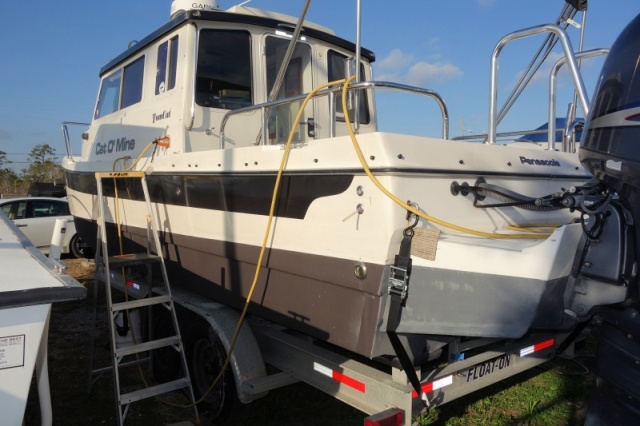
I bought a gallon of Pettit Hydrocoat in black (dont pay extra for SR slime reduction, it doesnt work here) for $130 on sale. I put two coats on almost all of the below water sponsons (except the far back) with 6 3/16 rollers. Ive always used Pettit ECO (no metals) for the aluminum bracket but have not been happy with it. I scraped off most of it (some tough spots still show through) then Primocon spray.
I used gray Pettit Alumaspray spray cans on the engine bracket for two reasons:
Reason #1: To make Colby jealous; he has always wanted a multi colored hull but he just wont admit it;
Reason #2: I had two cases of Pettit Alumaspray 2 gray spray cans on clearance at $6 each can. Like box wine, these cans do not seem to be getting better with age, even though we store them in wine racks and rotate them ⅓ turn every year.
1 gal Pettit HC black bottompaint: $130
6 rollers, Scotch blue tape and supplies: $8
5 spray cans Ptettit Alumacraft 2: $30
My labor after Colbys (most generous, thanks Colby) labor raise from $15 to $100/hour: $150 (OK, more like $400)
Grand total bottom paint job with paint that is not hazmat and legal to throw in the marina trash: $318
I think thats a pretty good deal for a bottom job!
Its been 10 years since a pro bottom job, so we think next year well get a pro sandblasting (or soda blasting) job.
Cheers!
John
_________________
John and Eileen Highsmith
2010 Tom Cat 255, Cat O' Mine
Yamaha F150, LXF150 |
|
| Back to top |
|
|
colbysmith
Joined: 02 Oct 2011
Posts: 4545
City/Region: Madison
State or Province: WI
C-Dory Year: 2009
C-Dory Model: 25 Cruiser
Vessel Name: C-Traveler
Photos: C-Traveler and Midnight-Flyer
|
| Posted: Fri Jan 08, 2021 8:44 pm Post subject: |
|
|
| Quote: | | Reason #1: To make Colby jealous; he has always wanted a multi colored hull but he just wont admit it; |
You haven't seen our new boat's hull have you John?  I did touch it up over summer with the left over bottom paint the previous owner gave me. It looked nice....for a day or two anyway.... My plans are to redo it sometime next summer perhaps. First I'll start with a better job of cleaning off whatever the stuff is under the paint. It's black, and if you touch it, it's on you! SO what advice do you have John? You mentioned scraping. I've got a high power pressure washer that I used before, and it seemed to get a lot of the paint off. I can't remember the name of the blue stuff, but I had been planning on using the stuff you mentioned. SO why the Alumincraft first? Or did I misunderstand? I suspect that if I do a better job cleaning off the old paint, especially where it was already chipping off, the new bottom paint will adhere better. BTW, look at one of the bow photos on my trailer sale thread and you can see what I'm talking about. Colby I did touch it up over summer with the left over bottom paint the previous owner gave me. It looked nice....for a day or two anyway.... My plans are to redo it sometime next summer perhaps. First I'll start with a better job of cleaning off whatever the stuff is under the paint. It's black, and if you touch it, it's on you! SO what advice do you have John? You mentioned scraping. I've got a high power pressure washer that I used before, and it seemed to get a lot of the paint off. I can't remember the name of the blue stuff, but I had been planning on using the stuff you mentioned. SO why the Alumincraft first? Or did I misunderstand? I suspect that if I do a better job cleaning off the old paint, especially where it was already chipping off, the new bottom paint will adhere better. BTW, look at one of the bow photos on my trailer sale thread and you can see what I'm talking about. Colby |
|
| Back to top |
|
|
thataway
Joined: 02 Nov 2003
Posts: 20803
City/Region: Pensacola
State or Province: FL
C-Dory Year: 2007
C-Dory Model: 25 Cruiser
Vessel Name: thataway
Photos: Thataway
|
| Posted: Fri Jan 08, 2021 9:16 pm Post subject: |
|
|
John, don't do the sand blast--too aggressive, and may lead to blistering....Soda blast if you must, but be sure that who does it does not over do--I have seen gel coat and epoxy blasted off...
What did you do about where the bunks on the trailer are? The boat on jack stands? How did you get off the trailer?
Thanks, |
|
| Back to top |
|
|
colbysmith
Joined: 02 Oct 2011
Posts: 4545
City/Region: Madison
State or Province: WI
C-Dory Year: 2009
C-Dory Model: 25 Cruiser
Vessel Name: C-Traveler
Photos: C-Traveler and Midnight-Flyer
|
| Posted: Fri Jan 08, 2021 9:55 pm Post subject: |
|
|
| Bob, when I recoated C-Traveler this summer I used boards against the hull and a couple of bottle jacks to get the boat off the trailer just high enuf to get a brush on the hull. First the stern then after that was dry, the bow. Because I found it took a ways to get the trailer off the axle springs I moved the jacks to the trailer cross members. I was able to get a lot of it done around where the bunks were with it on the trailer. But everything had to be done on my back under the boat and trailer. |
|
| Back to top |
|
|
thataway
Joined: 02 Nov 2003
Posts: 20803
City/Region: Pensacola
State or Province: FL
C-Dory Year: 2007
C-Dory Model: 25 Cruiser
Vessel Name: thataway
Photos: Thataway
|
| Posted: Sat Jan 09, 2021 12:36 pm Post subject: |
|
|
| Colby, I have painted more than one boat on the trailer, as well as having moved some off. I just wondered how John got the cat off the trailer. We did that with my 255 and Caracal at the boat yard, where we had all sorts of boat moving gear. The cheapest and easiest was to have the travel lift pickup the boat and then Jack stand and block. Cats can be particularly difficult when there is concern about taking load on the bridge deck. It means 2x blocking and jacking as a monohull. |
|
| Back to top |
|
|
colbysmith
Joined: 02 Oct 2011
Posts: 4545
City/Region: Madison
State or Province: WI
C-Dory Year: 2009
C-Dory Model: 25 Cruiser
Vessel Name: C-Traveler
Photos: C-Traveler and Midnight-Flyer
|
| Posted: Sat Jan 09, 2021 1:29 pm Post subject: |
|
|
| Oops, I forgot about the different hull on the cat. I can imagine that's a little more involved than the 22 or 25 for getting up to bottom paint. |
|
| Back to top |
|
|
gulfcoast john
Joined: 14 Dec 2012
Posts: 989
City/Region: PENSACOLA
State or Province: FL
C-Dory Year: 2010
C-Dory Model: 255 Tomcat
Vessel Name: Cat O' Mine
Photos: CAT O' MINE
|
| Posted: Sat Jan 09, 2021 6:06 pm Post subject: |
|
|
Colby,
If your bottom paint can be rubbed off, its likely an ablative paint. Most trailer boaters wouldnt choose other options, though there are some for racers etc. As long as it is well adhered (not flaking or peeling) you can prep with your high pressure spray, or 80g sandpaper, or just a green Scotch pad (per Pettit) before Hydrocoat. You can expect an epoxy barrier coat under whatever paint they chose, likely a contrasting color, but you dont have to scrape down to that. I used Primocon on the aluminum bracket only because I had a couple of gouges that went to bare aluminum, this requires sanding (or acid etch) to remove oxidation then immediate primer. It can also be used as a primer over an intact paint film of unknown type, but you shouldnt need that. Then Alumacraft 2 ( a zinc product for aluminum outboard lower legs; here on the aluminum engine bracket to decrease the changes of galvanic corrosion youd have with a copper paint over aluminum, even with a barrier primer).
My only prep on the sponsons was a good washing. Wear warm clothes for that this time of year.
I thought about getting this, but I didnt:
https://www.jamestowndistributors.com/product/product-detail/98161
The key to getting to the trailer bunk footprint portion of the sponsons is really very simple, fast and puts zero stress on the bridgedeck...you simply must have the right equipment.
First,
I text Albatross Divers and Aaron brings by his hooka, scuba gear and water blade gizmo. Depending on the amount of growth, he puts $100 to $125 on my Right Equipment (which is a Barclay Mastercard, in my particular case). 30 minutes later, SHAZAM! Clean and Done.
I have found that when any boat task challenges my ability, having the Right Equipment is critical to getting the thing done without me hurting myself, my pride, the boat, or the trailer.
The actual contact footprint on the trailer bunks is fairly small. Just loading the boat on the trailer crushes minor hard growth, but can cut up the bunk carpet. When the water is warm and shallow, Ill scrape those areas with a plastic scraper. If I dont keep the coating up, I get much more growth all over. When we stay around here in the summer (now rare) our favorite water destinations are only a few miles away and theres not enough ablating to knock down growth properly. The diver is still far, far less than paying for professional bottom painting every few years.
Bob, thanks for the prep tips.
Heres to having the Right Equipment!
John |
|
| Back to top |
|
|
|
|
You cannot post new topics in this forum
You cannot reply to topics in this forum
You cannot edit your posts in this forum
You cannot delete your posts in this forum
You cannot vote in polls in this forum
You cannot attach files in this forum
You can download files in this forum
|
|
 Search
 Private Messages
 Profile
 Log in
 Register
 Help
Help
