| View previous topic :: View next topic |
| Author |
Message |
Mike_J
Joined: 26 Mar 2012
Posts: 373
City/Region: Victoria, BC
State or Province: BC
C-Dory Year: 2011
C-Dory Model: 22 Cruiser
Vessel Name: Natural C-lection
Photos: Natural C-lection
|
 Posted: Wed Apr 06, 2016 10:53 pm Post subject: Bennet pump unit location recommendation Posted: Wed Apr 06, 2016 10:53 pm Post subject: Bennet pump unit location recommendation |
 |
|
My original Bennet trim tab pump motor gave up the ghost as a result of waster damage. The original location was a few inches above the floor in the space between the two fuel tanks. As a result of a partially flooded cockpit in a following sea, I think the pump unit got wet and eventually died. I have a new pump unit and was wondering where others have installed their pump units. I'd rather not have to replace the pump again next time I get a flooded cockpit (which i hope is not going to happen again soon!)
_________________
Mike and Monica Jackson, Victoria, BC
http://naturalc-lection.blogspot.ca/ |
|
| Back to top |
|
 |
Sunbeam
Joined: 23 Feb 2012
Posts: 3990
City/Region: Out 'n' About
State or Province: Other
C-Dory Year: 2002
C-Dory Model: 22 Cruiser
Photos: Sunbeam
|
| Posted: Thu Apr 07, 2016 2:08 am Post subject: |
|
|
I put mine above the starboard side fuel tank, around halfway between the forward edge of the tank and the transom. It's mounted on a Starboard "breadboard," which is in turn mounted to the hull side with Weld Mount studs. I then put the relay unit waaaay aft in the starboard lazarette, basically on the transom. These are areas on my boat that don't typically get wet, and keep the units out of the way.
Not sure if you would have room above the fuel tanks in a newer boat with the "liner" in the tank area (that is part of the raised/flat cockpit sole). But I figured the more ideas the merrier, and you never know what variation you might come up with. |
|
| Back to top |
|
|
Mike_J
Joined: 26 Mar 2012
Posts: 373
City/Region: Victoria, BC
State or Province: BC
C-Dory Year: 2011
C-Dory Model: 22 Cruiser
Vessel Name: Natural C-lection
Photos: Natural C-lection
|
| Posted: Thu Apr 07, 2016 10:40 am Post subject: |
|
|
| I am going to take a look at options. I might see about putting it in the Starboard lazarette along with the starter battery. |
|
| Back to top |
|
|
Sunbeam
Joined: 23 Feb 2012
Posts: 3990
City/Region: Out 'n' About
State or Province: Other
C-Dory Year: 2002
C-Dory Model: 22 Cruiser
Photos: Sunbeam
|
| Posted: Thu Apr 07, 2016 1:40 pm Post subject: |
|
|
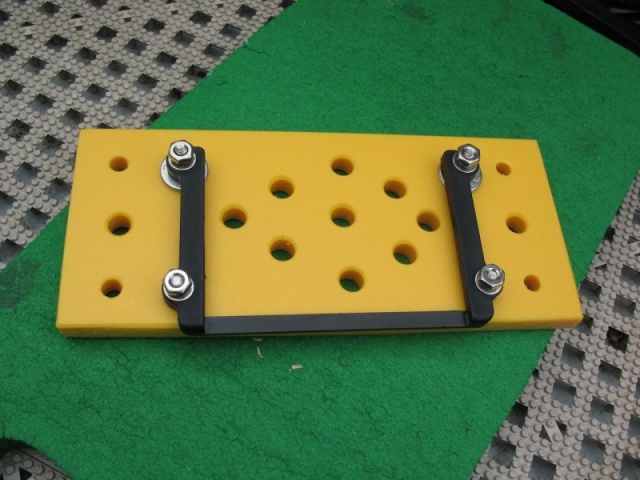
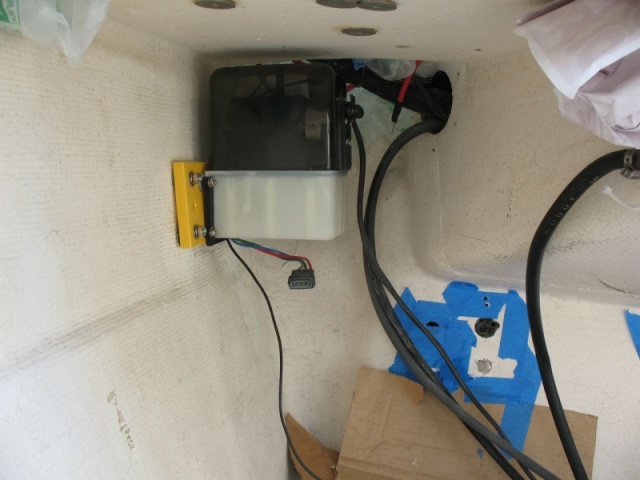
I'll put a couple of photos of my mounting method here, in case you can use any of it. Essentially, I wanted to mount it in a small, efficient space (in my case over the fuel tank), but as designed, you need a rather large open space above it to get it into its bracket and/or to get the cover off for (infrequent) adding of fluid. So I mulled it over and this is how I went about it. I should write it up in more detail in my "Sunbeam ~ 22 Cruiser" thread, but since that might not happen right away (ahem, I did this project two years ago!), I'll put some of it here now in case it is helpful in any way for your install -- you might have the same situation with "low headroom."
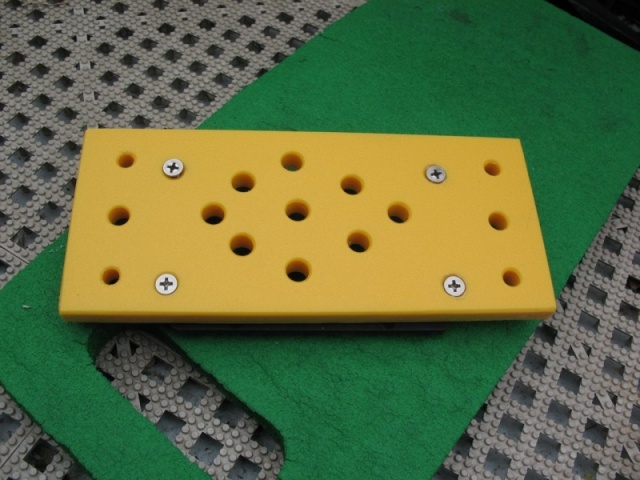
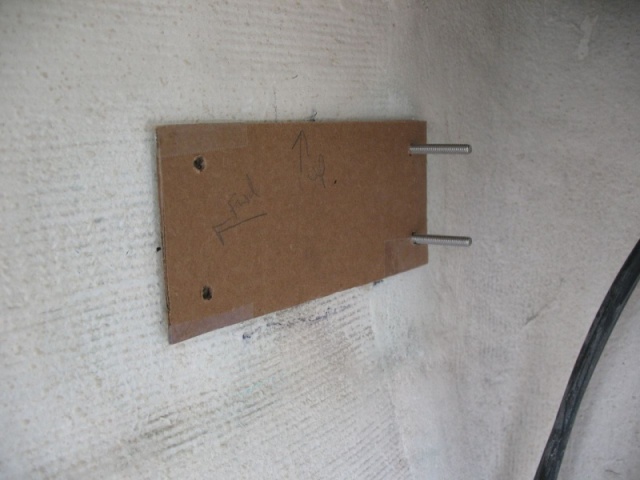
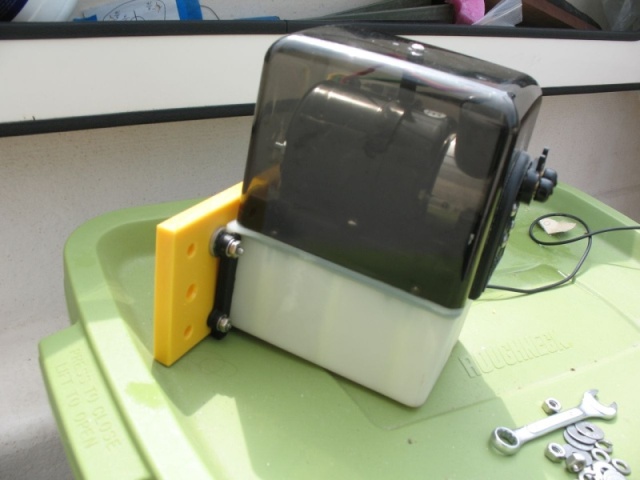
To put it in a nutshell, I made a (yellow) Starboard backing plate, and mounted Bennett's bracket to that, "permanently." Then I used Weld Mount studs to mount the backing plate to the hull. Now I can just pull the backing plate on and off the studs to service the unit and don't need to lift it up (into clear space that I don't have in that location). There is a bit more detail in the photo captions in my album (sub-album for trim tabs).
As you can see, the fuel tank is out (I had a few additional irons in the fire), but I finished up the installation with the fuel tank in place so I could be sure it would all work out once things were put back together. Just to give perspective, the "roof" above the HPU is the underside of the starboard lazarette.
This was all done a couple of years ago, and so far has been working out fine.
 |
|
| Back to top |
|
|
Kushtaka
Joined: 17 Dec 2013
Posts: 648
City/Region: Cordova
State or Province: AK
C-Dory Year: 1993
C-Dory Model: 22 Cruiser
Photos: Kushtaka
|
| Posted: Thu Apr 07, 2016 2:01 pm Post subject: |
|
|
Sunbeam, as usual, your documentation is great. Don't be too hard on yourself for taking a couple years to get to things. At least you get to them! I haven't even taken pics of a lot of my work. I just don't have the temperament to stop working and start documenting.
My unit is in my port lazarette. It's well protected. I've put spare batteries in there with it, and used oil bottles, etc to keep the battery from moving around and smashing things. That's the only time I'm worried about it in there, but the spare battery loose in the lazarette is a lazy, bad way to do things, and it would be my fault if something went wrong. I intend to permanently afix a second battery in my boat and a charging relay and switch this year. M'y wiring is not the best all around, with far too many items wired directly to the battery. When I get extra buses and the second battery in place I will have no qualms about my trim tab unit being in the lazarette. |
|
| Back to top |
|
|
Mike_J
Joined: 26 Mar 2012
Posts: 373
City/Region: Victoria, BC
State or Province: BC
C-Dory Year: 2011
C-Dory Model: 22 Cruiser
Vessel Name: Natural C-lection
Photos: Natural C-lection
|
| Posted: Thu Apr 07, 2016 9:35 pm Post subject: |
|
|
Nice clear description and images! Thanks. Where did you get your weld mount studs from? I seem to remember you were in Canada...
Did you drill out the starboard to make the breadboard?
cheers and thanks! |
|
| Back to top |
|
|
Sunbeam
Joined: 23 Feb 2012
Posts: 3990
City/Region: Out 'n' About
State or Province: Other
C-Dory Year: 2002
C-Dory Model: 22 Cruiser
Photos: Sunbeam
|
| Posted: Thu Apr 07, 2016 10:37 pm Post subject: |
|
|
Hi Mike,
I typically get the Weld Mount parts from Fisheries Supply. However I have also gotten them from Jamestown Distributors.
Yes, I just used a drill and regular bit to make holes and then a chamfering bit to tidy them up a bit. I couldn't see any good reason to add more weight to the stern  and that material wasn't needed. I also used a mini hand plane just to bevel the edges a little bit for pleasantness. and that material wasn't needed. I also used a mini hand plane just to bevel the edges a little bit for pleasantness. |
|
| Back to top |
|
|
|
|
You cannot post new topics in this forum
You cannot reply to topics in this forum
You cannot edit your posts in this forum
You cannot delete your posts in this forum
You cannot vote in polls in this forum
You cannot attach files in this forum
You cannot download files in this forum
|
|
 Search
 Private Messages
 Profile
 Log in
 Register
 Help
Help
