| View previous topic :: View next topic |
| Author |
Message |
Marco Flamingo
Joined: 09 Jul 2015
Posts: 1167
City/Region: Seattle
State or Province: WA
C-Dory Year: 2004
C-Dory Model: 16 Cruiser
Vessel Name: Limpet
Photos: Limpet
|
 Posted: Sat Aug 15, 2015 4:36 pm Post subject: Balsa core issues on the CD 16 Posted: Sat Aug 15, 2015 4:36 pm Post subject: Balsa core issues on the CD 16 |
 |
|
I've read the old posts and I am now in the process of removing all of the factory/dealer installed items screwed down to the hull. The bilge pump, presumably installed by C-Dory, appears to have had the SS screws dipped in 3M 5200 before screwed through the fiberglass in the little sump area. Other items (2 batteries, 2 Yamaha 6 gal. gas tanks, and a fuel filter) have hold down screws that appear to be just though the fiberglass skin and into the balsa.
Can I assume that there isn't any balsa in the sump area under the bilge pump as the hull is an inch thinner in that area? Also, the 16 has cockpit side panel/seat storage pieces that appears to be "pop riveted" on to the cockpit deck. Does anybody know how these panels are attached and whether these rivets go into the balsa core? You can see the floor rivets in picture #2 in the "Amelia Anne" folder (sorry, I don't know how to put photos in a post yet).
I'd go to the get-together in Bellingham this weekend and ask at the factory, but I have a prior commitment for a family reunion. New C-Dory or family, new C-Dory or family. It's a close call.
Mark |
|
| Back to top |
|
 |
Sunbeam
Joined: 23 Feb 2012
Posts: 3990
City/Region: Out 'n' About
State or Province: Other
C-Dory Year: 2002
C-Dory Model: 22 Cruiser
Photos: Sunbeam
|
| Posted: Sat Aug 15, 2015 5:41 pm Post subject: |
|
|
First of all, good on you for taking proactive steps to protect the core. I've done the same on my 22.
I don't know about the 16, but on my 22 there are two different "sumps" and two different methods of construction.
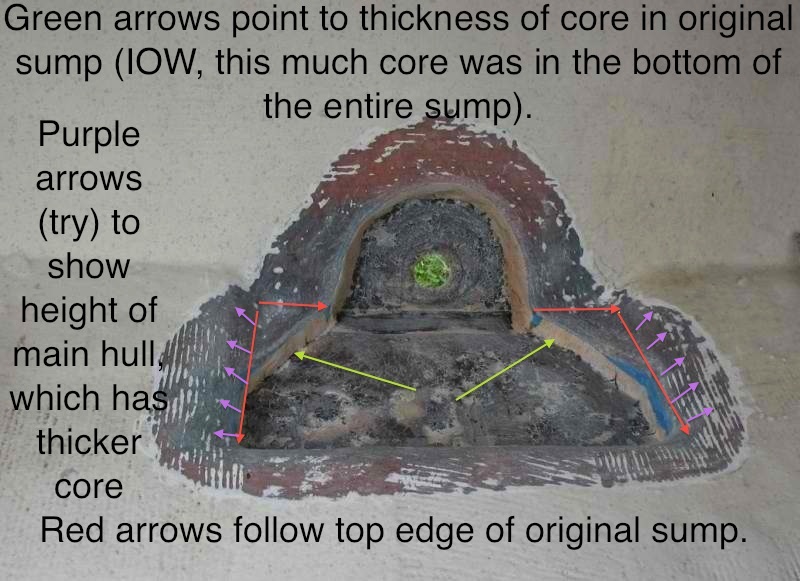
The sump that is right at the transom IS cored, but just with thinner core than the main hull. I actually dug in and found out (and eliminated it), but you can also tell because the depression is around 5/8" deep, and the hull is thicker than that (over an inch, I'd guess), due to thicker core.
My era 22 also has a sump in the cabin at the after bulkhead, and I'm pretty sure that sump is not cored. It is also much deeper (depth of the hull).
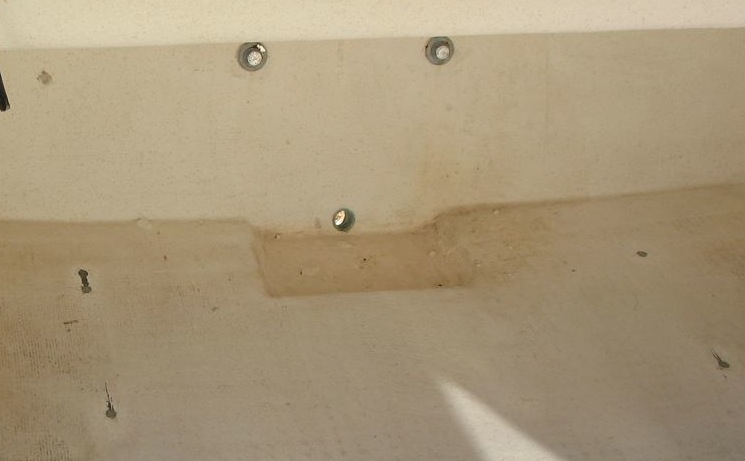
Here is are a couple of photos. Maybe by judging the depth of the sump in question as compared to the main hull thickness, you can decide whether your sump is cored or not.
First, a photo of the sump at the transom that IS cored - you can see how it's relatively shallow.
And here it is "excavated" so you can see the layers.
 |
|
| Back to top |
|
|
capt. meares
Joined: 04 Jul 2013
Posts: 146
City/Region: Tillamook
State or Province: OR
C-Dory Year: 1988
C-Dory Model: 22 Cruiser
Vessel Name: Vianey
Photos: Vianey
|
| Posted: Sat Aug 15, 2015 6:02 pm Post subject: |
|
|
I have removed and inspected every single screw that has penetrated the hull inside and out. The biggest surprise came with the factory gas tank brackets that are mounted to the floor. Every screw had been dipped in silicone with zero water penetration until I got to the last one. They must have simply forgotten or simply ran out of silicone because the balsa had rotted inside and spread to a 12X12" area.
Ever since this I have been on a personal crusade to make my entire boats balsa core impossible to be touched by any moisture. |
|
| Back to top |
|
|
Marco Flamingo
Joined: 09 Jul 2015
Posts: 1167
City/Region: Seattle
State or Province: WA
C-Dory Year: 2004
C-Dory Model: 16 Cruiser
Vessel Name: Limpet
Photos: Limpet
|
| Posted: Wed Sep 02, 2015 9:11 pm Post subject: |
|
|
I just posted some pictures of my balsa core drilling. So far, all is okay and I've buttoned-up the holes. But it's the cockpit panels that are riveted to the deck have me concerned. In some places the panels are actually missing the rivets. On the other hand, if I drill them all out to inspect I might as well remove the panels and see if there is usable space behind them.
Mark |
|
| Back to top |
|
|
Sunbeam
Joined: 23 Feb 2012
Posts: 3990
City/Region: Out 'n' About
State or Province: Other
C-Dory Year: 2002
C-Dory Model: 22 Cruiser
Photos: Sunbeam
|
| Posted: Wed Sep 02, 2015 10:09 pm Post subject: |
|
|
Great, an update  I just looked at your photos. Looks like you did a great job. My absolute favorite core-picking tool (even over power tools) is a dental pick that I obtained somehow. It's just a demon. So I could appreciate your "creepy medical tools" I just looked at your photos. Looks like you did a great job. My absolute favorite core-picking tool (even over power tools) is a dental pick that I obtained somehow. It's just a demon. So I could appreciate your "creepy medical tools" 
There's nothing like the feel and sound (kinda "crispy") of picking out..... dry balsa core. Ahhhhhh.
I'm not entirely clear on where that last shot is, of the rusty looking blind rivets, but yeah, if that goes into anything cored... I'd sure want to get a look at what's going on.
I've never looked behind the panels on a 16, but I think there may be foam flotation in them. Boats of that size are required to have X amount of flotation foam as built.
Anyway, great job on closing up those holes into the balsa  |
|
| Back to top |
|
|
Marco Flamingo
Joined: 09 Jul 2015
Posts: 1167
City/Region: Seattle
State or Province: WA
C-Dory Year: 2004
C-Dory Model: 16 Cruiser
Vessel Name: Limpet
Photos: Limpet
|
| Posted: Thu Sep 03, 2015 9:06 am Post subject: |
|
|
My last picture is the way that the integral seats and cockpit side covers are attached to the deck. I think that it is unique to the 16. That picture is the corner of the helm seat box, so it's attached to the deck 1/3 of the way across the deck. You can see the full rivet attachment method in picture #2 of the Amelia Anne folder. I can't really imagine how all of those blind rivets are not going into the balsa core. It would require pre-planning areas without balsa core to meander down the hull exactly where the deck rivets would eventually be placed.
There is styrofoam behind the cockpit side covers. It is wedge shaped and loose. I think that if it were attached (i.e., the styro pieces foamed into place), it would create a quieter boat.
I may be going where no man has gone before. Well, not since the boat was built.
Mark |
|
| Back to top |
|
|
Sunbeam
Joined: 23 Feb 2012
Posts: 3990
City/Region: Out 'n' About
State or Province: Other
C-Dory Year: 2002
C-Dory Model: 22 Cruiser
Photos: Sunbeam
|
| Posted: Thu Sep 03, 2015 11:08 am Post subject: |
|
|
I understand it better now. Of course I'd have to drill out those rivets and see what's under them! At least one or two for exploratory purposes. Given what I've seen there was no filling of core anywhere to "pre-plan" for fasteners, etc. (That's the case with most production boats.)
I suppose the rivets hold the "furniture" to the top skin of the sole? I guess I'd want to see how it was all put together (break out the medical tools  ), and then go from there to improve it based on what I found. I can think of a few possible ways, but then I don't really know what you have yet. ), and then go from there to improve it based on what I found. I can think of a few possible ways, but then I don't really know what you have yet.
BTW, my similar-era 22 had "loose" styrofoam blocks for floatation under the v-berth. I put loose in quotes because it was actually in there so tightly that I was cursing up a storm when I went to remove it! I could tell after I had completed the process that what they had done was lay a grid of masking tape, sticky side up, on the bottom (inside of hull), then placed pre-cut HUGE blocks of foam on that grid, THEN put in the top of the v-berth and fiberglass it in place. Even after I managed to saw down ~two feet to the bottom of the foam (through newly cut access hatch holes), I couldn't budge it! It was the tape. Which was really hard to get to to cut through. Would plain-old masking tape ever hold that well if you wanted it to? Nooooo. |
|
| Back to top |
|
|
Marco Flamingo
Joined: 09 Jul 2015
Posts: 1167
City/Region: Seattle
State or Province: WA
C-Dory Year: 2004
C-Dory Model: 16 Cruiser
Vessel Name: Limpet
Photos: Limpet
|
| Posted: Wed Sep 09, 2015 7:41 pm Post subject: |
|
|
Just as I suspected, the cockpit panels and seat boxes on the CD 16 Cruiser are attached to the balsa core in the worst possible way. Any amateur who was thinking of building a balsa core hull would not use this method. I didn't have my camera at the shop, so pictures will have to wait. I guarantee that they will be gruesome.
I read another post where somebody noted the cheesy way that the "rub rail" is attached on some C Dorys by using blind rivets, commonly called a "pop" rivet. The rivets would only hold as long as nothing really rubs against the rub rail. I just replaced some of mine with #8 1.5" stainless machine screws, which is clearly what the rub rail manufacturer intended to be used (the holes in the aluminum rail are countersunk and they don't make countersunk blind rivets).
The type of blind rivet that is used all over my boat is a large head tri-split with a steel mandrel. Its not a particularly good choice of rivet, unless your boat never gets wet. Steel, aluminum, and water are a bad combination. Any aluminum pop rivets in saltwater should be considered extended temporary fasteners. Electrolysis between the aluminum and the steel mandrel caused the heads of some of my rivets to fall off from corrosion. When I drilled some of them out, the heads just fell off from the torque of the drill bit no need to actually drill some of them out. But wait, it gets worse.
The cockpit panel/seat boxes on my 16 are pop riveted to the deck. To attach the panels, a hole is drilled into the balsa core and the blind rivet is inserted. As it is popped, it flairs out a little by crushing the surrounding balsa core. This gives a nice area for water to collect. These are not the waterproof type of pop rivets and apparently no attempt was made to make the fastening waterproof.
Since it is a steel mandrel (i.e., center pin) that is left in place when the rivet is popped, that is a good indicator of moisture in the balsa core. All of my steel mandrels had some rust, even in those holes that looked like perfectly good balsa wood. Those holes were the minority. The other holes had some indication of water intrusion. The least worrisome were those where the wood had discolored slightly just from being in contact with wet metal (sort of like the wood around a rusty nail). Second was areas where the wood had discolored to a putty color and seemed to have lost some of its structural integrity. These holes were further drilled out with a ½ bit and the suspect wood was removed.
And then there is the nasty stuff at the aft center of the passenger seat box. Drilling out those rivets brought up black mush. Once the seat box panel was completely removed, I drilled a few more holes in that area and brought up mush. Some of the holes further from ground zero revealed soggy balsa on the bottom and seemingly okay balsa on top. I drilled exploratory holes near the same rivets on the drivers side panel and didnt find any problems on the other side of the boat (yet).
I have a large heating pad that is used on a concrete floor when standing at a work bench. I wedged that up against the bottom of the hull and have a heater/blower working the top side. But if moving moisture out of the hull core is anything like seasoning fire wood, it would take months to make sure that the moisture level was down. Then, I could use a penetrating epoxy on the suspect wood and use an epoxy/cabosil/fiberglass putty to fill the removed balsa. I am already planning on this being an entire winter project. No winter salmon/crabbing with this boat.
So now the 64 thousand dollar question (hopefully only a $1K question). I have soggy rotten balsa the size of a distorted dinner plate. I have suspect balsa in an area approximately 18 by 18. More realistically, 24" by 24". Right now, I have perforated the worst area with ½ holes about 3 on center and roto-rooted the bad balsa out. At what point do I decide to tear into the deck, lay in new balsa, and re-glass?
I just had a root canal two weeks ago. It only took 30 minutes, was a lot less painful, and cheaper.
Mark |
|
| Back to top |
|
|
Kushtaka
Joined: 17 Dec 2013
Posts: 648
City/Region: Cordova
State or Province: AK
C-Dory Year: 1993
C-Dory Model: 22 Cruiser
Photos: Kushtaka
|
| Posted: Wed Sep 09, 2015 8:56 pm Post subject: |
|
|
You'll get some good advice with this solid bit of investigation.
If it were me, I would not worry about drying out any balsa. I'd remove the mush and the wet core and re-core those areas. There are lots of good products out there.
I've seen a few people address larger areas by removing a "Panel" of their deck skin over the offfending area (careful to set your blade depth to not cut through the outer skin!!!). Then, remove the offending core material and pour in your thickened epoxy (or whatever you choose: foam, new wood, etc), and then you can lay that cockpit skin right back over and cover it all up almost good as new.
For an 18"x18" area I'd do this before I'd swiss cheese my deck skin and try to dry it out.
But, perhaps pictures will be more revealing as to what your next steps should be.
From what you describe, you probably have three to four long-ish days of prep and finishing work, and one short day of re-coring. You could be back on the water in less than a week. |
|
| Back to top |
|
|
Sunbeam
Joined: 23 Feb 2012
Posts: 3990
City/Region: Out 'n' About
State or Province: Other
C-Dory Year: 2002
C-Dory Model: 22 Cruiser
Photos: Sunbeam
|
| Posted: Wed Sep 09, 2015 9:42 pm Post subject: |
|
|
Doesn't it just chap you when it would have been so much easier to do it right in the first place, vs. going in after the fact  (Has happened to me on many production boats.) (Has happened to me on many production boats.)
Okay, can't "see" it yet, but my preliminary thoughts:
1) Yeah, that was rotten balsa waiting to happen.
2) I have never seen any good come out of trying to dry balsa. For one thing, it'd take forever (and I'd want to just get it DONE); and for another, if it has de-bonded from either skin, it's not doing much even if/when it does dry out (it may not have done that of course).
3) I'd just get it out of there. It sucks to start with, because you are "making things worse," but after the bad is out and I'm putting the good back in, I have never regretted it. That's just me of course.
When I'm doing something like this, I just think, you know, this was not put together in the first place by Einsteins, and I'm nearly as smart as the average bear, plus I care the MOST about my own boat. Generally I can get it back together better than it was, and I know it, which is a huge comfort.
Yes, my rub rail had those aluminum rivets with steel mandrels. Water (especially salt water) in the rails makes a nice soup with which to mix metals.... My boat had been stored indoors and only had 50 hours on it (and I've never had it in salt water) and some of the rivet heads had *still* rotted off. The good thing about the rub rail on the 22 is that it can either pop off, or leak water into the boat, but can't affect any coring.
I don't know exactly what you'll be up against in re-attaching the "furniture," but a few possibilities come to mind (might be modified upon seeing it, which of course you have).
a) Tab with fiberglass (don't know if you've done this before, but picture sanding an area down on each side, then putting 4" masking tape on, only make it fiberglass instead. You could possibly do this "inside" the furniture bases instead of outside to minimize it's needing to look perfect (then just bond the outer flange down with thickened epoxy under it).
b) Hollow out and make "wells" in the balsa that are around the size of between a quarter and a fifty cent piece, fill those with thickened epoxy, and then tape them for machine screws.
c) Maybe something with Weld-Mound studs.
I hate to say "looking forward to the photos," but you know what I mean. I can share the agony. Plus maybe some of my ideas will prove to be inappropriate once I see it.
Break out the dental tools.... (actually, it IS somewhat satisfying to pick the bad stuff out, isn't it). |
|
| Back to top |
|
|
Marco Flamingo
Joined: 09 Jul 2015
Posts: 1167
City/Region: Seattle
State or Province: WA
C-Dory Year: 2004
C-Dory Model: 16 Cruiser
Vessel Name: Limpet
Photos: Limpet
|
| Posted: Thu Sep 10, 2015 10:33 am Post subject: |
|
|
Sunbeam,
I plan on using variations of your "Plan B." Now that the panel is out, I can make it into a removable panel. If each of the mounting holes is enlarged and filled with an epoxy putty, I can re-attach the panel using SS screws with SS countersunk finish washers (which is how it should have been attached).
One reason for having a readily removable panel is that there is valuable storage space behind the panel, originally filled with EPS (Styrofoam) wedges. While the wedges provide flotation, they also vibrate down and place considerable force on the panel and the original cheesy fasteners. If those blocks of EPS were held in place by spray-in foam, I could make up for any removed EPS foam and get a more solid boat.
In an attempt to make lemonade from lemons, I just purchased an Espar D2 heater that fits nicely behind the panel that I have just removed. It looks like a fairly simple fit to have forced-air heat on my 16. Hopefully, that will make up for my painful fix-it project.
I had already suspected that yanking out the bad balsa by removing the deck skin was the proper repair. I needed a few days and a few deep breaths to accept that. The balsa core appears to be 1.25" inches thick. My local Fiberlay doesn't stock that thickness. I'll have to look around unless somebody here has a good source in the PNW. Maybe C-Dory? Is there a C-Brats discount on balsa? An exchange program? I could take my old balsa to them in a bucket (laugh till I cry).
Mark |
|
| Back to top |
|
|
Sunbeam
Joined: 23 Feb 2012
Posts: 3990
City/Region: Out 'n' About
State or Province: Other
C-Dory Year: 2002
C-Dory Model: 22 Cruiser
Photos: Sunbeam
|
| Posted: Thu Sep 10, 2015 11:37 am Post subject: |
|
|
Hi Mark,
It always takes me a few days (or more) to "make the boat worse" by sawing into it. But I'm guessing that you'll be like me in that once you get going, it's such a relief to have the bad stuff out, that it's almost fun (in gross, why-do-I-even-have-to-do-this way, of course). But oh it's such a joy to have it fixed right, and not have that worry.
By the way, I see in my version #2 fix, I said to "tape" the holes. Duh, I meant to write TAP. Geez. I think that's what I'd do too. I have seen people bond in metal threaded female inserts (or even female Weld Mounts), but for things I don't take in and out too often, tapped epoxy has been fine. That said, I haven't used this way on things with a lot of back-and-forth type stress. I think if it were me I'd do a few mock-ups, mix my epoxy to be very tough (you could contact WEST System and see what they recommend for a really tough thickener mixture - they are great to talk to for tech help), and then abuse the fasteners a bit and see how it holds up. On the other hand, my only worry is any back and forth "wiggle a bad tooth" type motion, and if you have a good fit and decent preload on multiple fasteners, perhaps that's not a concern. Also, if it ever did "fail," all you'd have to do is fiill it in with epoxy and re-do (the wider epoxy plug filling the hole would likely remain). I'd rather not have metal (especially stainless) buried in there if I did not have to.
I suppose a variation would be to bond in studs (I'd use bronze), but then you'd have to be able to get the furniture up and over them. Not sure if that'd be a problem. OTOH, it would be a great index vs. placing the furniture and needing to align the holes, etc. I sometimes do studs on a piece that I need to reach in and align, etc. as then I just have to "throw" the item onto the studs, then at my leisure put the nuts on.
I suppose the force on the seats can't be TOO great if what you had there held up (sort of) for this long. I mean, it's not hard to beat a pop rivet set into balsa...
I have used the tapped epoxy plug method for my trim tab planes, battery hold downs (as I needed a perfectly flush surface to slide batteries in and out due to low clearance), transducer block, and forward hatch rim. So far, so good. I noticed that Alma's Only also used this method on transom items (saw in photo album).
I use the Dremel #115 bit, a set of Dremel sanding drums, and the dental pick to remove core. Plus a vacuum. The drums actually work the best if I can get them in there. I try to leave as much top skin as possible (and still get in to work), as it's nice to then have the epoxy plug slide under the rim for a bit of interlock. This is for dry holes, or ones where you can easily get all the damp out. Obviously it's different for huge black/mush areas. One trick for making a pattern for new glass: I used to use cardboard, back in the day; but then I started using translucent plastic that is sold to be notebook dividers (lightly colored, with tabs). It's stiff enough to be easy to work with, and you can just place it over an irregular hole (borders of which you can then see through the plastic), and then take a Sharpie and mark a line where you want the overlap of glass to end, and voila a perfect pattern. If you are laying new glass, and want to keep the area flattish, then you'd want to grind a bevel (lower area of some removed material) of a couple of inches wide into the existing glass (then the new glass can snug down into that area/and or the fiberglass "tape" attaching your saved panel to the part you didn't cut out. (Hope that's reasonably clear?) The general guideline is that you want to bevel/tape a width of about twelve times the thickness of the skin you're fixing. So say 1/4" skin, x 12 = 3" (although since this is not an underwater hull, likely 2" is fine). A lot depends on whether you want/need the repaired area to be flush, or whether an overlay is fine.
WEST has a fantastic book if you want to read/see (drawings) how to do things. It's free. I no longer see it on paper too often (used to be at marine stores, etc.), but you can read it online or download it from the link below. Each "drawing" is a chapter of the book.
http://westsystem.com/ss/use-guides/ |
|
| Back to top |
|
|
Marco Flamingo
Joined: 09 Jul 2015
Posts: 1167
City/Region: Seattle
State or Province: WA
C-Dory Year: 2004
C-Dory Model: 16 Cruiser
Vessel Name: Limpet
Photos: Limpet
|
| Posted: Thu Sep 10, 2015 7:34 pm Post subject: |
|
|
Thanks for the tips. The panel fit is too tight to slip over studs, plus even an acorn nut would be higher than the SS countersunk finish washers. The fit is so tight that for removal I had to punch the rivets back down out of the panel to get the panel out.
Here was my general method of attack. I pulled the supposedly expanded rivet out with needle nose pliers. They weren't expanded very far and most collapsed and came out easily. I then made my first exploratory drilling. Even if all looked well, I still drilled it out with a 1/2" drill. I then put the long end of a 1/8" allen wrench in my portable drill and set the clutch fairly strong. The short end I put in the hole I drilled. When I spun the drill, if the wood was good, it bounced around, the clutch slipped, and a little balsa came out. I undercut those holes just enough to get the future epoxy plug to hold.
If the wood was soft, it was turned into sawdust by the spinning allen wrench until I hit good wood and the clutch slipped. If I didn't hit good wood, I used a bigger allen wrench. If I still didn't hit solid wood, I drilled an adjacent hole. In one area, those holes then gave me the general shape of the area where the skin has to be removed.
In those areas where I drilled into good balsa, I plan to use penetrating epoxy and the right length of epoxy coated 1/2" dowel to fill the hole (if there will not be a screw). Any remaining low area will be filled with a final dollop of epoxy with a cabosil and fiberglass strand mix. The most common strand is 1/4" which is kind of long for filling 1/2" holes, but it makes a tough putty. In fact, it's so tough that it's not fun to grind smooth.
I think that the same mix is probably as good as you can get for the tapped screw areas. But some destructive tests are probably in order. I could also contact a friend of mine who is a naval architect that designs trimarans using West System. I'd would have to admit that I bought a balsa cored boat.
Mark |
|
| Back to top |
|
|
Kushtaka
Joined: 17 Dec 2013
Posts: 648
City/Region: Cordova
State or Province: AK
C-Dory Year: 1993
C-Dory Model: 22 Cruiser
Photos: Kushtaka
|
| Posted: Thu Sep 10, 2015 8:31 pm Post subject: |
|
|
| not sure I'd put dowels in, unless you pulled them up 1/8" from the bottom of their hole, cut them off, then sunk them 1/8" below your skin, then top with epoxy/gelcoat maybe? Your dowel end gran won't last long as the deck of your boat, and will become a conduit for water. |
|
| Back to top |
|
|
Marco Flamingo
Joined: 09 Jul 2015
Posts: 1167
City/Region: Seattle
State or Province: WA
C-Dory Year: 2004
C-Dory Model: 16 Cruiser
Vessel Name: Limpet
Photos: Limpet
|
| Posted: Wed Sep 30, 2015 4:12 pm Post subject: |
|
|
Good new, bad news. I drove up to Bellingham and talked with C-Dory. While there, I bought a 2 x 4 foot panel of 1.5" balsa, figuring that I would need it and I hadn't found a source in Seattle.
I also continued to pull off the helm seat panel and deck hardware. That side only had two obviously wet/rotten spots under the pop rivets. I took the bow hatch out and found the exposed balsa in the cut out unprotected (as others have found) and the balsa absolutely saturated. Basically, dripping wet. Apparently so wet that it hadn't rotted. I've reamed out enough to fill with some sort of structural epoxy putty for the screws. I'm drilling in a few places from inside in order to determine that it is all completely saturated (yes, it is) and to allow it to dry out over the next few months.
It was a perfect showcase on how to improperly install a hatch. The kicker was that it had been caulked inside and out. Caulking inside insures that when the screws leak the water won't be noticed even if it fills up the balsa.
Screws seem to be more of a problem than hardware that was through bolted, probably because a bolt that is gooped up and stuck in a hole keeps more goop on it than a screw driven through the deck. Every one of the screws on the bow pulpit had leaked and one attachment point was soggy. Maybe it's because the pulpit is an "option" that was slapped on later? Maybe because it's mounted on the non-skid deck? One of the side cleats had also leaked, but I don't think that I'll have to tear out any deck.
The bimini cover has pop-riveted little deck hardware behind the cockpit. There are also pop riveted snap fittings down the outside of the cockpit at about deck level. I've only removed a couple and they were (surprisingly) okay. Even better, when I drilled out the transom depth sounder screws the balsa was really sound. Yeah, about time for some good news.
This boat was not generally garaged, although it has been under cover for the last eight months with apparently no effect. So it's not going to naturally dry out without some ingenious coaxing. The local boat yard has a machine that applies heat and a vacuum to a hole drilled into the balsa core. I might have to come up with something like that. In the meantime, I've cut my first hole into the cockpit sole where it was clear that the area was too rotten to save. It's even too slushy to get a moisture meter reading. I found one area that looked pretty good and got a reading of 38%. Yowser.
Mark |
|
| Back to top |
|
|
|
|
You cannot post new topics in this forum
You cannot reply to topics in this forum
You cannot edit your posts in this forum
You cannot delete your posts in this forum
You cannot vote in polls in this forum
You cannot attach files in this forum
You cannot download files in this forum
|
|
 Search
 Private Messages
 Profile
 Log in
 Register
 Help
Help
