| View previous topic :: View next topic |
| Author |
Message |
Jasongalbavy
Joined: 24 May 2013
Posts: 9
City/Region: Kitimat
State or Province: BC
Vessel Name: Another G
Photos: Another G
|
 Posted: Sat Jul 05, 2014 12:20 am Post subject: I got a C-Dory! Posted: Sat Jul 05, 2014 12:20 am Post subject: I got a C-Dory! |
 |
|
Hello Folks,
Happy 4th of July.
I have been trolling this site now for about 5 years now. I must say that CBRATS is the best forum I have come across and you guys are a wealth of information and assistance.I even posted a C-Dory wanted ad, but wasn't able to find one in my area.
Life changes, the birth of a baby boy and house renovations caused the search for a c dory to take a back seat.
But I found one. Had to drive 1600 kms and take 2 ferries to get to her. But now shes mine. She needs some TLC but I should be on the water in a few weeks now.
Anyways, like I said I have been studying the forums and I am aware of the search function, but as times change and new products and technology become available, I thought I would look for some up to date advice and maybe share my journey with you all...
I bought the 1992 C-Dory 22 cruiser last week. After a pretty horrible sea trial (bad gas, dead batteries and a tow home) I still felt I had to have her, as I have a tendency to see a diamond in the rough, from a pile of crap. I paid too much but I'm committed now.
Next week I will be repowering her with a new yamaha 90 and 9.9 kicker.
BUT before I do that, I want to bring her up to spec in some other areas.
1. sealing any holes in the gecoat (PO installed bass pro shop special plastic cleats everywhere-with SS wood screws no less). I guess the saving grace was that she was kept on dryland in a boat house and the core around these areas doesnt appear to be rotten. I'll be drilling these holes out and filling with epoxy. Then topping off with gelcoat.
2.The cockpit sole,gunnel storage area , battery/livewell lazarettes and fuel tank were painted black with something (Truck bedliner?tremclad?). I want to remove this as it is flaking and looks bad. Any suggestions on paint strippers (safe on fiberglass)? or how to go about removing? I figured I'd ask before breaking out the sander. Also suggestions on paint or gelcoat? I was thinking of re-gelcoating in grey but adding a non-slip additive.
3. The wiring is a monkeys lunch. I want to rewire and label the entire boat. I have some 12V wiring experience from a past life as a car audio installer and have rewired or partial re-wired a couple boats now. Any tips or emotion support would be welcome.
4. The gauge package that comes with the yamaha is a pair of 3.5" gauges. I have a large empty spot and a small empty spot. What have others done here?
Anyways Ill keep it short as my first post but I am sure I will come up with a few more during the process.
Thanks for the password reset Bill!
Have a great weekend C-Brats!
Jason |
|
| Back to top |
|
 |
colobear
Joined: 23 Jan 2005
Posts: 2154
City/Region: Denver
State or Province: CO
C-Dory Year: 2006
C-Dory Model: 22 Cruiser
Photos: C-Cakes
|
| Posted: Sat Jul 05, 2014 1:26 am Post subject: |
|
|
congratulations and welcome. Glad to see one more Canadian C-Dory around.
_________________
Patti and Barry
formerly C-Cakes, now
rving around N. America |
|
| Back to top |
|
|
Sunbeam
Joined: 23 Feb 2012
Posts: 3990
City/Region: Out 'n' About
State or Province: Other
C-Dory Year: 2002
C-Dory Model: 22 Cruiser
Photos: Sunbeam
|
| Posted: Sat Jul 05, 2014 1:46 am Post subject: Re: I got a C-Dory! |
|
|
Welcome and congratulations on your new C-Dory! 
Good on you for tackling the core sealing. I did (and am still doing) the same, and like you, my boat was stored indoors so I started with dry core (and hope to keep it that way). I did have the advantage of no heaps of "extras" installed (don't you wish some people would just leave well enough alone!)
| Jasongalbavy wrote: | | The cockpit sole [and other areas..] Any suggestions on paint strippers (safe on fiberglass)? or how to go about removing? |
Folks I know and trust have had good luck with Franmar Soy Strip on boats. I once used Interlux's stripper, and although it's made for fiberglass I did find that it actually softened the resin after sitting for awhile (not on my C-Dory, luckily). I wouldn't say don't use it, but just get it on and off quickly if you do.
I've also used carbide scrapers on boat bottoms (surprisingly effective and quick) and a sort of odd drill wheel that I can't remember the name of (blue hub and wire "whiskers" coming out from it, but not like a typical wire wheel). That was good at getting the paint out of woven roving, but you won't likely have that problem. So I'd start with the stripper most likely
| Jasongalbavy wrote: | | Also suggestions on paint or gelcoat? I was thinking of re-gelcoating in grey but adding a non-slip additive. |
I'm all for using gelcoat to repair small holes or even bigger things in a "field" of original molded gelcoat. On the other hand, if I were doing a whole "new" area such as a cockpit sole or floorboards, then I think I would tend to paint. Gelcoat is great when sprayed in a mold (first), or being used in a repair (especially by someone skilled in it), but paint also can be good for "new" areas or delineated areas, and can be easier for some people. A two-part LPU is the hardest and longest lasting, but for a cockpit sole or floorboards I might use something like Pettit Easypoxy (which is not epoxy or an LPU, but mostly a really good alkyd paint) with a non-skid additive such as Interlux makes (or a number of other ones). Interlux makes a similar paint with the non-skid already in it called "Interdeck" that friends have been very happy with. Super easy to apply. It comes in limited colors but one of them is white so you can lighten the grey, cream, or blue they offer.
This is one of those things there are many good ways to tackle 
| Jasongalbavy wrote: | | The wiring is a monkeys lunch. |

| Jasongalbavy wrote: | | Any tips or emotion support would be welcome. |
I think you will get a lot of support and help here. Quite a few folks have published wiring diagrams or tips for various projects they have done (Ferret30 comes to mind). Also the "Blue Sea" website is helpful and they make a nice range of appropriate products. They happen to be located in Bellingham, WA.
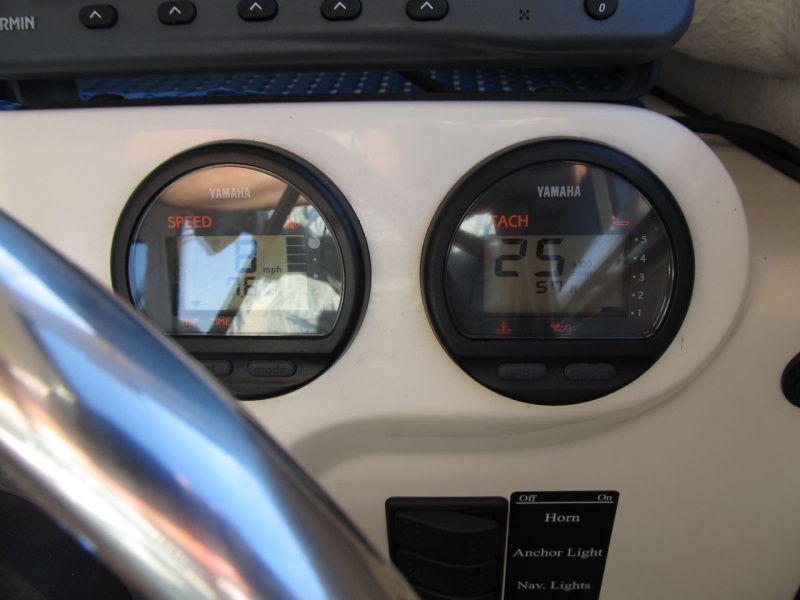
| Jasongalbavy wrote: | | The gauge package that comes with the yamaha is a pair of 3.5" gauges. I have a large empty spot and a small empty spot. What have others done here? |
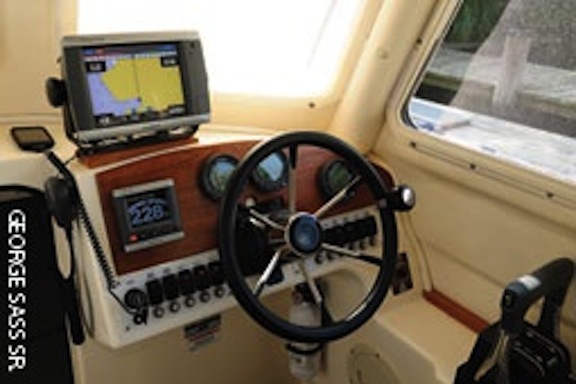
I have a Yamaha, and also have the two round gauges. They were already installed on my boat when it came to me, but they are right next to each other on the right (starboard) side of the rounded/flat area of the helm (the one that runs across behind the upper part of the wheel). I like them there. I was talking to a rigger who mentioned that he likes to install them that way (vs. one at each end of that area) so that you don't get the head-back-and-forth like you're watching a tennis match. It also leaves some space on the left for things you may want to be able to manipulate while your right hand is on the wheel or throttle (trim tab switches, etc.).
If the holes are too large or oddly placed, you could use something to make a cover plate (that covers the whole area in a natural looking way) and then make holes in that for the new gauges in the right places. I've seen this done with 1/8" black or grey plastic (rounded outside edges) or wood. Here is an extremely nice teak version on the Tomcat 255 "Viewfinder" (but I've seen humbler versions with textured plastic that also looked very good).
Again, congrats! I hope we get to see photos soon 
Edited to add a couple of photos of the Yamaha round gauges on my 22:

Last edited by Sunbeam on Sat Jul 05, 2014 2:11 am; edited 2 times in total |
|
| Back to top |
|
|
rainger
Joined: 24 Jun 2014
Posts: 112
City/Region: Victoria
State or Province: BC
Photos: C-Hawk
|
| Posted: Sat Jul 05, 2014 1:54 am Post subject: |
|
|
Hey congrats on your new boat.
I know once you get her the way you want her you will be so happy.
I just got my new boat on Wednesday. After some issues with the trailer and getting her home I am real happy after a pressure wash and an Bleach cleaning inside. |
|
| Back to top |
|
|
Larry Patrick
Joined: 03 Dec 2011
Posts: 605
City/Region: Dallas
State or Province: PA
C-Dory Year: 2008
C-Dory Model: 23 Venture
Vessel Name: Sea -Jo
|
| Posted: Sat Jul 05, 2014 11:57 am Post subject: |
|
|
| Congrats on boat,thats some miles to travel ,but im sure its worth it. Hope the day that we join the C-BRATS with a boat will be sooner than later. Working a lot of extra hours saving and looking forward to also posting about first C-DORY. enjoy your boat Larry. |
|
| Back to top |
|
|
hardee
Joined: 30 Oct 2006
Posts: 12632
City/Region: Sequim
State or Province: WA
C-Dory Year: 2005
C-Dory Model: 22 Cruiser
Vessel Name: Sleepy-C
Photos: SleepyC
|
| Posted: Sat Jul 05, 2014 12:01 pm Post subject: |
|
|
Jason, Congratulations on the "new to you" C-Dory. Welcome to the Brat site and the C-dory family. I think you will find that the wait was worth it. This is a great place with all the information, great people and ideas C-Dory style one could want.
Harvey
SleepyC 
_________________
Though in our sleep we are not conscious of our activity or surroundings, we should not, in our wakefulness, be unconscious of our sleep. |
|
| Back to top |
|
|
NORO LIM
Joined: 24 Apr 2008
Posts: 875
City/Region: Olympia
State or Province: WA
C-Dory Year: 2006
C-Dory Model: 23 Venture
Vessel Name: NORO LIM (sold 12/12/14)
Photos: NORO LIM
|
| Posted: Sat Jul 05, 2014 2:31 pm Post subject: |
|
|
Congratulations on the boat, and welcome!
You've got some great water there to use the new boat in. We were in Kitimat for the first time in our boat in May. On our previous trips up the Inside Passage, I've always eyed Kitimat as one of the many side trips I've been trying to work in. This year, Hartley Bay provided the perfect excuse by being out of fuel on our North bound trip. I'm so glad we got to explore the upper Douglas Channel and spend a couple of days in your fair city.
Happy boating!
_________________
Bill, Formerly on NORO LIM
2001 CD 16, 2001-2006
2006 CC 23, 2006-2014 |
|
| Back to top |
|
|
journey on
Joined: 03 Mar 2005
Posts: 3595
City/Region: Valley Centre
State or Province: CA
C-Dory Year: 2005
C-Dory Model: 25 Cruiser
Vessel Name: journey on
Photos: Journey On
|
| Posted: Sat Jul 05, 2014 3:01 pm Post subject: |
|
|
Welcome to comfortable boating. That cabin will be a blessing in Kitimat. Is Bishop Cove still in operation? We stopped there on our way to Alaska and spent our 1/2 hr in the hot tub enjoying life. Understood the Kitimat YC maintained the hot springs.
When I have a small gauge to mount in a big hole, I cut out a piece of plastic that's big enough to cover the existing hole, then cut a smaller hole for the gauge and mount the plastic where needed. You can make it look like it's (almost) original.
Boris |
|
| Back to top |
|
|
Dennis Meyer
Joined: 02 Jun 2010
Posts: 15
City/Region: Kitimat
State or Province: BC
C-Dory Year: 2003
C-Dory Model: 25 Cruiser
Vessel Name: C Monster
Photos: C Monster
|
| Posted: Sat Jul 05, 2014 3:29 pm Post subject: |
|
|
There are four of us in Kitimat now... We might have to organize a get-together next year!
Feel free to call if you need a tow back again.  |
|
| Back to top |
|
|
Sea-C
Joined: 16 Mar 2014
Posts: 47
City/Region: Skagit Valley
State or Province: WA
C-Dory Year: 1994
C-Dory Model: 22 Cruiser
Vessel Name: Lori-L
Photos: Lori-L
|
| Posted: Sat Jul 05, 2014 5:28 pm Post subject: Welcome Jason |
|
|
We sound like we could be twins(as far as the C-Brats site goes.) I too have just bought a 22 Cruiser. I did a lot of sole searching and reading on the Brat site before I made the purchase. I have only had it out a couple times now and also did a lot of (fix things the way it needs to be) repair. Mine is a 1994 green and white. 90 & 8 Highthrust 4 stroke Yamahas. I did most of the maintenance stuff that needed to be done before I put it in the water, so didn't have to be towed in. I have been by your area many times over the years fishing Alaska. Have fueled and stayed overnight in Rupert and many other spots up the inside. Have got my butt kicked more than once by the Queen (Charlotte). But back to your purchase, I think you probably made a good choice with the 22. The first time out with mine was in the Straits off San Juan Island in about a 25 knot wind and heavy tide. Not dangerous, but sure wasn't comfortable. The little Dory handled OK though. A little bouncy and had to back down bucking into them, but all in all I think we both made a pretty good choice.. Good luck and there are a lot of knowledgeable people on the Brat site (excluding me) that know the Dory very well and most would be more than willing to help you out in any way they might be able too I'm sure,,, myself included.
_________________
360-391-1333 text or cell |
|
| Back to top |
|
|
thataway
Joined: 02 Nov 2003
Posts: 20810
City/Region: Pensacola
State or Province: FL
C-Dory Year: 2007
C-Dory Model: 25 Cruiser
Vessel Name: thataway
Photos: Thataway
|
| Posted: Sat Jul 05, 2014 5:51 pm Post subject: |
|
|
Congratulations and welcome aboard! It sounds like you have great plans--seems to be in vogue this week to repower!
Some truck bed liners have worked well on boat decks, but if it is flaking off, it should be removed. I would start with a putty knife and see if you can lift the edges. Some times a little low heat from a heat gun will help strip items like bed liner off. Be cautious to not soften the gel coat. I would not try and "re gel coat", the cockpit area, unless you have a lot of experience doing this.
There are many excellent single part paints as I am sure you know. For a non skid area I would current choose Kiwi Grip. One of the other paints--for the cockpit sides. As with any re-paint, preparation is key, and takes the most time. The 1992 boats are just as good as the 2015 boats!
Another take on the gauges, might be to go with NMEA 2000 and display on the chart plotter/MFD. In older boats, re-facing the "dash" with a laminate or Starboard is a good options to get rid of the many holes thru the years.
We often add a second switch panel, as well as large fuse blocks, and upgrading the main wiring from the battery to the console to a larger size.
Don't let the summer slip away.
_________________
Bob Austin
Thataway
Thataway (Ex Seaweed) 2007 25 C Dory May 2018 to Oct. 2021
Thisaway 2006 22' CDory November 2011 to May 2018
Caracal 18 140 Suzuki 2007 to present
Thataway TomCat 255 150 Suzukis June 2006 thru August 2011
C Pelican; 1992, 22 Cruiser, 2002 thru 2006
Frequent Sea; 2003 C D 25, 2007 thru 2009
KA6PKB
Home port: Pensacola FL |
|
| Back to top |
|
|
Jasongalbavy
Joined: 24 May 2013
Posts: 9
City/Region: Kitimat
State or Province: BC
Vessel Name: Another G
Photos: Another G
|
| Posted: Sat Jul 05, 2014 11:37 pm Post subject: |
|
|
Thanks everyone for your warm welcome, support and advice.
For the record, the boat required a tow back to port BEFORE I purchased her. I do not intend to ever require a tow home again, more like a haul home with 2 days possession aboard...
When the weather shapes up I'll take some before photos. I've been treating this thing like a extreme makeover boat edition, as I would like to avoid summer slipping away, without us using the boat.
I'll be tackling the f/g work, painting the transom on Monday/Tuesday weather permitting.
Motor should be here Tuesday/Wednesday. New seastart steering kit maybe Thursday. Hopefully mounting the motor on Friday.
Somewhere inbetween I need to find the time for a basic rewire.
Well, back to work...
PS. Dennis my wife needs more money:) She wants a set of electrics... |
|
| Back to top |
|
|
ehmatthes
Joined: 16 Jul 2014
Posts: 7
City/Region: Sitka
State or Province: AK
C-Dory Year: 1985
C-Dory Model: 16 Angler
Photos: ehmatthes
|
| Posted: Wed Jul 16, 2014 3:24 pm Post subject: |
|
|
Hi, I live in southeast Alaska (Sitka). I've always been curious to hear more about what it's like to live on the ocean, but at the end of one of the long inlets like where Kitimat is.
What kind of fish do you catch there? Will you do most of your boating in the inlet, or do you get out to the ocean proper on a regular basis?
Eric |
|
| Back to top |
|
|
Jasongalbavy
Joined: 24 May 2013
Posts: 9
City/Region: Kitimat
State or Province: BC
Vessel Name: Another G
Photos: Another G
|
| Posted: Thu Jul 24, 2014 1:46 am Post subject: |
|
|
Hello again folks,
I've been pretty busy the last few weeks. I finished a 250 square foot sundeck in fiberglass before I tore into the boat. The admiral wanted some progress on the deck and the job was weather dependant so I had to do what I had to do and the boat would come next.
As with any other project, I found myself to be over-ambitious on both the time and cost, everything took twice as long and cost 3xs as much...
I didn't take as many photos as I intended to but here is a quick recap.
1. I stripped everything off the transom. This included the trim tabs, thru-hulls, transducers, water intake, old plastic cleats, cable straps, an livewell pump wired in with bulk lamp cord etc. I drilled out some holes that I found in various locations including the transom and the cockpit sole. I filled everything with thickened (col silica west system) epoxy. I ran into some damp in the core around abandon holes for previous transducers. I drilled the hole to 3/8, picked out what I could, and ran heaters, fans and a shopvac sucking on the hole for a week. The core shavings still smelt like fiberglass and everything sounds and feels hard so I'm not too worried about rot. I ended up painting the transom with a "brightside" top side finish. I wished I could have found the 2 part version but we dont have a huge selection up here and ordering things takes forever. I left off the trim tabs as they were installed with some sort of hydraulic line that was never designed to be on boats not to mention it doesn't fit the pump or levellers properly. New stuff is 6 dollars a foot and I need 30 feet. Thats a third of the way to brand new tabs and I get some more space under the sink. I'll be in the market for trim tabs and a perma trim for sure but I also want to try the boat naked first and see what I have.
2. I powerwahed the cockpit sole and old anti-foul paint on the hull. I tried 4 different strippers on the black "truck bed paint". The only thing that even sort of worked was "grafitti remover" and accidentally, acetone. I'll need supplied air and a set of bunker gear to try it but the stuff dissolves in the acetone but if you dont wipe it off straight away, ie within seconds it hardens up again. I never got around to getting all of it off as I believe there was at least 3 coats of this stuff on there.
3. The night before last, I stayed up all night rewiring the boat. The boat was scheduled in for new motors yesterday and I needed to get it together so they could hook up the yamaha guages. I ended up running the old battery cables, 2 new deep cycles, a new perko batt switch, a couple of power posts (one for pos, one for neg), 3 new post mount fuses, 2 new 6 guage wires ran to 2 new blue sea fuse panels (one 6 circuit, 1 12 circuit) I ended up re-using the stock switch panel but would like to upgrade this too. Anyone have any suggestions on a new switch panel for the helm? One that fits the stock panel as a direct replacement?Also Do we have any wiring schemanitics for the stock switches? I have a couple of switchs that I an unsure about jumper placement or even what each terminal does...
4. The guages will end of being mounted ala tennis match style, one on port, one on starboard. This winter I'll glass over the dash and french them in side by side.
Like I said, I've been busy. I have a few more questions as I am hoping to have the boat back tommorrow and would like to head to Bishop Cove hotsprings with the admiral and cabin boy this weekend...
We ordered up a new gps sounder (raymarine Dragonfly 5) and Standard Horizon ais/gps/dsc radio that I am waiting to arrive to install. I picked up a set of Scotty electrics that are going on Thurday or friday.
The fuel tank was one of the optional aluminum tanks. I had it checked out and a minor weld done to one of the mounting tabs. The tank appears to have been screwed to the cockpit sole in the past. Them someone mounted the aluminum tabs to a couple of pieces of stainless steel plate 3" x3"x1/2" and then jb welded them to the floor. When I pulled the tank out the jb weld (i am only assuming if was jb weld as I have worked with it before and grinded on it-smells the same) broke at the interface with the steel plate. I know this whole topic is controversial but I need to do something. I am leaning towards doing the west system recommended stainless steel wetsand with neat epoxy, paint some neat epoxy on the cockpit sole where the pads are to be, let gel and then use west system g/flex to bond the 2. Other ideas or Feedback would be apprieciated. Also I have a selction of west system adhesives but ordered and am waiting on the g-flex stuff.
My anchor locker was never equipped with a drain or a port to pass the rope into it through. We don't have any immediate plans for a windlass, as I am used to the ring and scotchman method and its what everyone up here uses, but may add one in the future. I would like to place the port for the anchor line in the same spot as I would mount a windlass. Suggestions on hole placement?
During the rewire I found the PO had cut off the connector to the wallas stove to wire in a section of lamp cord, a push pull switch and a livewell pump. I email Scan Marine today looking for a new plug. I want to hook up the stove electrically first. If it doesnt work i'll priobably yank it out and sent it into Scan for a redo.
I really just want to get this thing out on the water.
I am hoping we get out for the maiden voyage with new power this weekend.Prtobably an overnighter with a stop at the hotsprings.
I'm sick of watching my son pretend to fish off the side of the boat with a section of dock line, I need to get that boy into some halibut, ling cod, and salmon!
Anyways, need to get some rest
Goodnight all,
Jason |
|
| Back to top |
|
|
Sunbeam
Joined: 23 Feb 2012
Posts: 3990
City/Region: Out 'n' About
State or Province: Other
C-Dory Year: 2002
C-Dory Model: 22 Cruiser
Photos: Sunbeam
|
| Posted: Thu Jul 24, 2014 2:20 am Post subject: |
|
|
Wow, you've been busy! Great to hear your report
| Jasongalbavy wrote: | | Also Do we have any wiring schemanitics for the stock switches? I have a couple of switchs that I an unsure about jumper placement or even what each terminal does... |
I can't remember if there is one in the C-Dory manual or not, but I wonder if you are looking at the back of the two switches that are for the running lights and the anchor light. They have a bunch of jumpers between them. Reason is that the same all around white light does double-duty: First as the steaming-plus-stern light with the running lights; second as the anchor light without the running lights. The jumpers allow both/separate functions with the one bulb/fixture. I can post a photo of it if you have something similar (was a cluster of red jumpers IIRC).
| Jasongalbavy wrote: | | 4. The guages will end of being mounted ala tennis match style, one on port, one on starboard. |

| Jasongalbavy wrote: | This winter I'll glass over the dash and french them in side by side. [/quote
Can't wait to see that!
...Then someone mounted the aluminum tabs to a couple of pieces of stainless steel plate 3" x3"x1/2" and then jb welded them to the floor. |
I wouldn't be too excited about the aluminum and steel touching each other, at least if not well isolated (because of salt water and mixed metal interaction).
I can't totally picture how the tabs/plates/sole are interacting. I used fiberglass angles (adhered to sole) as part of my tank hold-down system. I wonder if you could use that or aluminum? In my case the angles are affixed to the sole, but then the tanks are strapped to the angles (so not a direct "weld" of the tank to the sole). I guess I like the idea of the tank tabs being attached to the tank, and then other tabs being attached to the sole and then those two being fastened or strapped or etc. (vs. them all being glued together and to the sole in one unit). But then I may not be picturing what you have correctly.
| Jasongalbavy wrote: | | My anchor locker was never equipped with a drain or a port to pass the rope into it through. ... I would like to place the port for the anchor line in the same spot as I would mount a windlass. Suggestions on hole placement? |
Here is a photograph from JKidd/Voyager's album. This shows the hole placement for a Lewmar 700 Pro/Pro Fish windlass (horizontal type). I have seen another that was mounted slightly forward of this (Kerri-On). I'm just installing one and am copying JKidd's placement. You can go by the start of the non-skid to see where it is (I don't believe that has changed, but you can probably tell).
http://www.c-brats.com/albums/Upgrades/IMG_1239.jpg
Here is the rest of the album with more photos:
http://www.c-brats.com/modules.php?set_albumName=Upgrades&op=modload&name=gallery&file=index&include=view_album.php
One note though: My boat came with a deck pipe off to one side (no windlass). Although the windlass hole is not in the same place, I think it will still come in handy because I can reach through it into the rode locker and joggle the chain, clear a "knot" or etc. So if you did put a deck pipe somewhere else, there might be that use in future. The only thing I don't like about mine is it is right where a fairlead could go (I'll have to work around it). On the other hand, if you put the deck pipe where the windlass would go, you will have options later (can always put the deck pipe elsewhere, or not have one). |
|
| Back to top |
|
|
|
|
You cannot post new topics in this forum
You cannot reply to topics in this forum
You cannot edit your posts in this forum
You cannot delete your posts in this forum
You cannot vote in polls in this forum
You cannot attach files in this forum
You can download files in this forum
|
|
 Search
 Private Messages
 Profile
 Log in
 Register
 Help
Help
