| View previous topic :: View next topic |
| Author |
Message |
Sunbeam
Joined: 23 Feb 2012
Posts: 3990
City/Region: Out 'n' About
State or Province: Other
C-Dory Year: 2002
C-Dory Model: 22 Cruiser
Photos: Sunbeam
|
 Posted: Mon Jun 16, 2014 3:37 pm Post subject: Lewmar 700 Pro (horizontal) windlass install note (hole cut) Posted: Mon Jun 16, 2014 3:37 pm Post subject: Lewmar 700 Pro (horizontal) windlass install note (hole cut) |
 |
|
I'm in the process of installing (or rather "planning") a Lewmar 700 Pro (horizontal) windlass. Although, I tell you, after lugging that thing up to the foredeck and looking at how big it is, how clean the foredeck is now, etc.... I had second thoughts! But I just have to think back to Jay (Hunky Dory) anchoring his boat by standing back with a remote control in hand and then I "re-want" it 
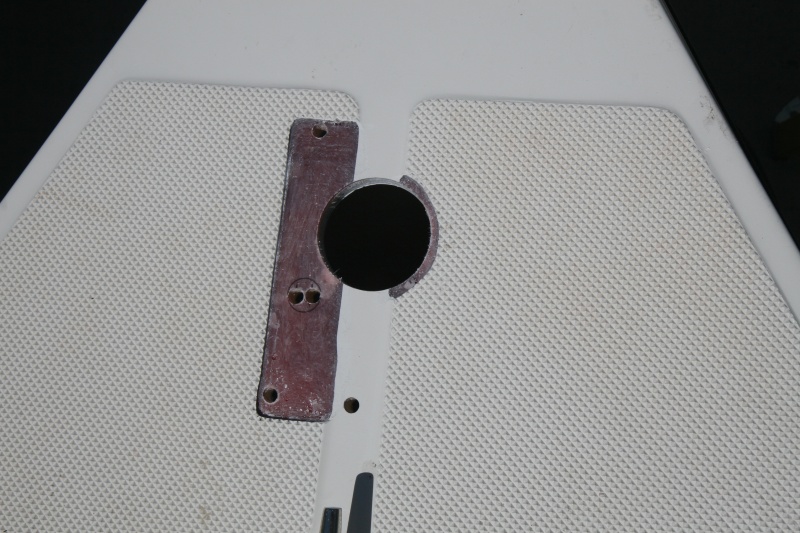
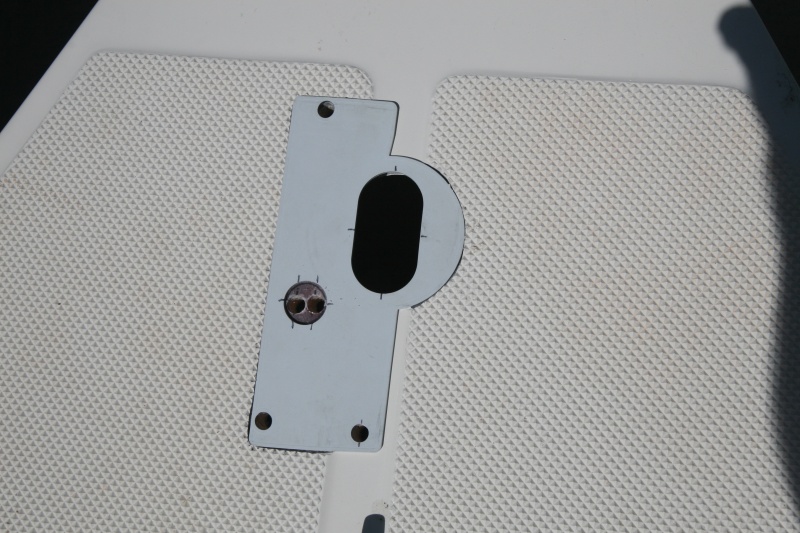
Anyway, after laying out all the parts and pieces, I came up with a question: The installation manual calls for a 3" round hole (for the "deck pipe" portion), but the hole in the bottom of the windlass -- and the gasket -- is a smaller oval. I borrowed the first two photos from Voyager's excellent album:
The hole they call for:
The shape of the gasket, which mirrors this template, and also the actual "hole" in the windlass bottom:
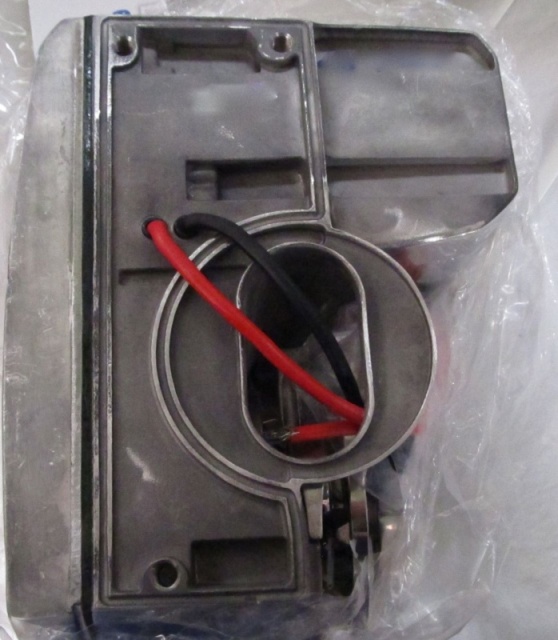
This is the bottom of the windlass:
If you use the 3" round hole, then a section of the gasket and that round plate will have nothing but air beneath them. Probably not a real issue, but since I don't have a 3" hole saw on hand, and could easily make a smaller, oval hole, I wondered. I couldn't see any downside (the chain seems to drop straight down, but I would probably make the oval slightly wider than that oval opening anyway*), but figured I didn't want to cause an "I must be smarter than they are" problem. My best guess was they were trying to make the hole drilling "easier."
So I put in a call to Lewmar last week. They called back today, and I asked them about it. They said that people had found it more complicated (more tools needed) to make an oval hole, and so when they slightly re-designed some of their windlasses, they decided to make them all work with one, 3" hole. All the same, all "easy."
So that answered my question. I'm going to go with an oval hole, because it's of about equal difficulty for me, and because I will like it slightly better without the "extra" hole under that plate (not sure yet if I will use the gasket or sealant -- usually I quickly toss the gasket and use good sealant, but it is a very nice gasket, so haven't decided yet).
*I did look at another C-Dory with the older windlass that required the smaller, oval hole. I wanted to see how likely the chain would be to "flare out" to the sides and possibly require a slightly wider hole. It seemed to want to drop straight down, and there was no evidence of scuffing on the side of the hole. I may add a bit of extra space anyway.
Sunbeam |
|
| Back to top |
|
 |
thataway
Joined: 02 Nov 2003
Posts: 20815
City/Region: Pensacola
State or Province: FL
C-Dory Year: 2007
C-Dory Model: 25 Cruiser
Vessel Name: thataway
Photos: Thataway
|
| Posted: Mon Jun 16, 2014 3:45 pm Post subject: |
|
|
I have not posted my photos of the winch install, but I use the oval, or rounded end square to be more precise. It is easy if you have the proper knowledge and tools. I did rout out the core, filled with thickened epoxy--no sign of chain slapping when we put the chain in.
I made a copy of the templet on very heavy paper to make a better templet.
I also drilled individual holes for the wires, rather than one large hole.
I ground down the non skid, and then leveled this with a thickened epoxy to make the deck area where the gasket fits level and fair for a tight seal. I used Boat life, life seal under and around the seals.
_________________
Bob Austin
Thataway
Thataway (Ex Seaweed) 2007 25 C Dory May 2018 to Oct. 2021
Thisaway 2006 22' CDory November 2011 to May 2018
Caracal 18 140 Suzuki 2007 to present
Thataway TomCat 255 150 Suzukis June 2006 thru August 2011
C Pelican; 1992, 22 Cruiser, 2002 thru 2006
Frequent Sea; 2003 C D 25, 2007 thru 2009
KA6PKB
Home port: Pensacola FL |
|
| Back to top |
|
|
Sunbeam
Joined: 23 Feb 2012
Posts: 3990
City/Region: Out 'n' About
State or Province: Other
C-Dory Year: 2002
C-Dory Model: 22 Cruiser
Photos: Sunbeam
|
| Posted: Mon Jun 16, 2014 3:55 pm Post subject: |
|
|
Thanks for the notes, Bob. I'm thinking I'll use a smaller hole saw at each end, then connect with a jig saw; but I do have a few other tools along if needed (although ironically, no 3" hole saw).
I do plan to take down the non-skid, and also to remove all the surrounding core and replace with thickened epoxy, plus a backing plate on the inside. It's nice to hear how you did it to confirm, thanks.
Good to know the chain doesn't tend to "flare out" and need the larger hole.
Sunbeam
PS: What did you do on the inside for backing? |
|
| Back to top |
|
|
jkidd
Joined: 23 Oct 2006
Posts: 1616
City/Region: Northern, Utah
State or Province: UT
C-Dory Year: 2007
C-Dory Model: 22 Cruiser
Vessel Name: Voyager
Photos: Voyager (JK)
|
| Posted: Tue Jun 17, 2014 8:58 am Post subject: |
|
|
Been thinking of adding the wireless to mine. It's really nice not to have to haul the anchor up by hand. To be able to control it from the bow or shore would be great.
_________________
Jody Kidd
KE7WNG
Northern, Utah
 |
|
| Back to top |
|
|
thataway
Joined: 02 Nov 2003
Posts: 20815
City/Region: Pensacola
State or Province: FL
C-Dory Year: 2007
C-Dory Model: 25 Cruiser
Vessel Name: thataway
Photos: Thataway
|
| Posted: Tue Jun 17, 2014 11:25 am Post subject: |
|
|
| Sunbeam wrote: |
PS: What did you do on the inside for backing? |
In the past I have used a 1/4" thick aluminum backing plate. However this time, I went with 2" fender washers, plain washers and lock washers--and medium strength thread loc in the studs into the windlass. A lot of what I do now revolves around my health. I was lucky to get these projects done, when I did.
I also added a small cleat on each side, right at the outside of the gunnel, for 5/16 snubber lines. These are also backed with 4 fender washers. I'll try and get some photos of this later today. |
|
| Back to top |
|
|
Sea Wolf
Joined: 01 Nov 2003
Posts: 8650
City/Region: Redding
State or Province: CA
C-Dory Year: 1987
C-Dory Model: 22 Cruiser
Vessel Name: Sea Wolf
Photos: Sea Wolf
|
| Posted: Tue Jun 17, 2014 11:54 am Post subject: |
|
|
| jkidd wrote: | | Been thinking of adding the wireless to mine. It's really nice not to have to haul the anchor up by hand. To be able to control it from the bow or shore would be great. |
Jody-
If you only want control from the bow or cockpit, consider the following:
I made my own DIY wired remote control for standing on the deck when cleaning or clearing the anchor rode so as to be able to operate it from up there, since the conventional switch is inconvenient back in the cabin when doing those things.
The wiring is exactly the same as the switch in the cabin/dash, and just piggy-backs onto that wiring at the relay terminals.
The remote switch is made up of a PVC pipe "T" fitting and three pieces of tubing. The one central longer one is where the wiring enters, and the two others house the momentary contact switches for the up and down functions. Mark them clearly so as to not confuse them. A trigger guard over the buttons would be a nice feature, as well as a hook to hang the control on the bow pulpit when using both hands on the rode. Accidental/unintended operation of the windlass could be very dangerous and result in loss of fingers, toes, or limbs, so this device must be used with great care!
The wired remote is stored along side the v-berth and brought out through the open deck hatch when needed. Alternately it can be led back through the cabin to the cockpit if desired. Always hang the control end up so you don't roll over on it at night in the sack!!!
This design works for windlasses with relay type switches in which a small current controls the relay which then sends the big time current (~40-80 or more amps) to the windlass motor. IMHO, IT WILL NOT BE PRACTICAL for some of the Lewmar (Simpson-Lawrence) smaller windlasses in which a simple rocker switch controls the windlass current directly (no relay involved), as the current draw makes the wiring size too large, and the full current draw has to go through the remote switch/control. It could be done, but size limitations and voltage drop considerations make it quite impractical.
OTOH, If you want to control the windlass from shore, wireless is the answer. How often would this be advantageous? Under what conditions?
Joe.  
_________________
Sea Wolf, C-Brat #31
Lake Shasta, California
  
"Most of my money I spent on boats and women. The rest I squandered'. " -Annonymous |
|
| Back to top |
|
|
Sunbeam
Joined: 23 Feb 2012
Posts: 3990
City/Region: Out 'n' About
State or Province: Other
C-Dory Year: 2002
C-Dory Model: 22 Cruiser
Photos: Sunbeam
|
| Posted: Tue Jun 17, 2014 1:01 pm Post subject: |
|
|
| jkidd wrote: | | Been thinking of adding the wireless to mine. It's really nice not to have to haul the anchor up by hand. To be able to control it from the bow or shore would be great. |
That's what sealed the deal for me. I saw Jay using his at Powell, and how handy it was. I ordered one. I will say the wiring diagram for the remote is making me a bit cross-eyed, with all its "T" junctions. It all looked so clear and easy until I got to that part of it.
 |
|
| Back to top |
|
|
BrentB
Joined: 15 Jul 2006
Posts: 4419
City/Region: Greenwood
State or Province: IN
Photos: BrentB
|
| Posted: Tue Jun 17, 2014 1:22 pm Post subject: |
|
|
maybe add a terminal strip (board)
useful for troubleshooting and part repalcement down the road
_________________
Brent Barrett |
|
| Back to top |
|
|
Sunbeam
Joined: 23 Feb 2012
Posts: 3990
City/Region: Out 'n' About
State or Province: Other
C-Dory Year: 2002
C-Dory Model: 22 Cruiser
Photos: Sunbeam
|
| Posted: Tue Jun 17, 2014 2:02 pm Post subject: |
|
|
| BrentB wrote: | maybe add a terminal strip (board)
useful for troubleshooting and part repalcement down the road |
Now why didn't I think of that. You mean where all those "T" junctions would be over by the switches and remove receiver box, right? (I don't have foot switches, but do have the main rocker switch and the remote receiver box). That sounds like a great idea -- thank you!
Sometimes I wonder if posting about things like this (or certain bonehead moves I've made) will make everyone think (realize?) that I'm clueless, but this is the huge upside: A great idea that did not occur to me, due to lack of experience.
I'm sure Blue Sea will have a clever and tidy one for me to order 
Edit: Looks like a Blue Sea 2404 would be the right one (?)
http://www.bluesea.com/products/2404/Terminal_Block_20A_-_4_Circuit

I do notice that that has #6 screws, whereas the 2504 has #8 screws. I suppose I might up-size to that one with no harm if I already have a bag of #8 heat shrink ring terminals (will have to check stock, etc.).
Sunbeam |
|
| Back to top |
|
|
jkidd
Joined: 23 Oct 2006
Posts: 1616
City/Region: Northern, Utah
State or Province: UT
C-Dory Year: 2007
C-Dory Model: 22 Cruiser
Vessel Name: Voyager
Photos: Voyager (JK)
|
| Posted: Tue Jun 17, 2014 2:36 pm Post subject: |
|
|
| I haven't seen the receiver part yet but I would guess 1 hot wire, 1 negative wire, 1 for up, and 1 for down. I can parallel them all off the back of my estop and up down switch. Should be easy. Adding the extra terminal would be nice but it will also make more places for things to go wrong. Joe when I installed mine I replaced the switch with the contactor so in the future I could add more switches like you said. I single hand the boat so it would be nice to put the bow on the shore jump off and pay out the anchor set it and tighten thing up from the shore. Maybe I'm being a little lazy but I'm ok with that if it is going to save some time in the wind. |
|
| Back to top |
|
|
BrentB
Joined: 15 Jul 2006
Posts: 4419
City/Region: Greenwood
State or Province: IN
Photos: BrentB
|
| Posted: Tue Jun 17, 2014 2:46 pm Post subject: |
|
|
Are you using their relay and wireless module?
That looks like the way to go! |
|
| Back to top |
|
|
jkidd
Joined: 23 Oct 2006
Posts: 1616
City/Region: Northern, Utah
State or Province: UT
C-Dory Year: 2007
C-Dory Model: 22 Cruiser
Vessel Name: Voyager
Photos: Voyager (JK)
|
|
| Back to top |
|
|
thataway
Joined: 02 Nov 2003
Posts: 20815
City/Region: Pensacola
State or Province: FL
C-Dory Year: 2007
C-Dory Model: 25 Cruiser
Vessel Name: thataway
Photos: Thataway
|
| Posted: Tue Jun 17, 2014 3:12 pm Post subject: |
|
|
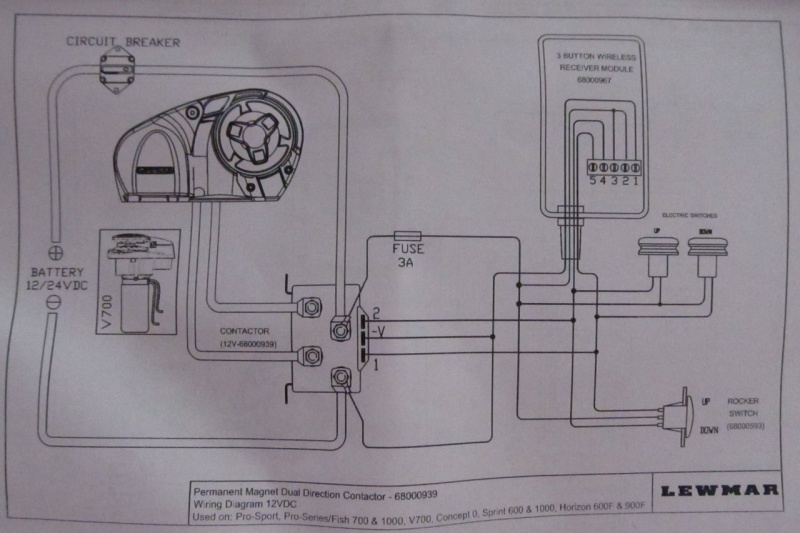
The wiring is very simple--and basically the same as the up and down switch--there is a PDF diagram (first diagram) which shows the positive in red, which may make it simpler:
http://www.lewmar.com/assets/img/dataset/Manual_3%20and%205%20button%20wiring%20diagrams.pdf
Using a 4 point terminal block would be appropriate, and keep form using spade connection doublers on the contractor.
Cost of the remote receiver and fob is $275 to $360, depending on source.
I can see where it might be handy going stern too at Powell. Of course that depends on the beach--or lack of a beach. Hopefully no one around has a device which operates on the same frequency
(There is an "on" button on the fob). I would invasion using a wired remote as Joe suggested-- Our technique is to let out the right amount of rode, then go fast astern, and pull the motor up, hopefully the anchor line coming tight with the stern about 2 feet from the beach waterline
(Anchor is set first). |
|
| Back to top |
|
|
BrentB
Joined: 15 Jul 2006
Posts: 4419
City/Region: Greenwood
State or Province: IN
Photos: BrentB
|
| Posted: Tue Jun 17, 2014 3:14 pm Post subject: |
|
|
Is the faceplacte metal or plastic?
Plastic degrades over time and wish Lewmar used metal |
|
| Back to top |
|
|
Sunbeam
Joined: 23 Feb 2012
Posts: 3990
City/Region: Out 'n' About
State or Province: Other
C-Dory Year: 2002
C-Dory Model: 22 Cruiser
Photos: Sunbeam
|
| Posted: Tue Jun 17, 2014 4:03 pm Post subject: |
|
|
Thataway: Thanks for the additional info on your install. I can understand exactly why you used fender washers, and I agree they will be fine. I did notice on my stock bow pulpit that some of the fender washers had dug into the gelcoat on the overhead, but I attribute this to tightening them against balsa core, whereas you have firm epoxy fill behind yours, and so they are not "crushable."
I'll probably go with a backing block, because I can and have the material on hand, but I'm sure it's overkill. Plus, unless you tie it into the topsides (which would be complete overkill on a boat our size), it's all just the same deck anyway. The load is spread with a block, but not to any additional component. |
|
| Back to top |
|
|
|
|
You cannot post new topics in this forum
You cannot reply to topics in this forum
You cannot edit your posts in this forum
You cannot delete your posts in this forum
You cannot vote in polls in this forum
You cannot attach files in this forum
You cannot download files in this forum
|
|
 Search
 Private Messages
 Profile
 Log in
 Register
 Help
Help
