| View previous topic :: View next topic |
| Author |
Message |
thataway
Joined: 02 Nov 2003
Posts: 20808
City/Region: Pensacola
State or Province: FL
C-Dory Year: 2007
C-Dory Model: 25 Cruiser
Vessel Name: thataway
Photos: Thataway
|
 Posted: Wed May 28, 2014 2:52 pm Post subject: Technique for proper wire crimps Posted: Wed May 28, 2014 2:52 pm Post subject: Technique for proper wire crimps |
 |
|
One common issue which comes up on all of our boats is adding another XXX electrical circuit--appliance--electronic. Almost always this includes doing either a butt connector or a ring terminal. Another thread brought up what is a proper crimp and connection.
There are a couple of good links to start with:
http://www.pbase.com/mainecruising/wire_termination
and a continuation with discussion:
http://forums.sbo.sailboatowners.com/showthread.php?t=125926
First the cut, should be a scissor type of cutting tool, which leaves a clean end--diagonal type of cutters tend to pinch the wire and jacket, and don't leave as clean a cut.
For stripping, I have a small type of scissor type with "V" on both sides of the jaws, and with different sizes of wire and insulation, you apply different amounts of pressure, to get a clean cut on insulation. I have tried a whole bunch of the "automatic" strippers. They are handy, and fast, but often I find that they cut off too many of the strands, or don't give a clean cut
.
I purchased a good double crimp ratchet tool, with parallel jaws, for shrink adhesive terminals many years ago. It is made by Ancor, and the new ones don't seem to be quite as good. In the above links there are other brands listed. I don't like the "multi tools" which strip, crimp, cut etc. They don't do any well. The double ratchet crimping tool will give consistent pressure crimps, which are clean and secure.
The best connectors are marine type--with copper body/ring, have two sizes of the metal which is pressed. The larger diameter which crimps around the wire and takes some of the load on the wire insulation, and the diameter which fits the wire size you are using. The insulating covering is best if you have adhesive lined shrink tubing. Next best, if insulated, without shrink, but then you put adhesive lined shrink tubing over the crimp, and heat it with a low heat gun (not a cigarette lighter
! In either case you need the adhesive shrink to increase the strength, and avoid metal fatigue from vibration.
Remember that there are also "step down" butt connectors, which allow you to join a #10 wire to a #16 wire, or a #14 wire to a #22 wire.

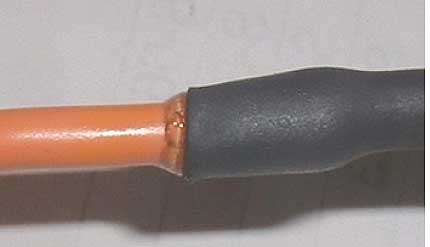
The dimple on the crimp should be opposite the cut on the fitting. You never want to break the plastic insulation.

The adhesive shrink tubing should be just a little larger in internal diameter than the crimp fitting it is going over. Heat shrink adhesive lined tubing comes in a number ofl shrink factors: such as 1:2, 1:3 and 1:6. Usually I use the 1:3 factor tubing.
[img]http://www.cabletiesandmore.com/american/catalog/images//heatshrink/HS31A.jpg [/img]
Below is a photo of adhesive leaking out of the end of a properly shrunk tubing.
For the larger cables such as #4 thru 000. There are several choices: from hit it with a hammer or clamp in a vise multitools (lowest on the list)

Or another type--both of these work best with a vise, rather than a hammer.

Large jawed crimpers, as used for rigging,

There are bolt drawn crimpers--again like used for rigging, which will work,

and hydraulic crimpers such as at Harbor Freight. (one problem with these is the the dyes are not exactly correct for each size of cable)

In all of these, you have to be sure that the crimp you make will be solid, since some are not specifically designed for battery cables.
I know that other C Brats have lots of experience with crimping and would like to see their suggestions.
_________________
Bob Austin
Thataway
Thataway (Ex Seaweed) 2007 25 C Dory May 2018 to Oct. 2021
Thisaway 2006 22' CDory November 2011 to May 2018
Caracal 18 140 Suzuki 2007 to present
Thataway TomCat 255 150 Suzukis June 2006 thru August 2011
C Pelican; 1992, 22 Cruiser, 2002 thru 2006
Frequent Sea; 2003 C D 25, 2007 thru 2009
KA6PKB
Home port: Pensacola FL |
|
| Back to top |
|
 |
rogerbum
Joined: 21 Nov 2004
Posts: 5922
City/Region: Kenmore
State or Province: WA
C-Dory Year: 2008
C-Dory Model: 255 Tomcat
Vessel Name: Meant to be
Photos: SeaDNA
|
| Posted: Wed May 28, 2014 4:28 pm Post subject: |
|
|
That's good info Bob. On one or two occasions, I needed to make a repair and I didn't have the marine heat shrink connectors available. In such cases, I have painted the connection thoroughly with "Liquid Electrical tape". I also use the same on connectors when I feel like the heat shrink didn't work as well as I'd like it to or on other connectors (like my down rigger cables) that don't seem well enough sealed for my happiness. The liquid tape seems to work well and is another way to get a good seal.
_________________
Roger on Meant to be |
|
| Back to top |
|
|
thataway
Joined: 02 Nov 2003
Posts: 20808
City/Region: Pensacola
State or Province: FL
C-Dory Year: 2007
C-Dory Model: 25 Cruiser
Vessel Name: thataway
Photos: Thataway
|
| Posted: Wed May 28, 2014 4:42 pm Post subject: |
|
|
Absolutely--there are many uses for liquid electrical tape, and I try and always have it aboard. You can use it to seal the connectors, solder joints, and at the end of a heat shrink ring connector, where there is some wire still bare.
I also use the same liquid tape to secure the burnt ends of dock lines or anchor lines. Also when doing splices, I heat cut/burn the ends of the tucks, and put a couple of dabs of liquid tape on them.
For tools, on the boat. I keep a set of Diagonal cutters always by the helm. These are older heavy duty, and did not have vinyl on the handles--a few dips of liquid electrical tape does the job. Protects from rust, and makes them easier to grip. |
|
| Back to top |
|
|
potter water
Joined: 12 Apr 2011
Posts: 1076
City/Region: Logan
State or Province: UT
C-Dory Year: 1997
C-Dory Model: R-21 Tug
Vessel Name: Poopsy
Photos: Still C-razy
|
| Posted: Wed May 28, 2014 7:12 pm Post subject: |
|
|
terrific technical post!
_________________
You can tell a man his wife is ugly, but never ever criticize his dog, his gun, his truck or his boat.
Never let ignorance interfere with an opportunity to state a knowledgeable opinion
Testosterone Tales-Amazon.com
2006 C-Dory 22 Cruiser 2008-2014
1997 Ranger Tug 21 Classic 2016
KG7RC |
|
| Back to top |
|
|
BrentB
Joined: 15 Jul 2006
Posts: 4419
City/Region: Greenwood
State or Province: IN
Photos: BrentB
|
| Posted: Wed May 28, 2014 7:44 pm Post subject: |
|
|
I purchased a good double crimp ratchet tool, with parallel jaws, for shrink adhesive terminals many years ago. It is made by Ancor, and the new ones don't seem to be quite as good.
I purchased a Ancor double crimp ratchet tool
Is considered a new one?
It works fine for me
A good tip
When crimping an insulated terminal with a double crimper it is important to note the direction of the terminal. The "open end" or the end you feed the wire into should always face the colored dots! The reason for this is simply that the dies are not symmetrical. The end where the colored dot is crimps the strain relief portion of the terminal and the other side crimps the barrel and wire creating a cold formed crimp.
_________________
Brent Barrett |
|
| Back to top |
|
|
BrentB
Joined: 15 Jul 2006
Posts: 4419
City/Region: Greenwood
State or Province: IN
Photos: BrentB
|
| Posted: Wed May 28, 2014 8:44 pm Post subject: |
|
|
pic of connector in the crimper
[img]http://www.pbase.com/mainecruising/image/93408973[/img] |
|
| Back to top |
|
|
thataway
Joined: 02 Nov 2003
Posts: 20808
City/Region: Pensacola
State or Province: FL
C-Dory Year: 2007
C-Dory Model: 25 Cruiser
Vessel Name: thataway
Photos: Thataway
|
| Posted: Wed May 28, 2014 9:25 pm Post subject: |
|
|
Two lessons here:
Be sure that the link has one of the photo modes in the link, like JPEG:

The second is the sentence from the link--and a warning, that:
"Other double crimp tools may be different so check with you manufacturer for instructions. The side with the smallest crimped ID is the one to crimp the bare wire end."
My Ancor tool (probably older than Brent's) is just the opposite. There are many different types and brands of crimpers. I always look at the crimped fitting, and the tool, so be sure that the wire is crimped in the tightest crimp.
 |
|
| Back to top |
|
|
BrentB
Joined: 15 Jul 2006
Posts: 4419
City/Region: Greenwood
State or Province: IN
Photos: BrentB
|
| Posted: Thu May 29, 2014 7:51 am Post subject: |
|
|
thanks
Each crimper can be different and need to follow the instructions |
|
| Back to top |
|
|
thataway
Joined: 02 Nov 2003
Posts: 20808
City/Region: Pensacola
State or Province: FL
C-Dory Year: 2007
C-Dory Model: 25 Cruiser
Vessel Name: thataway
Photos: Thataway
|
| Posted: Thu May 29, 2014 7:33 pm Post subject: |
|
|
I goofed--I do not have an Ancor crimper. My apology. My lesson, double check the brand of the tool! In fact I don't know what brand it is. There is a "AVP CS" sticker on in, and no brand name. The CS stands for "Geprüfte Sicherheit" (had to use an 10 X loop to read that) Which means that it meets German and European technical safety standards
for this type of tool.
It looks very similar to the older Ancor's, and I never did check the brand, just assumed it was an Ancor. I bought it in 1973 at Captain's Locker, Long Beach CA, which became West Marine's second store a couple of years later. Looks pretty good for a tool which is 40 years old, and has been on board sailing boats for well over 100,000 miles...
Here are the photos
The side with the color coded dots which correspond with the size of the crimp fitting: This is the opposite of the tool Brent pictured--and his tool.
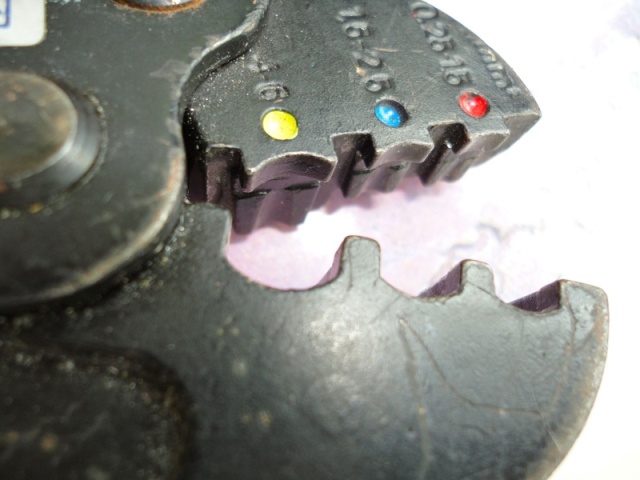
The other side, Notice the deeper crimp which will occur where the wire is pressed into the metal of the connector. This looks slightly different than the jaws of the Ancor--in that there are different lips on both sides of the dye. This tool is harder to use than the Ancor, because you are having to look at the side of the crimp away form you to be sure that it is precisely lined up--but it works very well, and I have never had a crimp fail. (but I do pull on them before doing the heat shrink adhesive).

Note that these jaws are not replaceable and I believe that they are forged. I do have another crimper in the RV with replaceable jaws, but this particular unit makes a better crimp. |
|
| Back to top |
|
|
BrentB
Joined: 15 Jul 2006
Posts: 4419
City/Region: Greenwood
State or Province: IN
Photos: BrentB
|
| Posted: Thu May 29, 2014 8:45 pm Post subject: |
|
|
| only if it could talk |
|
| Back to top |
|
|
|
|
You cannot post new topics in this forum
You cannot reply to topics in this forum
You cannot edit your posts in this forum
You cannot delete your posts in this forum
You cannot vote in polls in this forum
You cannot attach files in this forum
You cannot download files in this forum
|
|
 Search
 Private Messages
 Profile
 Log in
 Register
 Help
Help
