| View previous topic :: View next topic |
| Author |
Message |
slowtrot
Joined: 18 Jul 2012
Posts: 47
City/Region: dawsonville
State or Province: GA
C-Dory Year: 2006
C-Dory Model: 19 Angler
Vessel Name: Dabbler
|
 Posted: Thu Feb 20, 2014 1:10 pm Post subject: fuel tank cleat attachment methods Posted: Thu Feb 20, 2014 1:10 pm Post subject: fuel tank cleat attachment methods |
 |
|
I have a 2006 CD19 and am starting the potting process. The fuel tank cleats on my boat look like they are fiberglassed to the hull. Does anyone with a 22 or 19 have this same construction. When did the factory seem to go to the fiber in cleat design?
This could be just wishful thinking on my part to avoid the work.
tks Slowtrot |
|
| Back to top |
|
 |
Sunbeam
Joined: 23 Feb 2012
Posts: 3990
City/Region: Out 'n' About
State or Province: Other
C-Dory Year: 2002
C-Dory Model: 22 Cruiser
Photos: Sunbeam
|
| Posted: Thu Feb 20, 2014 1:46 pm Post subject: |
|
|
I have (had) the "plain old cleat screwed to the hull" style in my 2002. I have only really looked at photos of the newer boats, but it looks to me as though they started fiberglassing the cleats to the hull in the mid 2000's sometime. So it's reasonable to think yours are, if they look that way. I don't know what was used to form the "body" of the cleat (various possibilities include foam, wood, fiberglass, etc.).
I believe that when CD went to the flat, "permanent" cockpit sole that the drop-in unit (glued to the hull) included a molded pan/cleats for the fuel tanks. In that case I would guess the "cleats" are part of the molding (i.e. humps in the mold) but I'm not sure. This would probably be fairly obvious when looking at it in person.
Perhaps your 2006 is of the era with the rounded cockpit sole like mine (i.e. it is the hull "top"), but the improved cleat design (which looks like some sort of cleat or form fiberglassed to the hull). If you do have this then I would say all is well, with the possible exception that if the cleat form is, say, wood - and if there are screws into it - then it may have taken on water. Still, the fiberglass would likely be all that is needed for strength once it has cured (as with a stringer), so even if the wood (if it exists) rotted the cleat shape would still be viable. One might want to re-evaluate any fasteners into it then (if there even are any).
I took out my Starboard cleats and overdrilled/filled the holes, then went back in with a different design that utilized fiberglass angles bonded to the hull for the "cleats" (they double as anchors for the cover panels and the forward end of the hold-down straps), and footman loops bonded to the hull for the after side of the straps. In the original design, the straps were attached aft at the bottom of the tanks, and forward at the top of the free-standing cover panels.... talk about "wrong" leverage! Now the straps run from the hull/angles forward to the transom near the top of the tanks - a stronger arrangement.
I thought of a number of ways to re-do the tanks/cleats - just happened to choose the one I did for a few reasons, but there are quite a few "good" ways, I think.
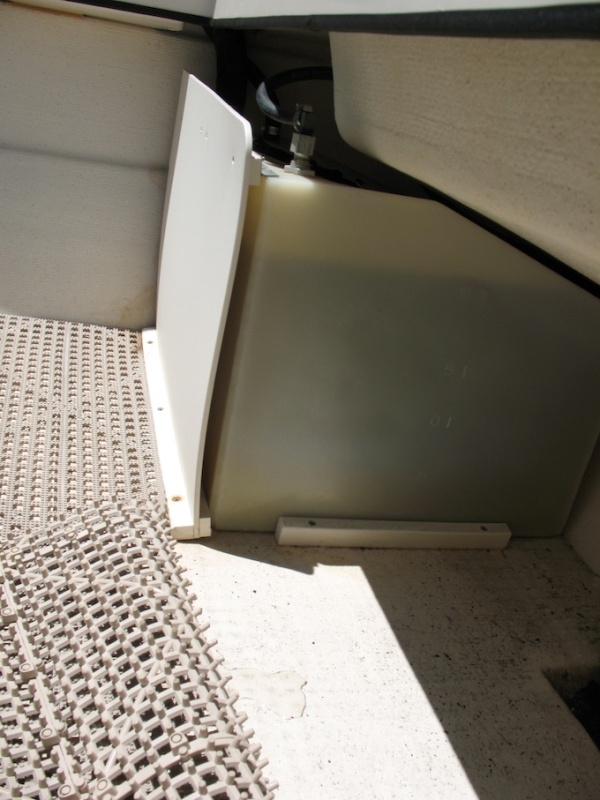
Edit: By the way, here is a photo of the fuel tanks/cleats in my 2002 as purchased. These were cleats made of Starboard type plastic which were screwed directly into the hull core. There was some sealant (not much) (and I don't recommend this type of installation anyway), but a few things made it even less likely to work properly. One is that this type of plastic doesn't "take" sealant very well (although I have been experimenting with Starboard and butyl with pretty good results - although I still would not use it in this type of application), another is that Starboard "moves" a fair bit, and third is that while poly fuel tank mfgrs. recommend quite a bit of expansion clearance be left between the tanks and cleats, it doesn't look like C-Dory left any, and so when the tanks predictably expanded, they "levered" the cleats right out of the sole (as you can see). Luckily my boat had been stored indoors, but even still there was a slight amount of damp core I had to remove (the slope of the sole funneled any slight amount of water right into the holes).
Having the tank hold-down straps attached to the top of the cover panel (!) probably didn't help matters either.
If your cleats don't look like this style, then there is a good chance they are the better type that may not need any re-doing.
 |
|
| Back to top |
|
|
thataway
Joined: 02 Nov 2003
Posts: 20860
City/Region: Pensacola
State or Province: FL
C-Dory Year: 2007
C-Dory Model: 25 Cruiser
Vessel Name: thataway
Photos: Thataway
|
| Posted: Thu Feb 20, 2014 3:46 pm Post subject: |
|
|
My 2006 C Dory 22, has the cleats glassed in--and do not require any modifications. There may be some variation from boat to boat even during the same year.
_________________
Bob Austin
Thataway
Thataway (Ex Seaweed) 2007 25 C Dory May 2018 to Oct. 2021
Thisaway 2006 22' CDory November 2011 to May 2018
Caracal 18 140 Suzuki 2007 to present
Thataway TomCat 255 150 Suzukis June 2006 thru August 2011
C Pelican; 1992, 22 Cruiser, 2002 thru 2006
Frequent Sea; 2003 C D 25, 2007 thru 2009
KA6PKB
Home port: Pensacola FL |
|
| Back to top |
|
|
BrentB
Joined: 15 Jul 2006
Posts: 4419
City/Region: Greenwood
State or Province: IN
Photos: BrentB
|
| Posted: Thu Feb 20, 2014 3:55 pm Post subject: Re: fuel tank cleat attachment methods |
|
|
| slowtrot wrote: | I have a 2006 CD19 and am starting the potting process. The fuel tank cleats on my boat look like they are fiberglassed to the hull. Does anyone with a 22 or 19 have this same construction. When did the factory seem to go to the fiber in cleat design?
This could be just wishful thinking on my part to avoid the work.
tks Slowtrot |
Can you post a pic?
_________________
Brent Barrett |
|
| Back to top |
|
|
mgarr682
Joined: 29 Sep 2012
Posts: 182
City/Region: Asheville
State or Province: NC
C-Dory Year: 2013
C-Dory Model: 22 Angler
Vessel Name: Glenda Jean
Photos: Glenda Jean
|
| Posted: Fri Feb 21, 2014 2:08 pm Post subject: |
|
|
| Sunbeam wrote: | | I have (had) the "plain old cleat screwed to the hull" style in my 2002. |
My 2013 Angler has the very same cleats you show in your picture, starboard screwed to the inside of he hull. An excellent way for water to get into the balsa core.
_________________
Mike Garrett
 |
|
| Back to top |
|
|
Captains Cat
Joined: 03 Nov 2003
Posts: 7313
City/Region: Cod Creek>Potomac River>Chesapeake Bay
State or Province: VA
C-Dory Year: 2005
C-Dory Model: 22 Cruiser
Vessel Name: Captain's Choice II
Photos: Captain's Cat
|
| Posted: Fri Feb 21, 2014 3:26 pm Post subject: |
|
|
| mgarr682 wrote: | | Sunbeam wrote: | | I have (had) the "plain old cleat screwed to the hull" style in my 2002. |
My 2013 Angler has the very same cleats you show in your picture, starboard screwed to the inside of he hull. An excellent way for water to get into the balsa core. |
Well, that's discouraging that the new Mfr is still doing this. At least on the Angler he has.
Charlie
_________________
CHARLIE and PENNY CBRAT #100
Captain's Cat II 2005 22 Cruiser
Thataway (2006 TC255 - Sold Aug 2013)
Captain's Cat (2006 TC255 - Sold January 2012)
Captain's Kitten (1995 CD 16 Angler- Sold June 2010)
Captain's Choice (1994 CD 22 Cruiser- Sold Jun 2007)
Potomac River/Chesapeake Bay
K4KBA |
|
| Back to top |
|
|
rogerbum
Joined: 21 Nov 2004
Posts: 5922
City/Region: Kenmore
State or Province: WA
C-Dory Year: 2008
C-Dory Model: 255 Tomcat
Vessel Name: Meant to be
Photos: SeaDNA
|
| Posted: Fri Feb 21, 2014 4:10 pm Post subject: |
|
|
It was around 2005 or so that the (previous) factory started glassing in the cleats. I took my 2003 back to the factory around that time for some other work and they (at no charge to me) took out the old cleats and put in the glassed ones. I have to agree with Charlie that it's disappointing to find a 2013 built by the new crew at the factory with the cleats screwed into the cockpit sole.
_________________
Roger on Meant to be |
|
| Back to top |
|
|
Sunbeam
Joined: 23 Feb 2012
Posts: 3990
City/Region: Out 'n' About
State or Province: Other
C-Dory Year: 2002
C-Dory Model: 22 Cruiser
Photos: Sunbeam
|
| Posted: Fri Feb 21, 2014 5:41 pm Post subject: |
|
|
I agree -- sad to see that on a 2013. You know, people talk about wanting new features and design changes; but I just wish (or at least wish first) that simple basic things that have been known problems could be corrected. It's seeing a repeated problem that gets to me. Some things are very labor intensive or expensive (or both) to change, but I'm thinking about "simple" things such as not repeating a problematic cleat installation 11 years later. I suppose this is only on the Angler, since it doesn't use the "new" pan/liner design in the cockpit that the Cruiser got circa 2007. But no reason the Angler could not have a better installation (such as the Cruiser had from 2005 to 2007 or so).
Another example would be letting in a solid fiberglass area in the hull mold (small section in bottom/transom corner) where trim-tab fasteners will go. Seems like just about every boat gets them, and it's an area that then has fasteners into core beneath the waterline (unless one changes that themselves). Setting up the mold to make that area solid fiberglass would only need to be done once.
I am very glad to hear that the new builder is apparently eliminating the core from the small "sump" area near the transom/center. I did that myself on my boat but it's so much easier to do during the build, and it's a spot that's ripe for fasteners and through hulls. Good move on their part  |
|
| Back to top |
|
|
thataway
Joined: 02 Nov 2003
Posts: 20860
City/Region: Pensacola
State or Province: FL
C-Dory Year: 2007
C-Dory Model: 25 Cruiser
Vessel Name: thataway
Photos: Thataway
|
| Posted: Fri Feb 21, 2014 5:51 pm Post subject: |
|
|
| Sunbeam wrote: | on (such as the Cruiser had from 2005 to 2007 or so).
Another example would be letting in a solid fiberglass area in the hull mold (small section in bottom/transom corner) where trim-tab fasteners will go. Seems like just about every boat gets them, and it's an area that then has fasteners into core beneath the waterline (unless one changes that themselves). Setting up the mold to make that area solid fiberglass would only need to be done once.
|
Why would it take any change in the mold? Gelcoat remains the same, outside laminates remains the same, the only difference, is no core is put in the area where the trim tabs/ cylinder goes, Glass is laminated in there instead, and the rest of the laminate continues as before. It might take a little more hand labor. |
|
| Back to top |
|
|
Sunbeam
Joined: 23 Feb 2012
Posts: 3990
City/Region: Out 'n' About
State or Province: Other
C-Dory Year: 2002
C-Dory Model: 22 Cruiser
Photos: Sunbeam
|
| Posted: Fri Feb 21, 2014 7:54 pm Post subject: |
|
|
I see what you mean - thanks for catching that! Probably shows that I have only built small things in molds (parts, kayaks, etc.), and even that has been a long while ago  I guess I should have said "a change in the layup schedule" or something like that. I other words, change the pattern of the transom core to eliminate a small section where the trim tabs go and make that area "solid" instead. So it may be even easier to do than I thought. I guess I should have said "a change in the layup schedule" or something like that. I other words, change the pattern of the transom core to eliminate a small section where the trim tabs go and make that area "solid" instead. So it may be even easier to do than I thought.
Granted, one could then say why not do that for all core penetrations (and you'd get no argument from me, but I can see where it would end up being expensive); but I would consider it a great step to at least do it for the most common below-the-waterline ones, such as the trim tabs, and the transom drain plug area. |
|
| Back to top |
|
|
slowtrot
Joined: 18 Jul 2012
Posts: 47
City/Region: dawsonville
State or Province: GA
C-Dory Year: 2006
C-Dory Model: 19 Angler
Vessel Name: Dabbler
|
| Posted: Fri Feb 21, 2014 8:05 pm Post subject: |
|
|
2006 CD 19
I did the balsa dig out and potting fill on the hatches , transducer, and drain. No dampness anywhere. The transom was some kind of high density foam.
I got lucky and the fuel tank cleats are glassed in.
I used an old rabbet bit ground down held in an electric drill for the hatches. I used another modified bit for the transducer holes. I ground an allen wrench with a hook end so I could go deep on the drain hole and have the screws firmly in the epoxy.
If I was going to do this in production I would use a bearing piloted bit shaped for each application so that one pass with a router would get it all out. With the right kind of epoxy injector this could all be reduced to less than 15 min per boat.
Slowtrot |
|
| Back to top |
|
|
thataway
Joined: 02 Nov 2003
Posts: 20860
City/Region: Pensacola
State or Province: FL
C-Dory Year: 2007
C-Dory Model: 25 Cruiser
Vessel Name: thataway
Photos: Thataway
|
| Posted: Fri Feb 21, 2014 8:31 pm Post subject: |
|
|
| slowtrot wrote: |
The transom was some kind of high density foam.
If I was going to do this in production I would use a bearing piloted bit shaped for each application so that one pass with a router would get it all out. With the right kind of epoxy injector this could all be reduced to less than 15 min per boat
|
It appears that after 2006 the boats have foam transoms. There also seems to be foam in the hull in the most recent boats.
To do it really right--all of the bolt holes (railings, cleats, screw holes hawse pipe, etc) would have to be potted with epoxy. The way the C Dory is built they do the laminate, and then cut out a template for openings. There is a waste of materials doing this. I suspect it would take considerably more than 15 minutes to do this even the main hatches, including the filling with epoxy, any masking and clean up. There ia also the option of putting core material in the areas where there going to be holes or points of stress.
The reality is that almost no builder does it this way, and the buying public does not demand it. It should be done--but is not. In the 20 boats we cut up when doing our core sampling studies, with ultrasound, there were some which were over 30 years old, and no problems where there were penetrations--and there were some boats only a few years old which did have problems. |
|
| Back to top |
|
|
Grazer
Joined: 16 Dec 2011
Posts: 183
City/Region: Yukon
State or Province: YT
C-Dory Year: 2004
C-Dory Model: 22 Cruiser
Vessel Name: C-Horse
Photos: Grazer
|
| Posted: Tue Apr 08, 2014 12:33 pm Post subject: |
|
|
I am now having to re-attach my cleats after having pulled out the screw downed method in favour of weldmounts. What I did was overdrill the screw holes and fill with thickened epoxy. In new undisturbed areas of the sole, I fastened weldmount treaded bolts and then drill new corresponding hole in the cleats to fasten my fuel tanks in place. Needless to say, they did not hold very long, I may have had a bad batch of the weldmount adhesive or a contamination issue. I am now considering drilling out the epoxy plugs that were the original hole locations for the screws, tap the hole with corresponding threads of stainless threaded rod and bond with epoxy into those holes. The bonded threaded rod will then hold down the cleats with a nyloc nut and washer. This should allow me enough room to change out the tanks if need be.
My question to you folks who are epoxy experts, is this: How well will the bond be with the treaded hole in epoxy to the treaded rod? I sure do not want to do this again.
Thanks everyone,
Grazer |
|
| Back to top |
|
|
Sunbeam
Joined: 23 Feb 2012
Posts: 3990
City/Region: Out 'n' About
State or Province: Other
C-Dory Year: 2002
C-Dory Model: 22 Cruiser
Photos: Sunbeam
|
| Posted: Tue Apr 08, 2014 12:53 pm Post subject: |
|
|
Grazer,
I'm sorry to hear that the Weld Mount studs failed. I'm also curious how yours failed, since I had some failures early on (attributed to bad glue...). In my case there was about equal failure (i.e. half of the glue stuck onto the boat, half of the glue stuck onto the stud that came free) so that basically agreed with Weld-Mount's bad glue theory (vs. say if all the glue had stuck to the stud but not the boat). Seems like a negative to me if the glue is so "fragile" (shoot, I'm camping and it's in my cooler!) I have considered going to a 3M methacrylate instead - not sure if it would be equally high maintenance; maybe that's the nature of the beast (?)
I would encourage you to call Weld-Mount (even if you go back in with another method). I think it's good for them to hear about failures, especially if they are "their" adhesive failures (if it was that).
I prep more than they say you have to (and 90% of mine haven't failed, even in heavier applications). First I use 202 Solvent wash to remove any mold release wax (from the boat), then I lightly sand (both the boat and the metal stud), then I clean both with denatured alcohol.
Back to your new method. I think it would work fine, but I would (and have) gone one step "simpler." That is that I have overdrilled/filled/thickened epoxied holes but then I don't put a stud into the hole. Instead I tap the hole and then use a machine screw to fasten to it. Not that a stud wouldn't work too, but with the tapped hole you don't have a permanent protrusion and you can more easily renew the fastener (say you use stainless, then there is crevice corrosion, or whatever). I fastened my trim tabs to the transom this way (although I used bronze fasteners since some of them are submerged, there is no oxygen, and I wanted to avoid crevice corrosion as much as possible). I also fastened my battery hold down system with tapped holes in a similar fashion; in that case it was necessary as I can only get my big battery out with full clearance (in other words, I could not slide it out if the hold down block or a stud were in the way).
Sunbeam
PS: So just to add, I don't rely on a "bond" between the fastener and the hole; since I just tap the hole and then use a fastener, I'm treating it like any other threaded hole/fastener combination. That's not to say epoxy would not bond a stud in place though. One note is that I would start with a slightly smaller drill bit prior to tapping than the recommended one, and then see how it feels. That's as compared to tapping metal or something. Most of the epoxy I tapped on the C-Dory was 610, but I have also tapped "home thickened" epoxy. Starboard also taps nicely, although I wouldn't use it for something heavy/critical like a fuel tank (just mentioning it though).
PPS: Guess I just keep thinking of one more thing! I was going to say that another option might be the one that I chose for my fuel tank cleats: I bonded the entire cleat to the boat with thickened epoxy. In my case I can easily get the fuel tanks in and out with the cleats in place (by lifting them up and over) (yes, I did think to check  ), so I couldn't see any reason I would need the cleats to be easily removable. This gave me much, much more bonding surface than a small stud and was cheaper too (just used epoxy). I used pre-formed fiberglass angle for both and adjusted placement of the forward one so that it would also anchor the cover panels and hold down straps. I didn't want to use Starboard because of it's tendency to creep under load and its reluctance to take sealant (although in [other] experiments it seems to "like" butyl, so far). ), so I couldn't see any reason I would need the cleats to be easily removable. This gave me much, much more bonding surface than a small stud and was cheaper too (just used epoxy). I used pre-formed fiberglass angle for both and adjusted placement of the forward one so that it would also anchor the cover panels and hold down straps. I didn't want to use Starboard because of it's tendency to creep under load and its reluctance to take sealant (although in [other] experiments it seems to "like" butyl, so far). |
|
| Back to top |
|
|
Sea Wolf
Joined: 01 Nov 2003
Posts: 8650
City/Region: Redding
State or Province: CA
C-Dory Year: 1987
C-Dory Model: 22 Cruiser
Vessel Name: Sea Wolf
Photos: Sea Wolf
|
| Posted: Tue Apr 08, 2014 1:57 pm Post subject: |
|
|
I learned from racing sailboats to only trust adhesives just so far.
There are times when the only sure thing that I will trust is a through-bolt or similar mechanical bonding with plenty of backing plate surface to distribute the load, preferring sheer to tension stressing, if possible.
Engineering tests in a lab are one thing, but exposure to heat, light, water, salt, vibration, oscillating loads, and what have you, can tip the scale past the load limit developed on the test bed.
Common sense seems to tell us to apply Murphy's Law to adhesives:
"If it can go wrong, it will"
(or at least expect it to!)
Joe. 
_________________
Sea Wolf, C-Brat #31
Lake Shasta, California
  
"Most of my money I spent on boats and women. The rest I squandered'. " -Annonymous |
|
| Back to top |
|
|
|
|
You cannot post new topics in this forum
You cannot reply to topics in this forum
You cannot edit your posts in this forum
You cannot delete your posts in this forum
You cannot vote in polls in this forum
You cannot attach files in this forum
You cannot download files in this forum
|
|
 Search
 Private Messages
 Profile
 Log in
 Register
 Help
Help
