| View previous topic :: View next topic |
| Author |
Message |
Grazer
Joined: 16 Dec 2011
Posts: 183
City/Region: Yukon
State or Province: YT
C-Dory Year: 2004
C-Dory Model: 22 Cruiser
Vessel Name: C-Horse
Photos: Grazer
|
 Posted: Thu Mar 28, 2013 2:00 am Post subject: Fastener installation into epoxy Posted: Thu Mar 28, 2013 2:00 am Post subject: Fastener installation into epoxy |
 |
|
Well I am finishing up some epoxy work and beginning to put things back. So I removed some screws holding the Racor fuel filter on the inside of the transom, overdrilled (enlarged the hole), backcut with a dremel, painted with neat epoxy and filled with cabosil thickened epoxy. After the green stage, I went back and trimmed flat with a chisel. Epoxy in now fully cured and resembles plastic.
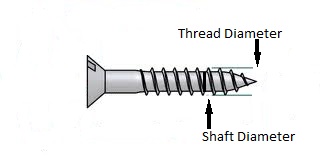
Now I measured the length of the fastener that will extend into the drilled hole so as to ensure the epoxy annulus remains solid and no breach of the core will be re-exposed. Since I have not put any screws in yet, I am wondering how large of a diameter should the hole be to accommodate the fastener without cracking the epoxy but having enough "bite" to hold the fuel filter. Should one drill the hole the diameter of the shaft of the screw allowing the threads to bite into the epoxy or drill a hole slightly less than the thread diameter. The later seems like it would also require some more adhesive to secure (i.e. more epoxy or 5200, 4200). It seems the epoxy is less forgiving than say balsa core would be accepting fasteners. This is where I rely on you folks who have done this before.
As always, I love the trusted advise I get on this site and much appreciation.
Grazer
 |
|
| Back to top |
|
 |
Sunbeam
Joined: 23 Feb 2012
Posts: 3990
City/Region: Out 'n' About
State or Province: Other
C-Dory Year: 2002
C-Dory Model: 22 Cruiser
Photos: Sunbeam
|
| Posted: Thu Mar 28, 2013 2:46 am Post subject: |
|
|
Sounds like you're doing a good, careful job. It's a nice feeling to get things squared away.
I'll be interested to hear what others have to say on this. I've found that if I got back into fully cured epoxy with a "pointy screw," that I have to drill the pilot hole quite large, because otherwise there is an un-settling amount of "cracking sounds" or resistance when driving the screw. That may not be a problem, or may be an issue with my technique, but at any rate, it kind of bugs me, and so with a few exceptions, I've gone to the following variations (depending on the situation):
1) Wax the (pointy) screw and screw it into soft/slightly green stage epoxy, then let it cure in place. After that I remove it, clean off the wax, and then reinstall (this also allows numerous removal/replacements if desired).
2) Let the epoxy cure completely and then tap it for a machine screw.
Sunbeam |
|
| Back to top |
|
|
mgarr682
Joined: 29 Sep 2012
Posts: 182
City/Region: Asheville
State or Province: NC
C-Dory Year: 2013
C-Dory Model: 22 Angler
Vessel Name: Glenda Jean
Photos: Glenda Jean
|
| Posted: Thu Mar 28, 2013 6:51 am Post subject: Re: Fastener installation into epoxy |
|
|
| Grazer wrote: | | I am wondering how large of a diameter should the hole be to accommodate the fastener without cracking the epoxy but having enough "bite" to hold the fuel filter. |
I had a book on building plywood/fiberglass boats years ago that gave a list of pilot hole sizes for common screws in fiberglass and wood. It's recommendation was for slightly larger pilot holes in fiberglass than in wood and I found in reality that the fiberglass (an epoxy plug would act the same way) did require a slightly larger hole than wood if one was to avoid the glass cracking. I'd be glad to cite you the book's recommendations but it is long gone.
What I do is eyeball it. Basically I place a drill bit over the screw and select one at least the diameter of the screw shaft for soft wood, maybe 1/64" or 1/32" larger for dense wood like oak or yellow pine. With fiberglass (or an epoxy plug) I select a bit just slightly smaller than the thread diameter. So far that has worked well for me.
If the screw is sized properly for the job it doesn't take a heck of a lot of grip from the screw threads to hold. About 30 years ago I "repaired" a pull handle in a wood door on a friend's boat where the two screws holding it in place pulled out of the wood by putting a single toothpick in each hole and putting the same screws back in. Last time I talked to him he told me my temporary repair was still holding.
_________________
Mike Garrett
 |
|
| Back to top |
|
|
Sea Wolf
Joined: 01 Nov 2003
Posts: 8650
City/Region: Redding
State or Province: CA
C-Dory Year: 1987
C-Dory Model: 22 Cruiser
Vessel Name: Sea Wolf
Photos: Sea Wolf
|
| Posted: Thu Mar 28, 2013 11:54 am Post subject: |
|
|
KiSS Principle answer:
Through-bolt it with machine screws, nylock nuts, and fender washers.
How thick is the fiberglass at that point?
Can you get to the back side to attach nuts, etc?
Of course this isn't you, but one of the worst installations of components in this kind of situation was done by someone who used pointed screws and allowed the tips to extend out into the cavity behind, creating dangerous "meat hooks" .
I always feel better with a machine screw/through bolt than a wood, sheet metal, or self-tapping screw.
Another viable alternative, properly installed, would be stainless or Monel pop rivets, or, better yet the new anchor thread inserts for machine screws that are installed with a pop-rivet style tool. Rivets can always be drilled out carefully, and seldom yield if properly installed, especially with backing plates/washers.
I would imagine there is quite a bit of stress on the filter mounting bracket when operating in heavy seas/chop.
Mine is installed with (4) 1/4 x 20 SS machine screws, nylock nuts, and fender washers. Fortunately, my boat is not cored, but solid fiberglass at that point (up on the side of the motor well).
Just my 2 cents for free! 
Joe.  
_________________
Sea Wolf, C-Brat #31
Lake Shasta, California
  
"Most of my money I spent on boats and women. The rest I squandered'. " -Annonymous |
|
| Back to top |
|
|
Sunbeam
Joined: 23 Feb 2012
Posts: 3990
City/Region: Out 'n' About
State or Province: Other
C-Dory Year: 2002
C-Dory Model: 22 Cruiser
Photos: Sunbeam
|
| Posted: Thu Mar 28, 2013 12:22 pm Post subject: |
|
|
I just noticed (by reading Joe's reply) that you are mounting a Racor filter. I'm just setting mine up to mount as well. I think I'm going to try Weld Mount studs for mine. Right now the plan is to mount it under the splashwell (in an uncored area), so I have no aesthetic concerns. I say "think I'm going to try" because I'm not 100% positive they will hold up to twisting forces (that I think I'd put on it when removing the filter). That said, they are used for much larger filters on bigger boats, so it's more my lack of personal experience rather than any specific, known concern. They have been pretty strong in my "whack tests." (I also had to remove four of them to re-mount something, so I got to test them to destruction on the boat.) I will go beyond the minimal prep required (meaning I will Solvent Wash 202 and then lightly sand). Just another potential tool in the arsenal.
Sunbeam
Not a great photo, but here is an example of a larger, heavier filter panel installed with Weld Mounts.

Another, of a water filter panel, mounted with four 1/4-20 WM studs:

These are from the Weld Mount site, not my boat! |
|
| Back to top |
|
|
dabfd
Joined: 24 Mar 2009
Posts: 42
City/Region: Thousand Oaks
State or Province: CA
C-Dory Year: 2007
C-Dory Model: 255 Tomcat
Vessel Name: Patriot (was Tom-a-Hawk)/sold
|
| Posted: Thu Mar 28, 2013 12:33 pm Post subject: |
|
|
It's been my experience to first drill a small pilot hole then use a counter sink to chamfer the gelcoat larger than the drill you will be using. Otherwise the gelcoat can crack or pop off. This makes for a nice clean hole in the fiberglass.
_________________
Dave & Donna
42' Catalina sold
07 Tomcat 255, Patriot sold
42' Catalina Mk II, Legado |
|
| Back to top |
|
|
Grazer
Joined: 16 Dec 2011
Posts: 183
City/Region: Yukon
State or Province: YT
C-Dory Year: 2004
C-Dory Model: 22 Cruiser
Vessel Name: C-Horse
Photos: Grazer
|
| Posted: Thu Mar 28, 2013 12:41 pm Post subject: |
|
|
Thanks for all the suggestions fellas. I had thought of most of those options as well.
Sunbeam, I am interested in the weldmount studs destruction how well did they hold? What do you mean by the "whack test"? This might be the way to go if they are as strong a bond as they claim. Anyone else have any experience with the Weldmount products?
Grazer |
|
| Back to top |
|
|
Sunbeam
Joined: 23 Feb 2012
Posts: 3990
City/Region: Out 'n' About
State or Province: Other
C-Dory Year: 2002
C-Dory Model: 22 Cruiser
Photos: Sunbeam
|
| Posted: Thu Mar 28, 2013 1:11 pm Post subject: |
|
|
| Grazer wrote: |
Sunbeam, I am interested in the weldmount studs destruction how well did they hold? What do you mean by the "whack test"? |
Well, I scientifically set up a test where I "whacked" at them with a sledge hammer 
More detail: I was thinking about mounting my trim tab planes with them, possibly also using VHB tape in place of bedding compound between the fasteners. So I set up a "whack test" wherein I took a piece of fiberglass similar to the outer transom layer (it was a cutout piece from a similar boat, had gelcoat on one side like our transoms do). I mounted one WM stud to the gelcoat, then mounted another one to an area where I had removed the gelcoat back to the fiberglass layer beneath it. Alongside that I mounted an angle (actually one of the mild steel angles I had removed from the cabinetry inside the boat) by "through screwing" it into a block of wood behind the fiberglass, to sort of simulate the normal mounting method.
I then clamped the panel in a vise and started experimenting. First I hung a bucket from each thing, and put lead into it, up until the (heavy duty) bucket started to fail. At the time I knew how much weight it was, but now I forget. Something around 200# maybe. Nothing budged. I wasn't too surprised as these were static loads.
Next I whacked on them with a big sledge hammer. The mount on the gelcoat was first to go, as I expected. The gelcoat ripped away from the fiberglass and stayed stuck to the WM. The WM mounted to the bare fiberglass went next, but it took a LOT more whacking, and when it came off the failure was "even," by which I mean some glass tore away, and some glue came off the stud (it was, however, chopped strand or mat, not cloth/woven reinforcement). The angle screwed into the wood bent, but never pulled out.
So that told me that by removing the gelcoat in circles where the WM bases would go, I would probably have a successful mount. And, I reasoned, if they did let go it isn't the type of thing where a piece would go flying down the highway or fall on someone and crush them. But.... in the end I just really didn't know how much force they would be required to withstand. So I had nothing to compare to. Hence I decided to go with a different method, and I wallowed out the holes, refilled them with thickened epoxy, and tapped them for 1/4-20 machine screws.
The other "whack tests" were in two areas where I had mounted Weld Mounts and then needed to change them. One was a Weld Mount footman loop that was used for the hold down strap on my original start battery (I replaced it with a larger one, which then made the loop be in the way); the other was the original mounting for my trim tab HPU, which I never did like but didn't listen to my inner voice the first time around (I had mounted the black bracket directly to four studs, which was a pain to get on and off; I removed them and made a larger Starboard panel, mounted the bracket to that with machine screws, and then mounted the panel to the hull with WM's. MUCH better and what I should have done in the first place!)
So anyway, I had to remove that one footman loop and the four studs. They were mounted when I was following the "minimal prep" method (a wipe-down with alcohol vs. a real solvent wash with 202/paper towels, then a light sanding, then an alcohol tack wipe). I used a junk chisel and a hammer and went at them from the side, right at the glue joint. They required a healthy whack or two, but were not extremely difficult to remove. The WM base and the boat remained mostly intact, and the glue let go. It would be interesting to compare those to the ones where I am now prepping a bit differently. (Conclusion: not at all scientific, but I didn't get the feeling they would have failed doing the job they were intended to do.) I've gone back with WM's in both cases (but repositioned) and have used the "more prep" method just since that's what I do now.
Sunbeam |
|
| Back to top |
|
|
Grazer
Joined: 16 Dec 2011
Posts: 183
City/Region: Yukon
State or Province: YT
C-Dory Year: 2004
C-Dory Model: 22 Cruiser
Vessel Name: C-Horse
Photos: Grazer
|
| Posted: Thu Mar 28, 2013 2:13 pm Post subject: |
|
|
Well is sound like the WM can withstand the stresses needed to hold a filter or starboard panel on a vertical panel on our boats quite adequately (providing one, installs them correctly). The biggest advantage I see is no more holes into the core!  |
|
| Back to top |
|
|
Sunbeam
Joined: 23 Feb 2012
Posts: 3990
City/Region: Out 'n' About
State or Province: Other
C-Dory Year: 2002
C-Dory Model: 22 Cruiser
Photos: Sunbeam
|
| Posted: Thu Mar 28, 2013 2:44 pm Post subject: |
|
|
Yes, that's a plus. I mean, you can overdrill/fill, but even nicer if you don't have to. Also, for example, I mounted my trim tab HPU, the battery switch, and a bus bar against the (uncored) hull side, which would not have been too elegant with through fasteners! (of course there are other ways, like affixing a mounting block and then fastening to that).
I first was made aware of them as they were used on some 35-40' semi-custom fast trawlers, for similar installations (a few years ago).
Sunbeam. |
|
| Back to top |
|
|
|
|
You cannot post new topics in this forum
You cannot reply to topics in this forum
You cannot edit your posts in this forum
You cannot delete your posts in this forum
You cannot vote in polls in this forum
You cannot attach files in this forum
You cannot download files in this forum
|
|
 Search
 Private Messages
 Profile
 Log in
 Register
 Help
Help
