| View previous topic :: View next topic |
| Author |
Message |
mgarr682
Joined: 29 Sep 2012
Posts: 182
City/Region: Asheville
State or Province: NC
C-Dory Year: 2013
C-Dory Model: 22 Angler
Vessel Name: Glenda Jean
Photos: Glenda Jean
|
 Posted: Sat Mar 09, 2013 4:46 pm Post subject: Ack!!! This is why I like to do things myself. Posted: Sat Mar 09, 2013 4:46 pm Post subject: Ack!!! This is why I like to do things myself. |
 |
|
Over the years I've been asked many times why I did some job myself rather than just paying to have it done. Sometimes I do it to save money but often I do it myself just so I know it was done properly and I won't have to worry about it in the future. This is a perfect example of that, why I should have installed the trim tabs myself rather than ordering them on the boat.
First let me say this. I've never owned a boat with trim tabs and I'm not convinced they are necessary on a 22' boat. My experiences with trim tabs have all been aboard other people's boats, all larger than the 22 Angler. For the most part my observations of their use has been, a. the operator never touched them, b. the operator fiddled with them constantly and I couldn't see that they made any difference, or c. they were broken.
With that in mind I had originally planned to order the boat without trim tabs and install them myself in the future should I decide that I needed or wanted them. After talking with the dealer about what installation entailed I decided to just order them from the factory. I wish I had waited and done it myself.
The last thing I wanted to get done before launching my C-Dory for the first time was fixing a couple of stripped screws in the hinge plates (where the trim tab is attached to the hull). I figured whoever installed them got carried away with the electric screwdriver and just stirpped the hole. While that is probably the case, here is what I found when I pulled the two screws.
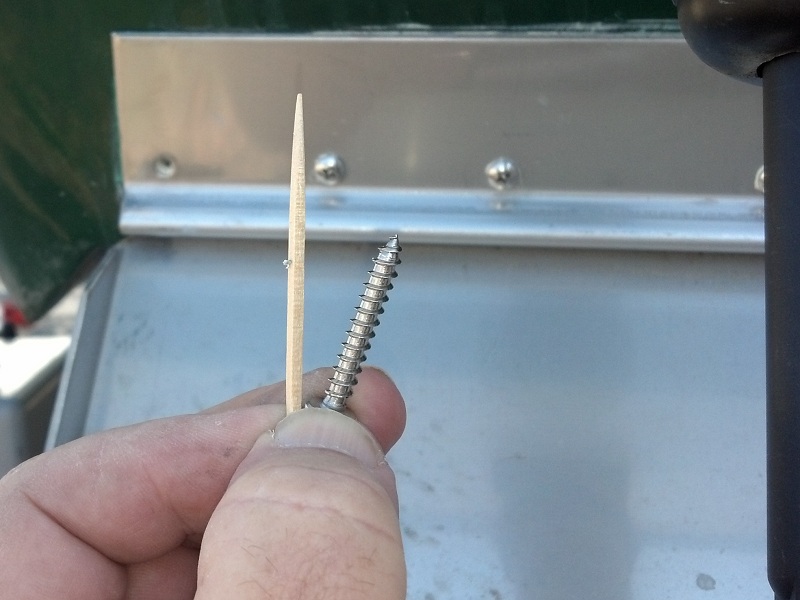
See where my thumbnail touched that toothpick? That's how deep the hole is. That's the mounting screw beside it. The other stripped screw was the same. There was the usual goop type sealer at the mouth of the hole and approximated 1/8 inch into the hole.
When I'm drilling a blind hole for a mounting screw, particularly into the hull, after selecting the proper diameter bit I lay the screw along side the drill bit and wrap a piece of tape around the bit to let me know how deep to drill. It usually takes less than 30 seconds and prevents voids in the hull that can weaken it or allow water to collect that can cause blisters, delamination or rot in the balsa core.
Had I done this job myself there wouldn't be twelve one inch long voids in my hull to cause trouble in the future.
ACK!
_________________
Mike Garrett
 |
|
| Back to top |
|
 |
Sunbeam
Joined: 23 Feb 2012
Posts: 3990
City/Region: Out 'n' About
State or Province: Other
C-Dory Year: 2002
C-Dory Model: 22 Cruiser
Photos: Sunbeam
|
| Posted: Sat Mar 09, 2013 5:06 pm Post subject: |
|
|
Well that's aggravating! I was just talking with a friend this morning, because (and I know I do this) I tend to "lose" a lot of time because I want to do everything myself, vs. just going ahead and letting a pro do it. I have "trust issues."  But you know what? The two jobs I did have done by the pros I'm having to re-do anyway. And not just because I'm being too persnickety, but because they were not usable as-completed. Hmmph! But you know what? The two jobs I did have done by the pros I'm having to re-do anyway. And not just because I'm being too persnickety, but because they were not usable as-completed. Hmmph!
I'm especially keen on having things "right" that are below the waterline on a cored hull, so I would have to re-mount those trim planes. Not just because of the overlong holes, but also because I'm not going to trust just caulk to keep the core dry (that said, it probably does work to a certain extent, especially on a "dry sailed" boat, but I would not be able to stop worrying about it). But too, I can see why you did order the boat with them already installed, as it was (for me anyway, doing it the first time) a finicky job (not difficult, but time consuming as I checked and re-checked, etc.).
What I did for the trim planes (and the actuator tops) was drill a slightly oversized hole around 1-1/4" deep. I think I used a 7/16" or 1/2" drill bit. That allowed me to get in there with a Dremel and hollow out plenty of core all the way around (in other words, I "back cut" it). I then filled those holes up with thickened epoxy, and then after it had cured I re-drilled and tapped for 1/4"-20 cap screws (on the Bennetts the planes are intended for #10 screws, so I eased the holes slightly on a drill press). On the actuator holes I basically ended up with one big empty spot that I filled (the three fasteners plus the pipe nipple for the hydraulic line). I could also have set waxed "pointy screws" into the epoxy, but I felt that trying to get the holes filled with no air pockets was enough to do in one stage, without having to fool around with screws. That said, I could also have driven them into green epoxy. I just decided to tap... just because.
I then dry fit everything and that's the stage I'm at now. Final installation is awaiting a small gel coat repair that's really close to the plane (where my transducer was originally). I agree that it's a detail-filled installation. I haven't even started the electrical part yet (not my forte!).
Anyway, I sure can understand your frustration. Sorry you're having that experience 
Sunbeam
PS: My long-winded description above wasn't because I don't figure you know what you are doing if you had installed them yourself. I get that you simply requested them done in order for you to not have to! I hope you can get things squared away soon so that you can enjoy your wonderful new boat 
Last edited by Sunbeam on Sat Mar 09, 2013 5:17 pm; edited 1 time in total |
|
| Back to top |
|
|
thataway
Joined: 02 Nov 2003
Posts: 21469
City/Region: Pensacola
State or Province: FL
C-Dory Year: 2007
C-Dory Model: 25 Cruiser
Vessel Name: thataway
Photos: Thataway
|
| Posted: Sat Mar 09, 2013 5:09 pm Post subject: |
|
|
First the trim tabs are a very good addition to the C Dory 22. They allow both balance from Port to Starboard, and help to get the bow down in chop (A Permatrim will also help, in addition to the Trim tabs). Both are necessary to get the most out of your boat.
The problem is that there is only a relitatively small amount of glass on the exterior of the transom--and I am sure that the screws are put in with a power driver at the factory. Best practice is to drill the holes an over size, undercut (although the current boats are foam transoms, so rot is not an issue, you don't want water in the transom, there may be some balsa core to the back of the boat at the transom--not sure about current boats) then fill these over drilled and undercut holes with epoxy--redrill the pilot hole and then put the tab on with a proper sealant. At this point, you need to remove the tab, drill out all of the holes, undercut fill and put improper sealant.
_________________
Bob Austin
Thataway
Thataway (Ex Seaweed) 2007 25 C Dory May 2018 to Oct. 2021
Thisaway 2006 22' CDory November 2011 to May 2018
Caracal 18 140 Suzuki 2007 to present
Thataway TomCat 255 150 Suzukis June 2006 thru August 2011
C Pelican; 1992, 22 Cruiser, 2002 thru 2006
Frequent Sea; 2003 C D 25, 2007 thru 2009
KA6PKB
Home port: Pensacola FL |
|
| Back to top |
|
|
Captains Cat
Joined: 03 Nov 2003
Posts: 7313
City/Region: Cod Creek>Potomac River>Chesapeake Bay
State or Province: VA
C-Dory Year: 2005
C-Dory Model: 22 Cruiser
Vessel Name: Captain's Choice II
Photos: Captain's Cat
|
| Posted: Sat Mar 09, 2013 8:15 pm Post subject: |
|
|
Mike, would you mind sharing the name of the dealer that installed those?
Charlie
_________________
CHARLIE and PENNY CBRAT #100
Captain's Cat II 2005 22 Cruiser
Thataway (2006 TC255 - Sold Aug 2013)
Captain's Cat (2006 TC255 - Sold January 2012)
Captain's Kitten (1995 CD 16 Angler- Sold June 2010)
Captain's Choice (1994 CD 22 Cruiser- Sold Jun 2007)
Potomac River/Chesapeake Bay
K4KBA |
|
| Back to top |
|
|
DuckDogTitus
Joined: 31 Jan 2013
Posts: 1034
City/Region: Gig Harbor
State or Province: WA
C-Dory Year: 1988
C-Dory Model: 22 Cruiser
Vessel Name: C-Miner
Photos: Hemingway
|
| Posted: Sat Mar 09, 2013 9:06 pm Post subject: |
|
|
unfortunately the people we outsource these jobs to are the reason we develop said "trust" issues. 
_________________
Dustin |
|
| Back to top |
|
|
C-Nile
Joined: 09 May 2008
Posts: 638
City/Region: Connecticut
State or Province: CT
C-Dory Year: 2012
Vessel Name: Betty Ann
Photos: C-Nile
|
| Posted: Sat Mar 09, 2013 10:50 pm Post subject: |
|
|
I can't resist putting in my two cents worth. Firstly, with power drivers today, there is no excuse for stripping screws. That is what torque settings are for. Secondly, if the installer realized that they stripped the screws, and left it that way -- that is unforgivable. This is a hot button with me. On my sold CD 16 several years ago, I fell into the water. Using my Garelick ladder to enter the boat, the ladder broke, and it screwed up my knee. If it happened while at sea, it could have had serious consequences. So I took the ladder apart, and discovered that whoever put the stainless steel parts together, they over torqued the stainless steel internal bolt, and it snapped under my weight. In my opinion, the person probably realized their mistake, but chose to leave it that way. Frankly, having EQ Marine rig my boat was a major factor in choosing the Marinaut, albeit they rig other boats like Rosboroughs and C-Dorys. I'm impressed with their quality of work. You won't see them leaving a problem they know they caused. And I know many on this forum that are beneficiaries of that level of quality feels the same as I do.
_________________
Marinaut 215 - "Betty Ann" Sept-2011
CD 16 Cruiser "C-Nile" Sold 06/2011 |
|
| Back to top |
|
|
mgarr682
Joined: 29 Sep 2012
Posts: 182
City/Region: Asheville
State or Province: NC
C-Dory Year: 2013
C-Dory Model: 22 Angler
Vessel Name: Glenda Jean
Photos: Glenda Jean
|
| Posted: Sun Mar 10, 2013 8:58 am Post subject: |
|
|
| Captains Cat wrote: | Mike, would you mind sharing the name of the dealer that installed those?
Charlie |
They weren't installed by the dealer. They were installed at the C-Dory factory. |
|
| Back to top |
|
|
mgarr682
Joined: 29 Sep 2012
Posts: 182
City/Region: Asheville
State or Province: NC
C-Dory Year: 2013
C-Dory Model: 22 Angler
Vessel Name: Glenda Jean
Photos: Glenda Jean
|
| Posted: Sun Mar 10, 2013 9:24 am Post subject: |
|
|
| C-Nile wrote: | | I can't resist putting in my two cents worth. Firstly, with power drivers today, there is no excuse for stripping screws. That is what torque settings are for. Secondly, if the installer realized that they stripped the screws, and left it that way -- that is unforgivable. |
I totally agree but the way things are built these days I expected to find a few stripped screws and did. Two in the trim tabs and one in one of the gunwale brackets for the bimini. The trim tabs were installed at the factory. The custom bimini was made and installed by a canvas maker in Portland used by the dealer, Sportcraft Marina. Sportcraft caught that one and fixed it. |
|
| Back to top |
|
|
Discovery
Joined: 08 Dec 2003
Posts: 1245
City/Region: LOA, UTAH
State or Province: UT
C-Dory Year: 2006
C-Dory Model: 255 Tomcat
Vessel Name: Discovery
Photos: Discovery
|
| Posted: Sun Mar 10, 2013 9:43 am Post subject: |
|
|
I guess it's even more disturbing that they were installed at the factory.
_________________

Brent and Dixie,
1984 22' Classic sold 2003
2003 24' TomCat sold 2005
2006 TC255 Discovery Sold 2020
2006 CD 22' Angler Sold 2014
https://share.delorme.com/FBrentBetenson
"Free men do not ask permission to bear arms." ~ Thomas Jefferson |
|
| Back to top |
|
|
mgarr682
Joined: 29 Sep 2012
Posts: 182
City/Region: Asheville
State or Province: NC
C-Dory Year: 2013
C-Dory Model: 22 Angler
Vessel Name: Glenda Jean
Photos: Glenda Jean
|
| Posted: Sun Mar 10, 2013 10:14 am Post subject: |
|
|
| Sunbeam wrote: | | What I did for the trim planes (and the actuator tops) was drill a slightly oversized hole around 1-1/4" deep. I think I used a 7/16" or 1/2" drill bit. That allowed me to get in there with a Dremel and hollow out plenty of core all the way around (in other words, I "back cut" it). I then filled those holes up with thickened epoxy, and then after it had cured I re-drilled and tapped for 1/4"-20 cap screws (on the Bennetts the planes are intended for #10 screws, so I eased the holes slightly on a drill press). |
No doubt the epoxy method is the best way to do it but my only concern is getting thickened epoxy packed completely into a narrow hole a little over two inches deep without leaving air pockets. If I could get the holes into a vertical position it would be simple, just pour in the epoxy unthickened and the air will rise. I've done that in the past to fill voids in plywood hulls and it seemed to work quite well. Since I can't get the holes vertical I'd have to thicken the epoxy which might well prevent any air trapped in the deepest portion of the narrow hole from working out.
I'm not sure yet how I'm going to repair this. I may just pull all the screws and go with screws long enough fill the length of the holes sealed with either epoxy (which has certain advantages) or sealed with the usual goop (which I despise but has advantages of its own). |
|
| Back to top |
|
|
Sunbeam
Joined: 23 Feb 2012
Posts: 3990
City/Region: Out 'n' About
State or Province: Other
C-Dory Year: 2002
C-Dory Model: 22 Cruiser
Photos: Sunbeam
|
| Posted: Sun Mar 10, 2013 10:50 am Post subject: |
|
|
| mgarr682 wrote: |
No doubt the epoxy method is the best way to do it but my only concern is getting thickened epoxy packed completely into a narrow hole a little over two inches deep without leaving air pockets. ... Since I can't get the holes vertical I'd have to thicken the epoxy which might well prevent any air trapped in the deepest portion of the narrow hole from working out. |
You have a completely valid concern, and it is a challenge when filling a blind hole, especially when the surface is not horizontal. Air pockets are a very real problem  Here's how I ultimately handled it (and when I re-drilled, I found zero air pockets, so I would say it worked). Here's how I ultimately handled it (and when I re-drilled, I found zero air pockets, so I would say it worked).
1) Upper (actuator) mounts.
On the upper (actuator) mounts, I made it so the holes were not blind. Actually, they already had "outlets" because of the hydraulic line hole on the inside, but I found that still didn't completely do the trick, because there was a lot of (undercut) hole still above that point. So what I did was drill a very small hole (1/8" or less) into the inner skin of the transom (i.e. in where the fuel tanks are) at the very apex of the undercut hole (so above the hydraulic line entrance by an inch or so). Then I filled from the outside with a large syringe, keeping constant but slow pressure on the fill. In this way the entire void filled as air came out that upper hole. In the very end epoxy started coming out there, and I had an assistant slap a piece of pre-cut tape over it. I then slowly withdrew the syringe while continuing to press epoxy out of it (to fill the void being left as I withdrew the syringe). When I took the syringe out completely, no epoxy came back out, although I then taped over the hole while it cured. This was similar to filling a lower unit on an outboard. (I first coated the entire void inside surfaces with neat epoxy; then in the syringe I had epoxy thickened with colloidal silica to a thick-catsup-to-mayonnaise consistency. Basically about as thick as I could make it and still have it come out the syringe adequately.)
2) Lower, trim plane mounts.
On the lower (trim plane) mounts of course I had blind holes. And not just blind holes, but worse, holes with a considerable "cave" above the opening. I considered making an "air release" hole inside the boat, but then of course realized that there is no place to do that because the screw paths are actually beneath the level of the hull's top skin. I didn't want to make an additional hole on the outside of the boat (and because of where the fasteners are in relation to the plane this hole would not have been covered by the planes). So here is what I did:
a) After taping and protecting all around the area, I drilled a hole of around 7/16" so that I could get a Dremel/dental pick in there and hollow out the hole (back-cut) quite a bit. I wanted plenty of cured epoxy around the fasteners on all sides and on the inside/ends.
b) I "painted" neat epoxy all around inside the holes by twirling an acid brush on which I had bent the handle to around 90º. I then filled the holes as much as possible with neat epoxy from a syringe, and let that soak a bit.Then I used the syringe to withdraw any non-soaked-in neat epoxy. That could tack up (or not) while I prepared the thickened epoxy.
c) I cut some pieces of electrical shrink tubing that would reach the back of the holes and also fit in alongside the syringe tip (about half the diameter of a drinking straw).
d) I fit another piece of shrink tubing over the end of the syringe and allow it to reach the very back of the hole. It was a tight friction fit, but I taped it just to be sure.
e) I thickened some epoxy with colloidal silica, to a catsup consistency and loaded it into the syringe, then placed the syringe tubing and the extra tubing into the hole, with the syringe tubing right at the back of the hole. The extra tubing I angled up to the top of the hole (which was higher than the top of the opening).
f) I slowly started filling the hole with the syringe, pulling the syringe out as I went. Air was noticeably coming out the extra tube. At the end I removed the extra tube and then slowly pulled out the syringe tube all the while slowly pumping more epoxy in. When I finished withdrawing the tube the epoxy pretty much stayed put, but I covered it with tape to hold it in. If I'd had a fourth hand I might have some photos of this stage 
g) When the epoxy was in the green stage, I removed the tape and sliced it off flush with a chisel.
h) When I drilled the holes for the trim plane fasteners I found no evidence of air voids.
I still plan to bed the planes (caulk) when I install them.
Sunbeam 
Last edited by Sunbeam on Sun Mar 10, 2013 11:06 am; edited 6 times in total |
|
| Back to top |
|
|
island park
Joined: 18 Apr 2011
Posts: 19
City/Region: Ft Myers
State or Province: FL
C-Dory Year: 2005
C-Dory Model: 22 Cruiser
Vessel Name: Island Girl
Photos: Island Park (Name TBD)
|
| Posted: Sun Mar 10, 2013 10:59 am Post subject: |
|
|
I am curious, do any of the dealers oversize drill and then fill with epoxy when outfitting these cored boats? If not, is it just the labor cost that prevents them from doing so. I am not trying to throw any of the fine dealers who support this site under the bus, but I would like to hear their comments on this matter.
Paul |
|
| Back to top |
|
|
Sunbeam
Joined: 23 Feb 2012
Posts: 3990
City/Region: Out 'n' About
State or Province: Other
C-Dory Year: 2002
C-Dory Model: 22 Cruiser
Photos: Sunbeam
|
| Posted: Sun Mar 10, 2013 11:16 am Post subject: |
|
|
| island park wrote: | | I am curious, do any of the dealers oversize drill and then fill with epoxy when outfitting these cored boats? |
I'm not a dealer, but my guess would be very few to none. It is time consuming (thus expensive) to do after the fact of the build. I do know of some boat builders who "make it easy" by building typical mounting areas of fiberglass (in other words, they don't put core in places where they know things will be mounted, but make those areas solid fiberglass). When planned ahead in this way I don't think it's that much extra work/time, and is just part of the mold/build process (so of course you have to put some work into designing it into the process initially). That way there is no additional labor involved when installing things like trim tabs, and the core is completely closed out.
I also do know of some boatyards who routinely do the overdrill/fill - or even complete core closure - when installing hardware into cored boats, but these are more likely to be "higher end" yards working on larger boats, in my experience (which is not all inclusive!). So the additional labor charge is smaller in relation to the overall job and the overall value of the boat.
Sunbeam |
|
| Back to top |
|
|
thataway
Joined: 02 Nov 2003
Posts: 21469
City/Region: Pensacola
State or Province: FL
C-Dory Year: 2007
C-Dory Model: 25 Cruiser
Vessel Name: thataway
Photos: Thataway
|
| Posted: Sun Mar 10, 2013 11:52 am Post subject: |
|
|
I sent a PM to Mgarr682 last PM. Basically there are a number of factors in the void. It may be how far back the balsa or foam core comes in the boat as it is laid up, and low far down the transom core comes. But some boats have a considerable void back here, where the bottom core material should nearly but onto the transom core material--and not all boats are the same. You have to use a viscosity of filler (epoxy and filler) which flows thru the over size drilled holes--and you can fill up this area--but it may take a fair amount of epoxy. You are venting one side and filling the other--it can back fill form the inside the screw holes between.
I know of a few boat restorers and repairers who do use the epoxy plug method for installing under the water hardware. Not sure about dealers. It is the old issue about time, money, and what a customer is willing to pay. |
|
| Back to top |
|
|
Sunbeam
Joined: 23 Feb 2012
Posts: 3990
City/Region: Out 'n' About
State or Province: Other
C-Dory Year: 2002
C-Dory Model: 22 Cruiser
Photos: Sunbeam
|
| Posted: Sun Mar 10, 2013 12:10 pm Post subject: |
|
|
Just as a data point (and because re-reading my earlier post and juxtaposing it with Thataway's post I realized that I didn't write that clearly).
On my boat the transom is balsa cored (I've also heard some are plywood and I think they are now foam). I didn't find any voids in the transom when making my oversized holes - it was all solid, continuous, dry balsa - and well bonded to the skin(s). The air voids I was speaking of are the ones that are hard to avoid when re-filling a blind hole with epoxy. That's the part that may not have come out too clearly above - you know how it all seems so clear when you are writing, but then you re-read and see how it might read to other people.... not so clear!
At the "back" of my trim plane holes I believe I came to a vertical fiberglass layer (i.e. a transom inner skin between the transom core and the hull/bottom core), but it's hard to be sure how substantial it was due to the limited access. When I excavated for my new transom drain sump there was only a very-thin-to-no glass layer between the transom and the thin core under the original bilge sump. There was some of the blue putty dividing the two and at least some resin - maybe some very thin glass. This may be because there was a slightly different technique used where the transom transitions to the original bilge sump (thin core) vs. the fully cored hull areas.
I think I remember reading in Thataway's posts about his 2003 25's transom that there were some voids and materials changes within the transom, so I guess there is some variation.
Sunbeam |
|
| Back to top |
|
|
|
|
You cannot post new topics in this forum
You cannot reply to topics in this forum
You cannot edit your posts in this forum
You cannot delete your posts in this forum
You cannot vote in polls in this forum
You cannot attach files in this forum
You can download files in this forum
|
|
 Search
 Private Messages
 Profile
 Log in
 Register
 Help
Help
