| View previous topic :: View next topic |
| Author |
Message |
ferret30
Joined: 22 Mar 2011
Posts: 569
City/Region: Seattle
State or Province: WA
C-Dory Year: 2006
C-Dory Model: 22 Cruiser
Vessel Name: Lily Pad
Photos: Lily Pad
|
 Posted: Thu Feb 14, 2013 5:10 pm Post subject: Posted: Thu Feb 14, 2013 5:10 pm Post subject: |
 |
|
| Sunbeam wrote: | | ...I'll make some holder-lines to keep them from even opening far enough to touch the gelcoat... |
That's makes a lot of sense! I really like these hatches, but as you mentioned it would have been nice if they had made it so you could separate the lid after they were installed.
Do you have any ideas for the old hatches? Maybe V-berth storage access? |
|
| Back to top |
|
 |
Sunbeam
Joined: 23 Feb 2012
Posts: 3990
City/Region: Out 'n' About
State or Province: Other
C-Dory Year: 2002
C-Dory Model: 22 Cruiser
Photos: Sunbeam
|
| Posted: Thu Feb 14, 2013 5:30 pm Post subject: |
|
|
| ferret30 wrote: | | Do you have any ideas for the old hatches? Maybe V-berth storage access? |
I gave mine the heave-ho after removing them. One I actually had to saw partway in half to get it off the boat (thanks, silicone), and the other was probably still contaminated with silicone residue. Buh-bye 
I probably will put some hatches in the V-berth, but I'll likely make flush lids that rest on cleats affixed to the underside and that can be slid to the side, sailboat style. Or if I use commercial hatches, get some new/larger ones.
Projects are a lot more fun when sharing ideas with other Brats 
Sunbeam |
|
| Back to top |
|
|
Sunbeam
Joined: 23 Feb 2012
Posts: 3990
City/Region: Out 'n' About
State or Province: Other
C-Dory Year: 2002
C-Dory Model: 22 Cruiser
Photos: Sunbeam
|
| Posted: Fri May 17, 2013 3:57 pm Post subject: |
|
|
Reading a new splashwell drain tube thread reminded me that I never wrote up how I finished the job when I replaced mine. I was a bit negligent about taking photos through this last stage, but I will describe it, and I do have photos of the finished product.
So, when I last posted on the subject (earlier in this thread), I had removed the original brass tube (very thin material with barely any caulking and no other sealing of the balsa core - very glad I removed/replaced that installation), removed core by "back cutting" for a good distance around the hole (leaving the fiberglass skins intact), and filling with neat/thickened epoxy. As I did that, I also bonded in a 1", pre-made fiberglass tube. That sealed the area completely.
What I wasn't sure about was how I wanted to finish it off cosmetically. I had a few ideas, but hadn't settled on any one. So, I prepped for the option which would also leave all the other ones open, and I left a short bit of tube protruding on either side of the transom, then bullnosed those ends and filleted around them, thinking I might gelcoat it. As I did other jobs, I kept the drain in the back of my mind. One day at a marine store I found a brand/style of through hull that had a nice, low/rounded flange which piqued my interest because finishing off with a through hull was one of my ideas, but I didn't want a really chunky/vertical look. This was just one, wrongly sized through hull on dusty shelf, but it gave me something to go on. Turned out it was an Attwood made of 316 stainless. I was able to source a pair of the right size (3/4") on Amazon (was no longer anywhere near the marine store). They look like this:

For my "real" through hulls, I like the Grocos, but they don't have quite as svelte a look.
Once I had the through hulls in hand, I test fit them in a scrap piece of the fiberglass tubing I had bonded in to the transom. As I had figured, they were a bit too large to fit; but nothing that grinding off a bit of the threads would not fix (I was not going to be using the threads anyway). Once I had the diameter just right for a snug fit, I then cut the length of the two through hulls so that they would just meet in the center of the transom. In addition, I took a scoch off the back side of the flange of the lower bit of the inside one, so that it would fit perfectly snugly against the splashwell (which starts to curve slightly there). This is not visible once installed.
Now I was sure it would all work and fit well, so I taped off the transom and used a Fein Multimaster to cut the fiberglass tubing off flush with the inside and outside of the transom. Everything was already bonded in with thickened epoxy, so no gaps or unsealed areas were exposed - while the through hulls will add another layer of sealing, it's completely unnecessary and they were mainly chosen for aesthetic purposes (I could also have left the tube out and just used thickened epoxy and these through hulls, but I'm happy to have both so all is good).
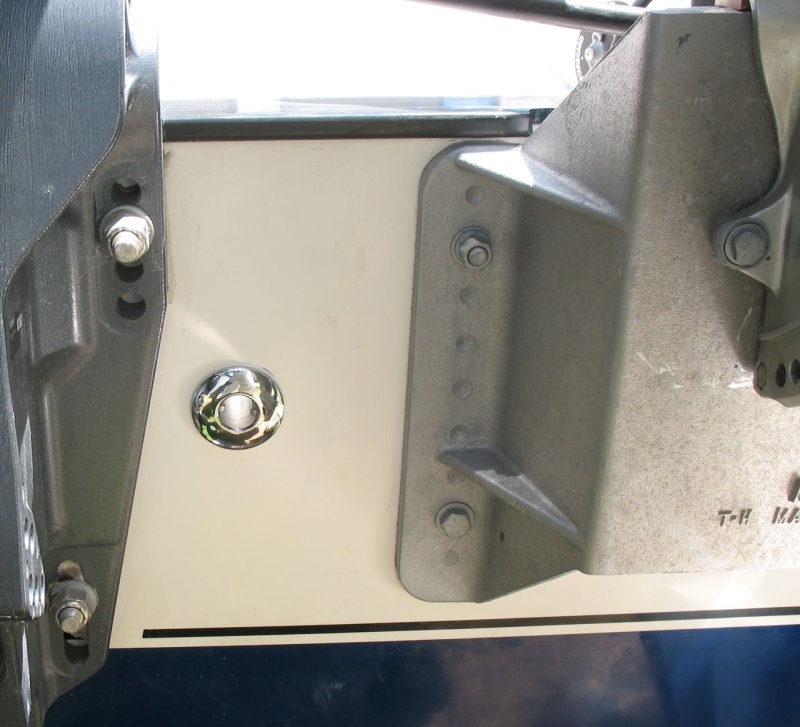
Next I taped off the through hulls (to avoid scratching and/or sealant mess) and the boat (same reason), and solvent washed everything. Then I bonded the through hulls in place with 3M 4000 (decent adhesive properties and supposedly resistant to yellowing with UV - not that much sealant shows in the end). I had pre-made a "puller" out of a long bolt, two fender washers, and nuts, which I fastened in place to pull the through hulls tight and keep them in place while things cured. Later I removed that and the tape and here is how it looks:
Inside:
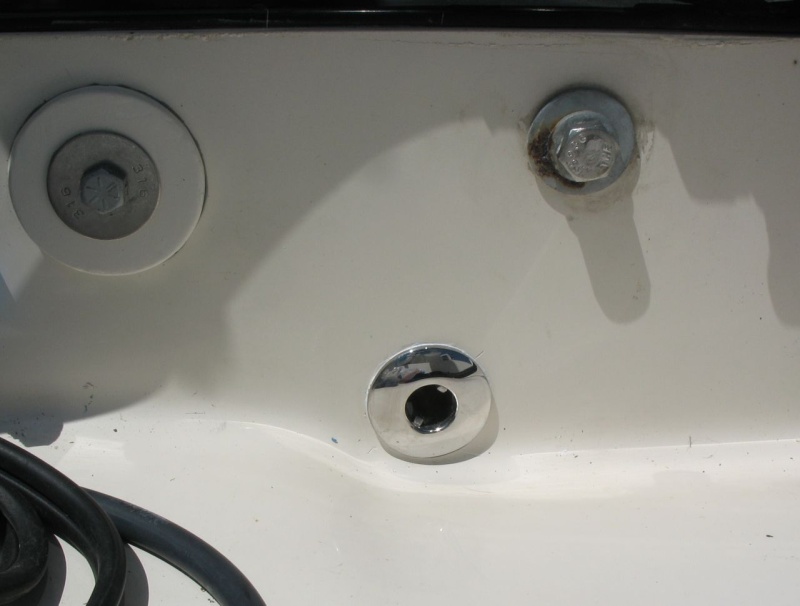
Outside (you can also see a bit of the newly-installed Mini Jacker with the Honda 8 kicker on it):
Sunbeam |
|
| Back to top |
|
|
ferret30
Joined: 22 Mar 2011
Posts: 569
City/Region: Seattle
State or Province: WA
C-Dory Year: 2006
C-Dory Model: 22 Cruiser
Vessel Name: Lily Pad
Photos: Lily Pad
|
| Posted: Fri May 17, 2013 5:58 pm Post subject: |
|
|
| Can this through work with a drain plug, i.e. could this approach work for the bilge drain? |
|
| Back to top |
|
|
nimrod
Joined: 15 Jul 2008
Posts: 268
City/Region: Mount Vernon
State or Province: WA
C-Dory Year: 1996
C-Dory Model: 22 Cruiser
Vessel Name: 'Berta's Boy
Photos: 'Berta's Boy
|
| Posted: Fri May 17, 2013 6:08 pm Post subject: |
|
|
I'd be interested to see how your transom drain turned out. Considering the same thing myself.
jd |
|
| Back to top |
|
|
Sunbeam
Joined: 23 Feb 2012
Posts: 3990
City/Region: Out 'n' About
State or Province: Other
C-Dory Year: 2002
C-Dory Model: 22 Cruiser
Photos: Sunbeam
|
| Posted: Fri May 17, 2013 6:31 pm Post subject: |
|
|
| ferret30 wrote: | | Can this through work with a drain plug, i.e. could this approach work for the bilge drain? |
Maybe, but.... probably not very "slickly." Background: Before I did my transom drain (i.e lower sump, not this splashwell one), I considered all kinds of options. Now that's not to say there are not more, but in thinking it over I came up with two scenarios for mine that I thought I would like.
1) Close out the core completely in the way of the drain, and then use a "typical" garboard drain plug type of fitting.
2) Bond in a fiberglass tube and then use the "thermos stopper" type plug in it.
Ultimately I couldn't see any reason I would not prefer option #1, except for being loathe to get started on cutting things out. So I got the tools out and went with #1 (and I'm glad I did; would do it the same way again. I'm glad to just be done with the core there, and plus my sump is now slightly deeper as a bonus). Most of the job is detailed earlier in this thread, although I have yet to finish the sump (i.e. gelcoat or paint) and fasten in the drain plug (it's all fitted, which you can see in the earlier post, but I don't want to "goop" it in place until after I finish the sump).
The reason I rejected the idea of using a through hull and then threading something into it is because most (all?) of them only have the provision to screw the plug in from the "ugly" (threaded ring) side, which to me would be on the inside of the boat -- and I didn't want a drain plug I could only put in from inside. For example, Groco makes a through hull that is threaded both outside and inside, that you can put a plug into (although they specify it for use above the waterline). Perko makes a bronze, "through hull style" garboard drain plug that takes a plastic plug, but it also has the "inside only" issue.
As I mentioned above though, there are a lot of different fittings and it's possible one could come up with something. I liked #1 for the reasons mentioned above, and also because numerous manufacturers make plugs with the same size/fastener spacing, so it would be easy to replace if/when desired.
jd: The lower drain (transom drain) in my boat still looks similar to the way I showed it earlier in the thread (save for an additional coating of neat epoxy). I'll post again when it's finished (which will involve either paint or gelcoat on the sump and caulking/fastening the drain plug in place - although the earlier entry shows it dry fitted).
Sunbeam |
|
| Back to top |
|
|
Sunbeam
Joined: 23 Feb 2012
Posts: 3990
City/Region: Out 'n' About
State or Province: Other
C-Dory Year: 2002
C-Dory Model: 22 Cruiser
Photos: Sunbeam
|
| Posted: Fri Jun 14, 2013 5:30 pm Post subject: |
|
|
Follow up to a comment I made earlier in the thread about the lazarette lids.
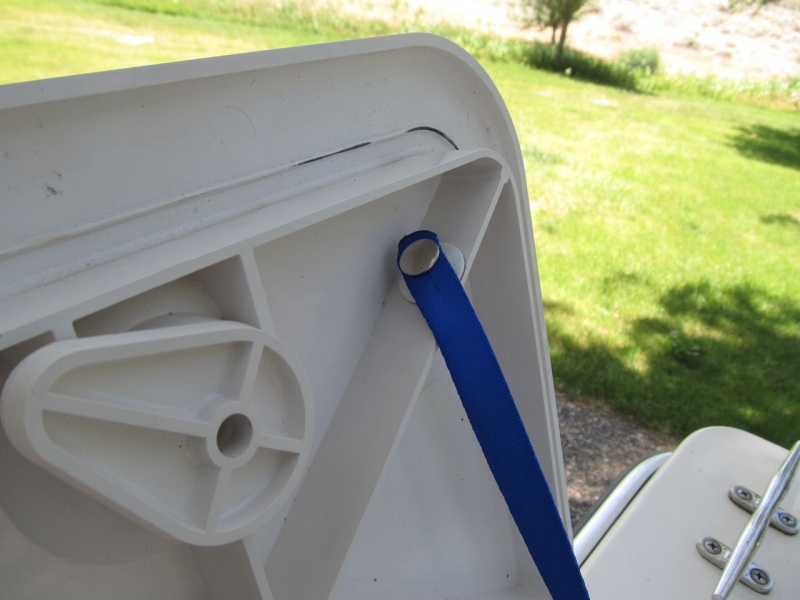
I recently made up and installed some restraint straps for the IMTRA lazarette hatch lids. Without the straps, the lids would open to 180º and (just barely) rest on the deck. I didn't like this from the first time I mocked up the new hatches - because it seems like it would be way too easy to break the lids and because I don't like things resting on the gelcoat - so I figured I'd come up with some restraints.
I wanted the straps to fall into the lazarettes of their own accord when closing the lids (vs. my needing to pull them out of the way each time), and I also wanted them to be out of the "working area" of the opening as much as possible. So, I mocked them up in various ways with some scrap webbing and a couple of pony clamps to figure out where I wanted to put them. Here are the new straps in action. First open:
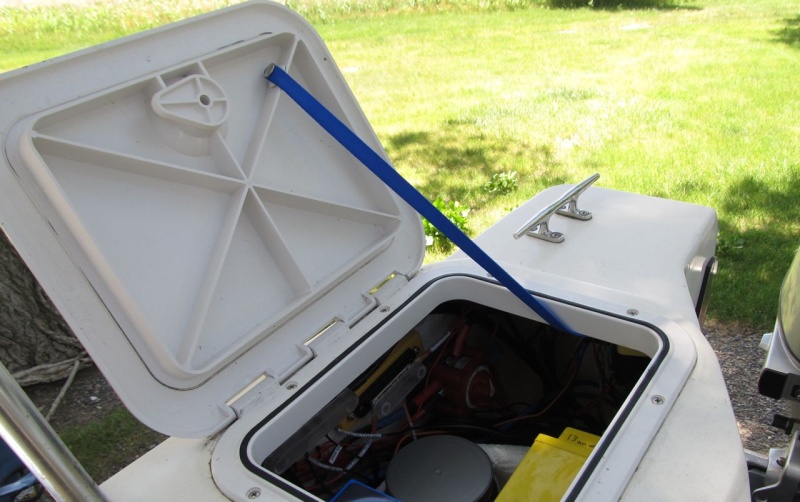
Then closing, showing the webbing falling into the locker. I had thought about encasing a fishing weight into the (tubular) webbing to encourage it, but as it turned out that wasn't necessary.
I decided to use snaps to hold the straps on. This way I could remove the straps if I wanted to, and I could also potentially change the length by making up new ones. I sized them so that the lids would open past the "any little breeze will blow them closed on me" point, but not so far that the force on the hinges was great or the temptation to use them as shelves would exist.
On the hatch lid I mounted VHB-backed male snap studs.
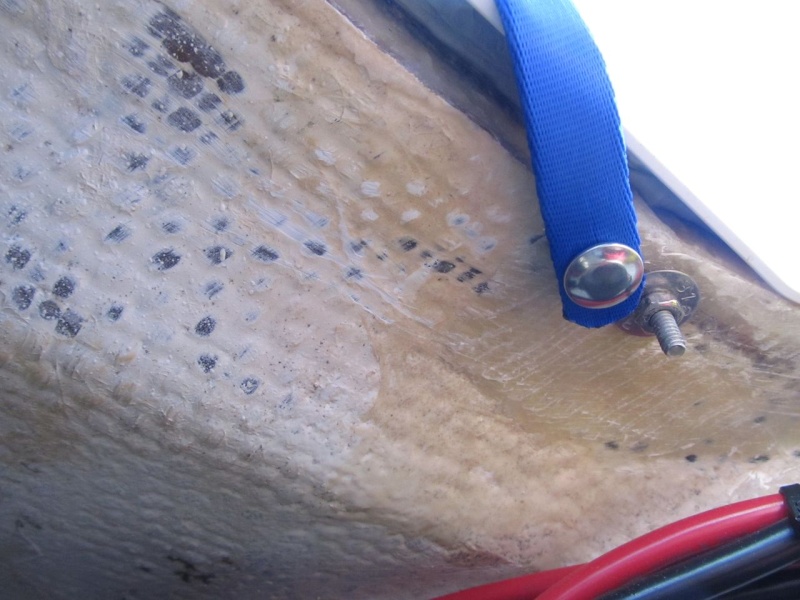
On the boat side I used screw-in snap studs. This core in this area was previously removed and replaced with thickened epoxy, so I was able to simply drill and attach.
Materials and sources:
1) Webbing, 1/2" tubular - REI (outdoor store). They sell it by the foot. Ends were cut with scissors and then melted with a small butane torch/appliance. Holes were made in webbing with a heated awl.
2) Snaps on webbing were in my bosun kit (but are commonly available). I used a "cheapy" snap setting plyer-type tool I own that came from a sewing store (a pro one from Sailrite would be preferable).
3) Snap studs on laz lids are conformable VHB tape backed studs I bought from Sailrite.
4) Snap studs on boat I had "in stock," but are commonly available ones with a "pointy screw" back.
Sunbeam  |
|
| Back to top |
|
|
ferret30
Joined: 22 Mar 2011
Posts: 569
City/Region: Seattle
State or Province: WA
C-Dory Year: 2006
C-Dory Model: 22 Cruiser
Vessel Name: Lily Pad
Photos: Lily Pad
|
| Posted: Fri Jun 14, 2013 5:39 pm Post subject: |
|
|
| Very nice. If I had installed them that way I would definitely be doing this! I installed mine to swing in so I could access them from the dock or standing on the trailer wheel wells, but I still cringe when I have them half way open and they blow all the way open! |
|
| Back to top |
|
|
hardee
Joined: 30 Oct 2006
Posts: 12632
City/Region: Sequim
State or Province: WA
C-Dory Year: 2005
C-Dory Model: 22 Cruiser
Vessel Name: Sleepy-C
Photos: SleepyC
|
| Posted: Fri Jun 14, 2013 8:55 pm Post subject: |
|
|
Sunbeam,
Nice job on the laz straps. I installed my hatches in the same way as yours, and went through the same anxiety about having them all teh way open (180) so put stops in at ablut the same points as yours, but with an 1/8th inch nylon line. Easily removable or adjustable if needed.
Looks like you are still busy working on the boat. Have a great weekend.
Harvey
SleepyC
_________________
Though in our sleep we are not conscious of our activity or surroundings, we should not, in our wakefulness, be unconscious of our sleep. |
|
| Back to top |
|
|
Sunbeam
Joined: 23 Feb 2012
Posts: 3990
City/Region: Out 'n' About
State or Province: Other
C-Dory Year: 2002
C-Dory Model: 22 Cruiser
Photos: Sunbeam
|
| Posted: Fri Jun 14, 2013 9:11 pm Post subject: |
|
|
| hardee wrote: | Sunbeam,
I ... put stops in ... with an 1/8th inch nylon line. Easily removable or adjustable if needed. |
That's a good idea and probably simpler. I can see where you could just make a hole in the support "web" on the lid and then knot the line on one side to hold it in place, and then fasten it underneath in a similar way to the snap stud. I should have thought of that! I guess since I have webbing in my kit, suddenly webbing looks right for every job 
Sure is nice having a "stopper" (of any kind) in place, after worrying about breaking those lids off for months. |
|
| Back to top |
|
|
hardee
Joined: 30 Oct 2006
Posts: 12632
City/Region: Sequim
State or Province: WA
C-Dory Year: 2005
C-Dory Model: 22 Cruiser
Vessel Name: Sleepy-C
Photos: SleepyC
|
| Posted: Sat Jun 15, 2013 1:29 am Post subject: |
|
|
That is pretty much what I did. it just isn't as good looking 
Harvey
SleepyC |
|
| Back to top |
|
|
Sunbeam
Joined: 23 Feb 2012
Posts: 3990
City/Region: Out 'n' About
State or Province: Other
C-Dory Year: 2002
C-Dory Model: 22 Cruiser
Photos: Sunbeam
|
| Posted: Tue Aug 27, 2013 11:40 pm Post subject: |
|
|
I recently installed some temporary water tanks, and figured I'd write it up in case it might be of interest.
The back story is that a while back I looked at the original water tank installation, and I wasn't fond of it. A poly tank is supposed to be supported all along the bottom, and mine was a bit too wide for them to set down flat on the hull, so they just put it in "propped up." It was only touching (and thus supported) in two places -- the inboard edge on the hull bottom and the outboard edge which was resting on the hull side. That wasn't to my liking, so I removed it and made a better support. As it turned out, by simply setting it on 1/2" material (Starboard in this case), it fit just fine and was completely supported along its bottom. I put cleats around three edges of the starboard to keep the tank from shifting, and from pressing on the upper inboard cabinet side, and then Weld Mounted two footman loops to the hull for a strap to hold it down (I made the shelf above removable, as opposed to using it to hold the tank down as originally configured; this way I could get to some additional stowage).
Well after all this I decided to measure/mark the tank for capacity, and as I did that I apparently caused the supply fitting to start leaking  I considered trying to repair the tank, but I never really did like the supply fitting being at the bottom of the tank (I prefer all the fittings on or near the top, and then a dip tube for the supply access), so I decided to go with a new tank. That of course raised questions: Go with the same size? Same location? Something different? I decided to hold off on ordering anything so that I could see how the boat would trim with the water in the aft seat, and how ~20 gallons would work for my uses. I considered trying to repair the tank, but I never really did like the supply fitting being at the bottom of the tank (I prefer all the fittings on or near the top, and then a dip tube for the supply access), so I decided to go with a new tank. That of course raised questions: Go with the same size? Same location? Something different? I decided to hold off on ordering anything so that I could see how the boat would trim with the water in the aft seat, and how ~20 gallons would work for my uses.
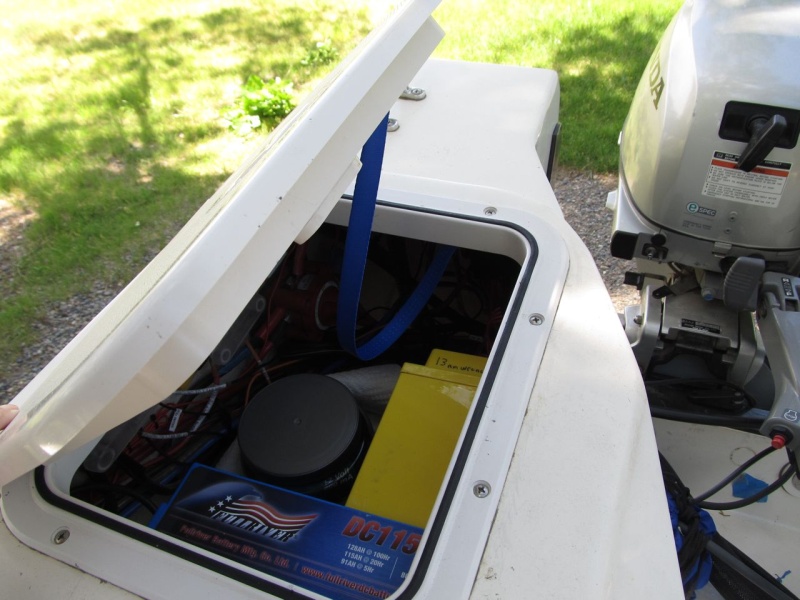
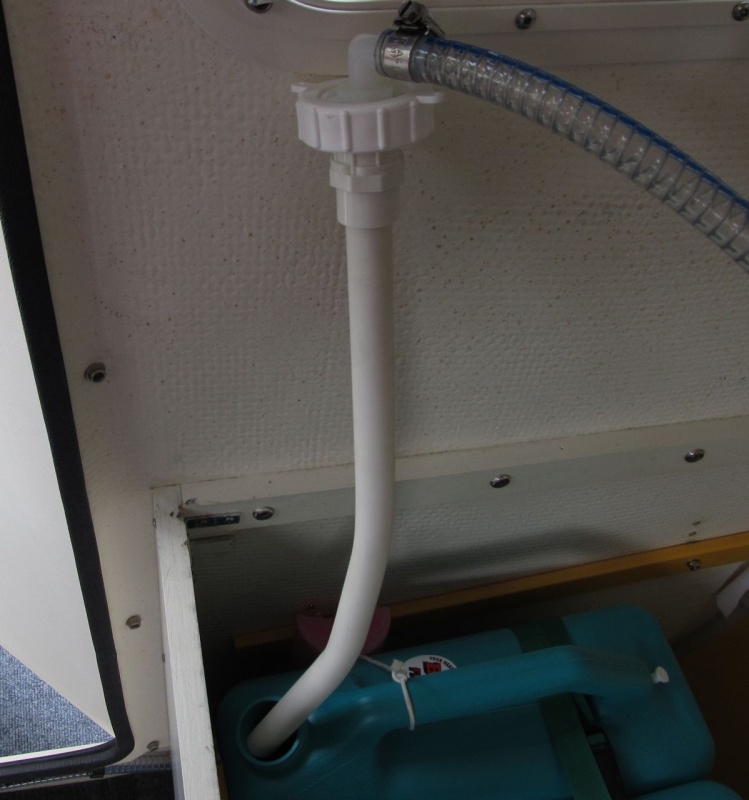
I just figured I'd go with gallon jugs and hand pouring in the interim, but then when shopping for something else, some Reliance 6-gallon potable water jugs caught my eye... As it turns out, three of them fit very efficiently into the aft seat (with storage space outboard, and even allowing me to use my installed footman loops to strap them in place. Aha, a chance to try this location, with close to the "normal" amount of water/weight. And maybe I could use the foot pump instead of pouring from jugs? Here is an overview, with all three jugs in place (18 gallons total). The view is outboard from the passageway:
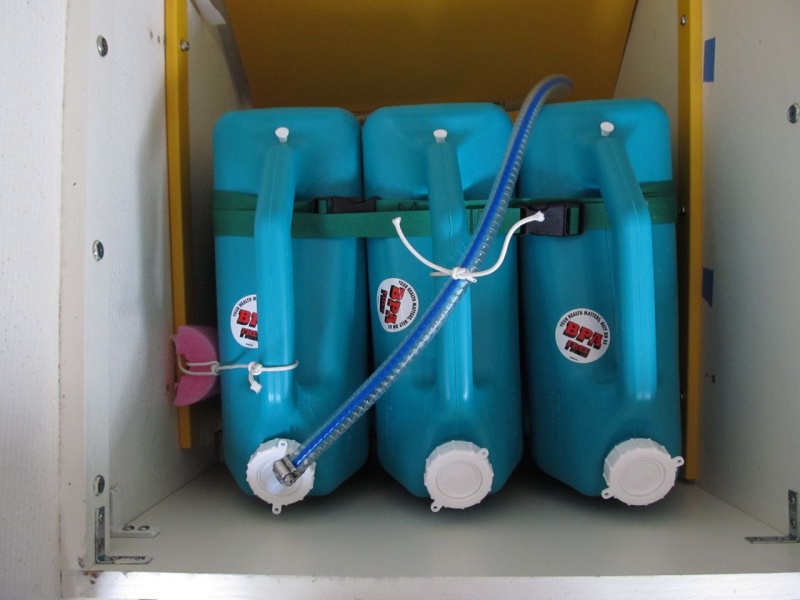
The green strap runs through the fore and aft footman loops I had already glued to the hull. The yellow platform is the 1/2" Starboard one I had made for the original water tank. Cleats fastened to it keep the tanks off the locker walls. The hose is the (new) one that runs to the foot pump at the galley sink -- I just left it a bit long for now. I figure I'll just switch that "supply" lid into the other tanks as I go. I think I can (carefully) fill the tanks in place with a garden type hose that has a shut off pistol-type end.
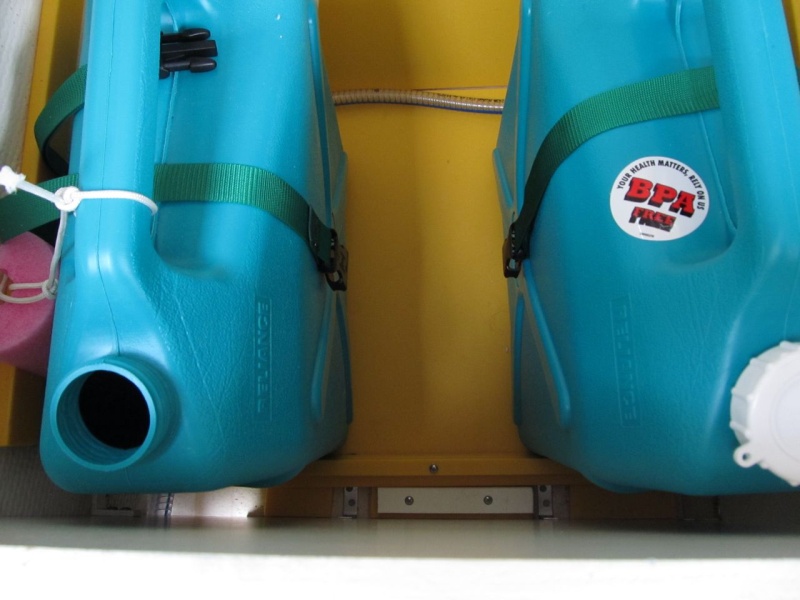
Here you can see the cleats a bit better with the middle tank removed. The white cleat is the "permanent" one I put in for the original tank; I set a longer yellow one up against it for now. Since these jugs are tall, they would have rested on the upper part of the cabinet wall otherwise, which I didn't want. The angle brackets are stainless replacements that are epoxied to the hull (I drilled and filled the original screw holes). The yellow Starboard cleats fore and aft (on the cabinet sides) are what I had put in to hold up the original shelf above the permanent water tank. The yellow piece outboard is just extra Starboard being stored there for now.
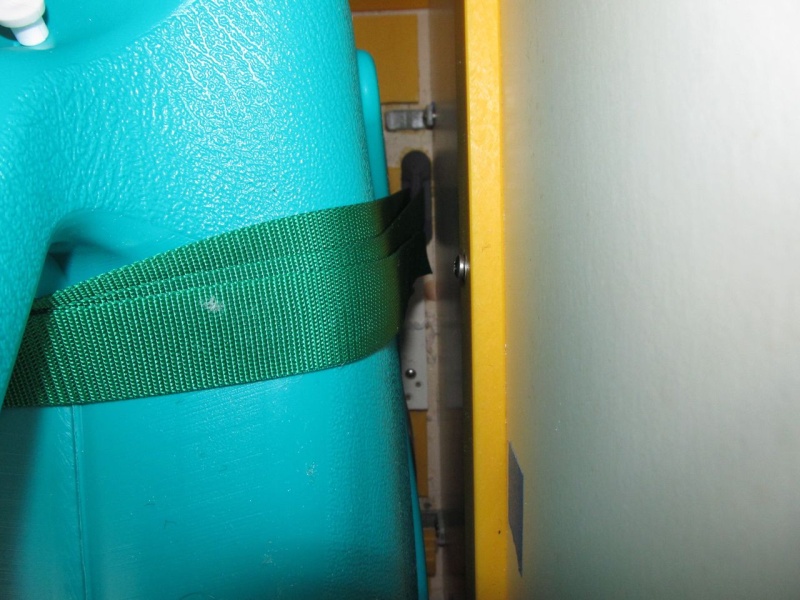
Not a great photo here, but it slightly shows the Weld Mount footman loop on one side that holds the strap. Here I used fiberglass angles for brackets (also adhered to the hull vs. using screws as originally done)
Now to get the water out of the tank(s). I used a section of 1/2" PVC plumbing pipe for a dip tube, heating it up with a heat gun and bending it slightly so it would reach the lowest point of the jug(s). Acetone gets the lettering off the outside of the pipe.
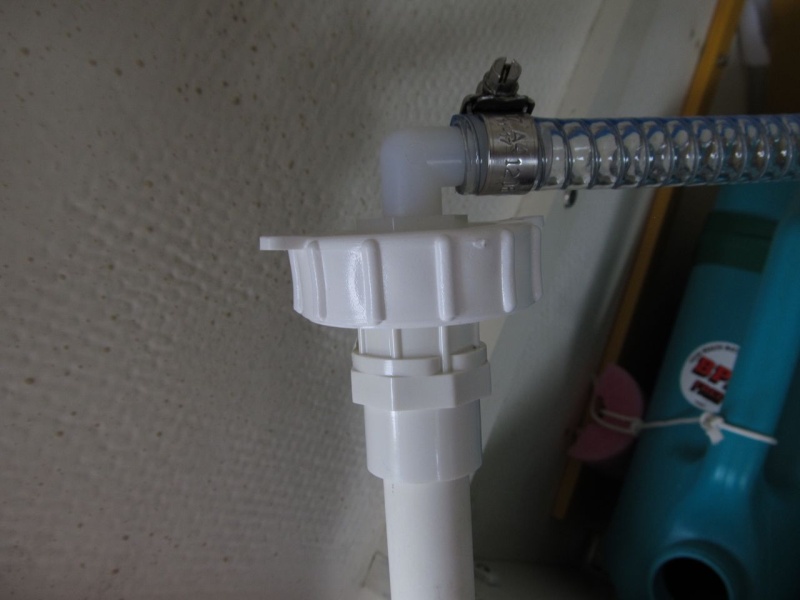
The fittings up top are pretty simple - there are just two. Starting at the hose and working down is a nylon elbow, 1/2" barb to 1/2" male NPT. I drilled a hole in the flat cap from one of the jugs to make a tight fit for the threaded side, and pushed that down in from the top. Connected to that from below is a PVC fitting that is 1/2" NPT female on top (threads onto the elbow and sandwiches the flat cap), and a meant-to-be-glued socket on the bottom side which fits the OD of the 1/2" PVC pipe. It's a tight friction fit so I don't think I'm going to need to glue it.
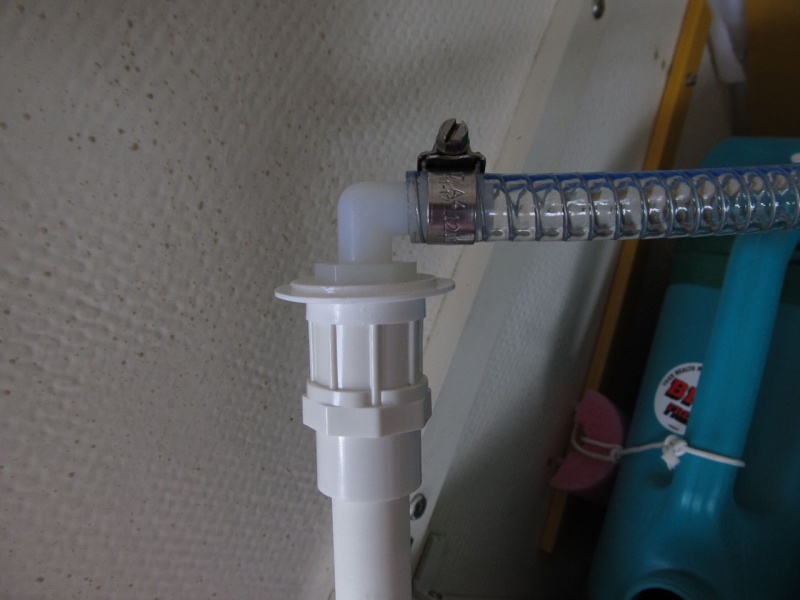
Here you can see the outer "Saturn" ring that is the other part of the Reliance jug cap. This one fitting can be shifted to the other jugs (and a solid cap moved to this jug).
One note is that the way I have it now, I'll probably only use it when not underway, because I need to open the vent in the active tank so that I can pump water out. I think water could slosh out of this when underway (unless very smooth and the tank is low on water), so I'll likely keep them closed then. I think I could screw some small NPT male to barbed fittings into the vent holes and then run hoses up higher, but first I'll see how the whole system works, and/or how long I'll keep it vs. deciding on and ordering a new "real" tank. If it all goes pear-shaped, it's 18 gallons of water storage and I'll go to the one-gallon jug/pouring method 
Sunbeam |
|
| Back to top |
|
|
BrentB
Joined: 15 Jul 2006
Posts: 4419
City/Region: Greenwood
State or Province: IN
Photos: BrentB
|
| Posted: Wed Aug 28, 2013 10:23 am Post subject: |
|
|
thanks nice writeup
What camera model are your using?
_________________
Brent Barrett |
|
| Back to top |
|
|
DuckDogTitus
Joined: 31 Jan 2013
Posts: 1034
City/Region: Gig Harbor
State or Province: WA
C-Dory Year: 1988
C-Dory Model: 22 Cruiser
Vessel Name: C-Miner
Photos: Hemingway
|
| Posted: Wed Aug 28, 2013 10:35 am Post subject: |
|
|
I like the scale-ability here. It seems like if needed, you could keep more matching jugs of water somewhere and swap when appropriate, or even less and use the storage space for something else. Pretty cool and clean modification
_________________
Dustin |
|
| Back to top |
|
|
Sunbeam
Joined: 23 Feb 2012
Posts: 3990
City/Region: Out 'n' About
State or Province: Other
C-Dory Year: 2002
C-Dory Model: 22 Cruiser
Photos: Sunbeam
|
| Posted: Wed Aug 28, 2013 11:26 am Post subject: |
|
|
| BrentB wrote: | thanks nice writeup
What camera model are your using? |
Let me look....okay, Canon SX130. It's a "hand me down" from a buddy who's into upgrading (always nice to have!). While it is technically superior (because of being newer), I actually prefer my older Canon A630, mostly because of the flip screen (but I also like the viewfinder). I can't think of enough superlatives for the flip screen! It's especially handy for photographing things on boats that are otherwise hard to get to (such as serial numbers on inboard engines, under soles, etc.).
This camera takes much better video though, and has a better, stabilized zoom feature, so I'm trying to get used to life without the flip screen. |
|
| Back to top |
|
|
|
|
You cannot post new topics in this forum
You cannot reply to topics in this forum
You cannot edit your posts in this forum
You cannot delete your posts in this forum
You cannot vote in polls in this forum
You cannot attach files in this forum
You can download files in this forum
|
|
 Search
 Private Messages
 Profile
 Log in
 Register
 Help
Help
