| View previous topic :: View next topic |
| Author |
Message |
Sunbeam
Joined: 23 Feb 2012
Posts: 3990
City/Region: Out 'n' About
State or Province: Other
C-Dory Year: 2002
C-Dory Model: 22 Cruiser
Photos: Sunbeam
|
 Posted: Sat Jan 19, 2013 8:24 pm Post subject: Posted: Sat Jan 19, 2013 8:24 pm Post subject: |
 |
|
This is just a parts tale so far, but it may have a happy ending.
So, like a number of other 22's I've seen, mine has the fuel vent fittings right up under the gunwale, with absolutely no room for a proper loop, which means that water/spray has a direct path into the fuel tank. Given that I'm re-doing my fuel system and have the vent hoses off, the idea of just putting them back onto those vents wasn't really thrilling me.
In another thread (http://www.c-brats.com/viewtopic.php?t=19063&postdays=0&postorder=asc&start=30 top of the page), Will-C had recommended a set of Attwood P-trap vents to the original poster. Thing is, I had already looked (longingly) at those vents, but it didn't look like they would fit because they require at least 1-1/2" from the center of the hole in the topsides to the underside of the gunwale (on the inside). On my boat there was a scant 1" 

Still, I kept looking at them on the Attwood web page, as if wishing could make them fit  No, actually, I was thinking about potentially carving out a bit of the underside of the deck core to make them fit, or even disusing those holes and making new ones. But wait......look at this page.... No, actually, I was thinking about potentially carving out a bit of the underside of the deck core to make them fit, or even disusing those holes and making new ones. But wait......look at this page....
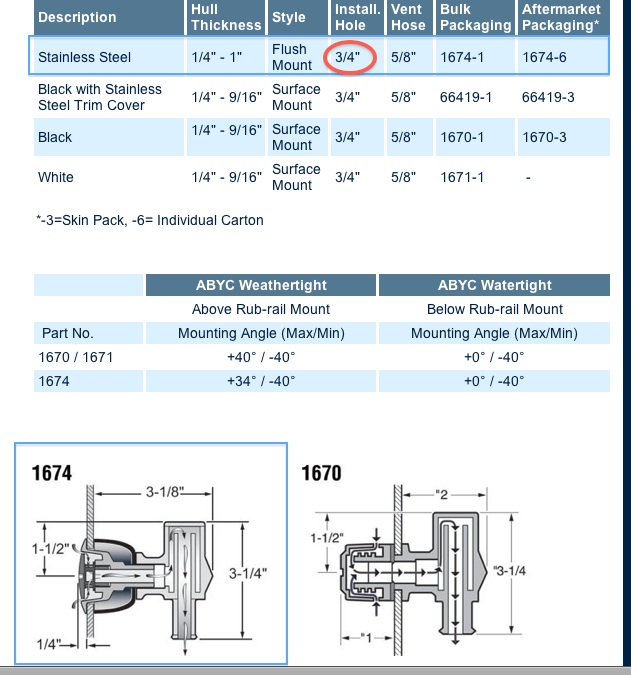
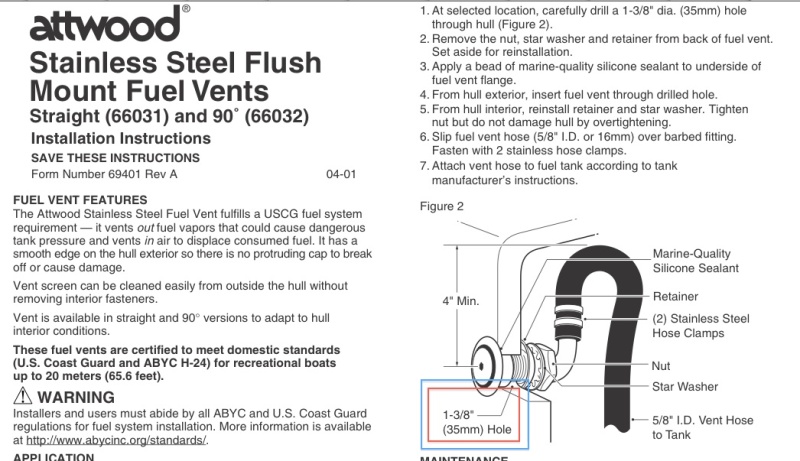
I've installed flush (non-P-trap) vents before, and because they recess into a dish of sorts, the hole in the boat is necessarily larger. So how could the flush model of the vent (one is flush, the other three are surface-mounted) take the same 3/4" hole as the others? Just to confirm, I looked at Attwood's instructions for the same-style-but-not-P-trap flush mount vent, and lo-and-behold.... it takes a 1-3/8" hole. That's more like it!
Just to make sure there wasn't something I was missing, I sent an e-mail to Attwood. They confirmed that their web page had a mistake (that they said they will correct) and that the #1674 Flush-mount P-trap vent does take a 1-3/8" hole. You can probably see where I am going with this: If I make the current hole (~3/4") into the new hole, but put all the "new" hole on the bottom edge of the existing one, then I will have a bit more than the required 1-1/2" from the center of the hole to the underside of the gunwale and, Voila, fuel vents that are very water resistant, even though they were put in "too high up" at C-Dory originally (I looked up Attwood's test results and the vents seem very resistant to spray and even water). To top it off, they look nice.
Armed with this encouraging information, I ordered a pair of the vents. They arrived today and I don't see anything obvious that would make them not work (can you tell I don't "trust" boat projects until they are done and I've gotten past any "gotchas"?  ) I'll report back once I've actually tried them in real life. ) I'll report back once I've actually tried them in real life.
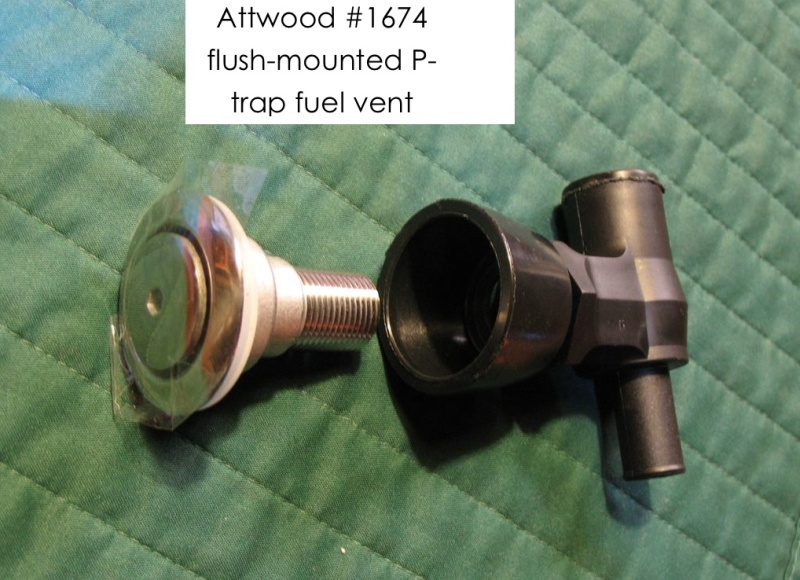
The black plastic "bowl" you see in the middle goes on the inside of the boat, and then the P-trap screws on after that. The vents come with three different bowls to allow for varying hull thicknesses.
Sunbeam 
PS: I put a link in that above-linked thread to this one, so the trail can be followed. |
|
| Back to top |
|
 |
Emurph8
Joined: 23 Nov 2012
Posts: 33
City/Region: South Jersey
State or Province: NJ
C-Dory Year: 1990
C-Dory Model: 22 Cruiser
Vessel Name: Murphy's Law
Photos: Emurph8 (Name TBD)
|
|
| Back to top |
|
|
Sunbeam
Joined: 23 Feb 2012
Posts: 3990
City/Region: Out 'n' About
State or Province: Other
C-Dory Year: 2002
C-Dory Model: 22 Cruiser
Photos: Sunbeam
|
| Posted: Sat Jan 19, 2013 8:56 pm Post subject: |
|
|
Emurph, I was thinking of you as I was typing up the post about the vents. How are you getting on with your fuel system?
| Emurph8 wrote: | | I bought 2 of these [fuel fill and vent combos] and am still trying to decide if I am going to use them. |
I thought about those too - especially when I was under the impression the P-traps wouldn't fit my boat - but for a couple of reasons decided not to go with combo fittings.
1) I already have vent holes in the topsides.
2) If I remember correctly, Practical Sailor (or someone?) did a review on a number of examples of this type of combo fill-and-vent, and none of them scored very highly.
3) Just looking at how they are put together, I wasn't real confident about how they would keep water out of the vent. I may be missing some key though.
Now that you have them in hand, what do you think about #3?
Sunbeam |
|
| Back to top |
|
|
Emurph8
Joined: 23 Nov 2012
Posts: 33
City/Region: South Jersey
State or Province: NJ
C-Dory Year: 1990
C-Dory Model: 22 Cruiser
Vessel Name: Murphy's Law
Photos: Emurph8 (Name TBD)
|
| Posted: Sat Jan 19, 2013 9:05 pm Post subject: |
|
|
Everything is coming along nicely. I filled all the holes from the old tanks, I installed the weld man foot loops I have all the hose and clamps and tanks ready to go. I am going to paint the floor with non skid to cover the new epoxy and re do the cockpit floor and under the tanks. As soon as that is done I am going to finish it up. As far as the plastic fill/vent set up, the vent is totally covered by the lid. I'm sure it would work fine. It is all plastic though and I would have to enlarge the hole pretty much to make them work. And to your point I still have the vents on the sides I would have to plug. The Atwood vents you bought look real nice. Where did you get them? I didn't see them on Jamestown. When are you tackling this job? I'm curious how it works out.
Thanks |
|
| Back to top |
|
|
Sunbeam
Joined: 23 Feb 2012
Posts: 3990
City/Region: Out 'n' About
State or Province: Other
C-Dory Year: 2002
C-Dory Model: 22 Cruiser
Photos: Sunbeam
|
| Posted: Sat Jan 19, 2013 9:34 pm Post subject: |
|
|
| Emurph8 wrote: | | Everything is coming along nicely. I filled all the holes from the old tanks, I installed the weld man foot loops I have all the hose and clamps and tanks ready to go. I am going to paint the floor with non skid to cover the new epoxy and re do the cockpit floor and under the tanks. |
Sweet! Sounds like you're making great progress. Isn't it nice to know you don't have water potentially seeping into the core?
| Emurph8 wrote: | | As far as the plastic fill/vent set up, the vent is totally covered by the lid. I'm sure it would work fine. |
What I couldn't ascertain (just going by what I could see on the web) is how do they let air in/out, meanwhile keeping water and spray out? I understand how the P-trap works, because it's basically like a dorade vent, but I couldn't "see" how the combo fills work. Maybe you can speak to that now that you have one in hand?
| Emurph8 wrote: | | The Atwood vents you bought look real nice. Where did you get them? I didn't see them on Jamestown. When are you tackling this job? I'm curious how it works out. |
I actually (and rather non-nautically) got them through Amazon. I'm not sure when I'm going to put them in - I've got like seventy-hundred projects going at once, is why. I will try to keep up a project log of sorts in this thread, so unless I'm slacking (has happened) I should post here whenever I do tackle them.
Sunbeam |
|
| Back to top |
|
|
Sunbeam
Joined: 23 Feb 2012
Posts: 3990
City/Region: Out 'n' About
State or Province: Other
C-Dory Year: 2002
C-Dory Model: 22 Cruiser
Photos: Sunbeam
|
| Posted: Sun Jan 20, 2013 8:16 pm Post subject: |
|
|
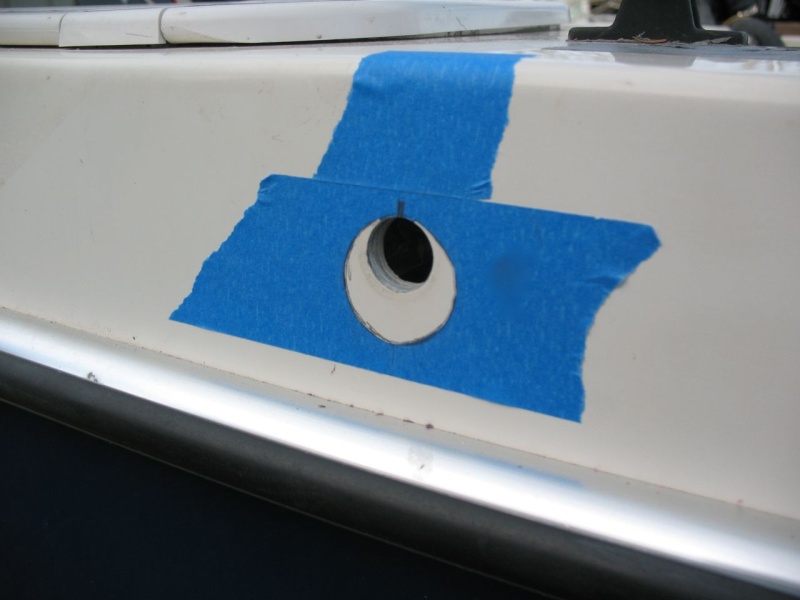
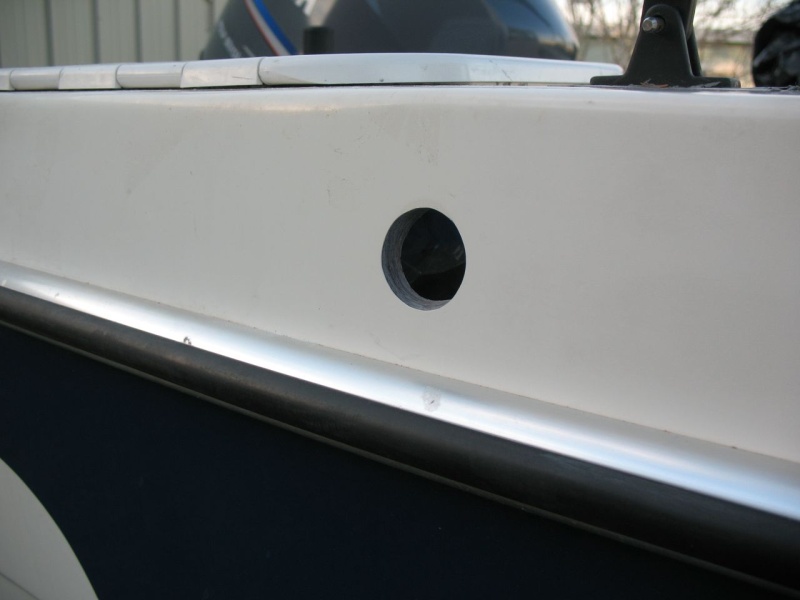
Today I looked over the new vents, played around with them to try to discover any "gotchas" before proceeding, and then got started on the installation. Here you can see how the new hole relates to the old one. I needed to make all the "new" fall below the old in order to have clearance for the P-traps under the gunwale inside the boat. This necessitated using the flush vents (although I think I like them better anyway), since the surface-mounted vents still need the 1-1/2" clearance above the P-trap but would use the original-size 3/4" hole (thus not enough clearance). I did have the option of moving them slightly forward or aft, but they both fell best centered on the old locations.
After I had the hole marked, I taped plastic bags over the inside of the holes (port and starboard) to catch any dust before it got into the boat. I also set up a vacuum on the outside and taped the nozzle in place just above the hole. I first thought I would cut the new holes with a hole saw, so I tapered a 1" dowel so that it fit in the hole with a wedge fit, to guide the mandrel bit, however the center (where the mandrel bit would go) was juuust at the lower edge of the dowel, and when I started to drill a pilot hole for that, I didn't really get a good feeling about how accurately I'd be able to place that center guide hole. So I went to Plan B.
For Plan B, I started with a straight cutting bit on the Dremel (looks kind of like a small drill bit but with finer spirals), and made several "sun ray" lines radiating out from the bottom of the old hole to just a bit shy of my pencil/tape line. Then I connected the "rays" with the same bit, but still shy of the line (no photo because the camera was up in the boat - oops). Next I exchanged that bit for a sanding drum, still on the Dremel, and with that I eased the cut out to the pencil line. Every so often I would test fit the vent. But of course when it doesn't fit (yet), it's hard to know exactly where you need to remove more material (we're talking the fine amounts here, not the gross cutting). So what I did was take a small (1/2") "slice" of PVC pipe that was 1-3/8" ID, and held that up to the hole and then marked on the inside with pencil where I hadn't quite cut enough yet. By that method I got the holes to the right size but kept them tidy and just large enough. (That's also how I marked the holes to begin with.) Here is the new hole just after cutting:
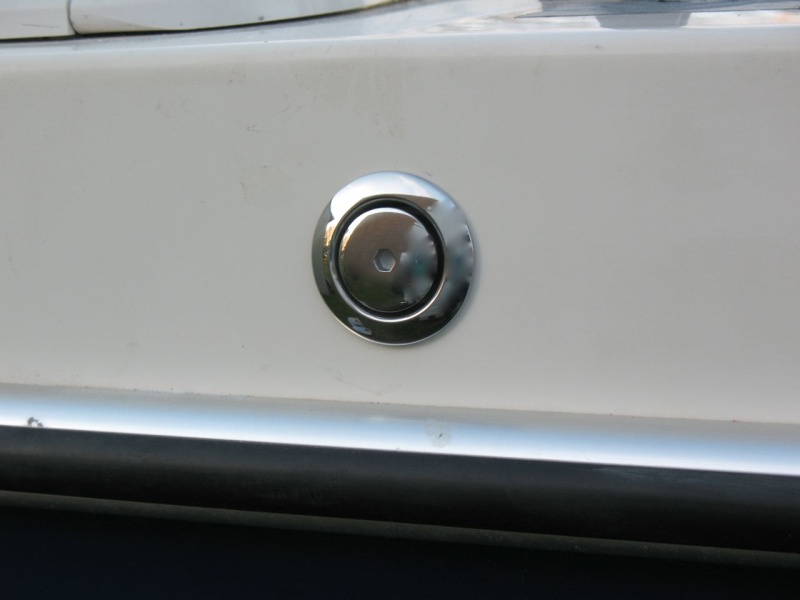
The outside part of the vent set in place in the new hole:
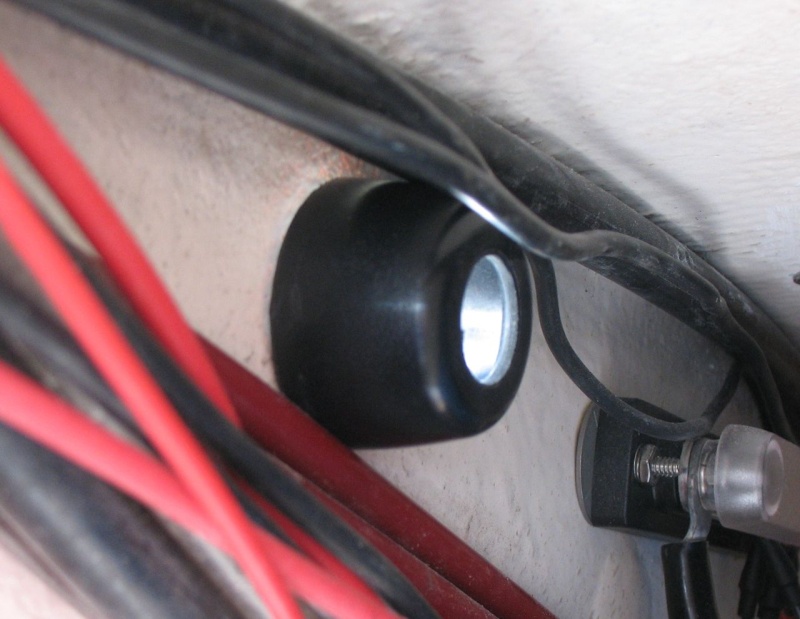
And a view of part of the vent inside the gunwale. This is actually just the largest possible spacer ring (there are three; I can tell I'll be using either this one or the middle-sized one), which shows that it is a bit of a tight fit, but from what I can tell, do-able. The large black "wire" just above the spacer is the steering cable. This spacer ring is not part of the seal - that is made between the P-trap section and the metal part of the vent. This just spaces the P-trap so that as it tightens up on the metal threaded section it also braces itself against the hull side.
Sunbeam |
|
| Back to top |
|
|
Emurph8
Joined: 23 Nov 2012
Posts: 33
City/Region: South Jersey
State or Province: NJ
C-Dory Year: 1990
C-Dory Model: 22 Cruiser
Vessel Name: Murphy's Law
Photos: Emurph8 (Name TBD)
|
| Posted: Sun Jan 20, 2013 9:11 pm Post subject: |
|
|
You didn't waste anytime knocking that out! Looks really good. That is a big hole to cut though. Kind of scares me. My current Vent is below the rub rail so maybe I could get away with the smaller hole version? But then I guess it sticks out which could be a problem? I understand I would need a 4" loop to do it the old way. I don't have that much room I don't think?
The vent/fill I have now would work. The vent hole is under the lid so water can't get to it but you can blow air through it with the lid closed so it doesn't prevent air from moving through. My main concern with it is the extra if hole I would have to cut and the quality of the plastic hinge. If it breaks I'm stuck with the big hole.
The other minor concern I have is my old fill has a broken chain on the lid so I need to del with that and of course I wouldn't have to ground the all plastic fill / vent setup either. I'll have to decide soon. I need to get this done and move on to other things so its ready to get wet in spring!
Thanks for the pics and great info! |
|
| Back to top |
|
|
Sunbeam
Joined: 23 Feb 2012
Posts: 3990
City/Region: Out 'n' About
State or Province: Other
C-Dory Year: 2002
C-Dory Model: 22 Cruiser
Photos: Sunbeam
|
| Posted: Sun Jan 20, 2013 9:50 pm Post subject: |
|
|
| Emurph8 wrote: | | You didn't waste anytime knocking that out! Looks really good. That is a big hole to cut though. |
Thanks. It's always a little scary to start, but the way I did it is really controllable, which helps (vs. say, going wrong with a hole saw - not that you would probably).
| Emurph8 wrote: | | My current Vent is below the rub rail so maybe I could get away with the smaller hole version? |
If your vent is below the rub rail, you may not even "need" the P-trap vent. Even if you can't get a full 4" loop, a somewhat lesser loop would likely still do the job (of keeping water or spray out) - as long as it's reasonably "loopy." I basically didn't have room for any loop at all, so the existing vent was just a nice, smooth 90º slide right into the tank - for air or water.
The flush-mounted vs. the surface-mounted vent is usually just a preference thing, to my mind. However with the vents being so high on my boat, the only way to use the P-trap vent (which takes the place of a loop) was to use the flush-mounted one. The larger required hole worked to my advantage and allowed me to fit the vent, while "including" the original hole.
So my guess is that you really have all the options: Flush-mounted or surface mounted "regular old" vent with loop, flush-mounted or surface-mounted P-trap style vent, or vent-n-fill combo. |
|
| Back to top |
|
|
rogerbum
Joined: 21 Nov 2004
Posts: 5922
City/Region: Kenmore
State or Province: WA
C-Dory Year: 2008
C-Dory Model: 255 Tomcat
Vessel Name: Meant to be
Photos: SeaDNA
|
| Posted: Mon Jan 21, 2013 12:01 am Post subject: |
|
|
For future reference on enlarging such holes - here's a tip I got from another brat sometime last year. With some hole saw mandrels, you can stack two saws. If the larger saw goes on first the smaller one will stick out a little and serve as a centering guide. If need be, you can use a washer between them to get a little more overhang. It works like a charm.
_________________
Roger on Meant to be |
|
| Back to top |
|
|
Sunbeam
Joined: 23 Feb 2012
Posts: 3990
City/Region: Out 'n' About
State or Province: Other
C-Dory Year: 2002
C-Dory Model: 22 Cruiser
Photos: Sunbeam
|
| Posted: Mon Jan 21, 2013 1:16 am Post subject: |
|
|
| rogerbum wrote: | | For future reference on enlarging such holes - here's a tip I got from another brat sometime last year. With some hole saw mandrels, you can stack two saws. If the larger saw goes on first the smaller one will stick out a little and serve as a centering guide. If need be, you can use a washer between them to get a little more overhang. It works like a charm. |
That's a good tip  , and it would have worked if the new hole had been centered on the old one. However, since in this case I needed the new hole to be offset from the original one, that trick was not an option. , and it would have worked if the new hole had been centered on the old one. However, since in this case I needed the new hole to be offset from the original one, that trick was not an option.
Sunbeam |
|
| Back to top |
|
|
rogerbum
Joined: 21 Nov 2004
Posts: 5922
City/Region: Kenmore
State or Province: WA
C-Dory Year: 2008
C-Dory Model: 255 Tomcat
Vessel Name: Meant to be
Photos: SeaDNA
|
| Posted: Mon Jan 21, 2013 11:44 am Post subject: |
|
|
| Sunbeam wrote: | | rogerbum wrote: | | For future reference on enlarging such holes - here's a tip I got from another brat sometime last year. With some hole saw mandrels, you can stack two saws. If the larger saw goes on first the smaller one will stick out a little and serve as a centering guide. If need be, you can use a washer between them to get a little more overhang. It works like a charm. |
That's a good tip , and it would have worked if the new hole had been centered on the old one. However, since in this case I needed the new hole to be offset from the original one, that trick was not an option.
Sunbeam |
I guess I missed that (duh!). Also, you might have even given me that tip.   |
|
| Back to top |
|
|
Sunbeam
Joined: 23 Feb 2012
Posts: 3990
City/Region: Out 'n' About
State or Province: Other
C-Dory Year: 2002
C-Dory Model: 22 Cruiser
Photos: Sunbeam
|
| Posted: Mon Jan 21, 2013 11:57 am Post subject: |
|
|
Well I bet someone is going to read it who's in the midst of a project (or contemplating one) and it'll make their day -- a good tip never hurts!
That "offset" hole detail is also the reason I got a bit nervous about using a (single) hole saw. The new center was near to where the (softer) wood bung and and (harder) fiberglass met that I was concerned about keeping the centering bit exactly where I wanted it. Probably would have been fine, but I decided not to find out since the clearances were tight (as far as overall placement), and there's really no turning back once the hole saw hits the gelcoat.
Sunbeam |
|
| Back to top |
|
|
beermanPDX
Joined: 01 Feb 2012
Posts: 261
City/Region: Portland
State or Province: OR
Photos: Jean Marie
|
| Posted: Mon Jan 21, 2013 12:20 pm Post subject: |
|
|
| Sunbeam wrote: | | That "offset" hole detail is also the reason I got a bit nervous about using a (single) hole saw. The new center was near to where the (softer) wood bung and and (harder) fiberglass met that I was concerned about keeping the centering bit exactly where I wanted it. |
Another way to do what you want is to just get a scrap piece of wood and drill your hole through that with your hole saw. Then clamp or hold that scrap piece of wood over the desired drill location. The scrap wood become the hole saw guide and will keep it from moving / walking.
I've used this method quite a few times when changing out locksets on doors.
_________________
Cheers 
Rob
2008 25 Cruiser - Sold
2002 Nordic Tug 32/4 - Sold
1989 40 Tollycraft Sport Sedan |
|
| Back to top |
|
|
Sunbeam
Joined: 23 Feb 2012
Posts: 3990
City/Region: Out 'n' About
State or Province: Other
C-Dory Year: 2002
C-Dory Model: 22 Cruiser
Photos: Sunbeam
|
| Posted: Mon Jan 21, 2013 12:39 pm Post subject: |
|
|
Another good idea
In this case I couldn't see a real good way of clamping to the surface... but I did think about it, because the hole saw would have been such a quick, simple way to make the hole. As it turned out, the Dremel method didn't take too terribly long either, but I didn't know it was going to be as quick as it was, so I spent some time trying to avoid it. You know how some boat projects seem like they are going to be a breeze but then .... NOT. Well making the holes turned out the opposite (for once!), once I just gave in to the Dremel. Can't complain when that happens |
|
| Back to top |
|
|
rogerbum
Joined: 21 Nov 2004
Posts: 5922
City/Region: Kenmore
State or Province: WA
C-Dory Year: 2008
C-Dory Model: 255 Tomcat
Vessel Name: Meant to be
Photos: SeaDNA
|
| Posted: Mon Jan 21, 2013 12:46 pm Post subject: |
|
|
| Sunbeam wrote: | Another good idea
<stuff clipped>You know how some boat projects seem like they are going to be a breeze but then .... NOT. <more stuff clipped> |
Some? That sounds like all my boat projects! |
|
| Back to top |
|
|
|
|
You cannot post new topics in this forum
You cannot reply to topics in this forum
You cannot edit your posts in this forum
You cannot delete your posts in this forum
You cannot vote in polls in this forum
You cannot attach files in this forum
You can download files in this forum
|
|
 Search
 Private Messages
 Profile
 Log in
 Register
 Help
Help
