| View previous topic :: View next topic |
| Author |
Message |
Yellowstone
Joined: 07 Feb 2006
Posts: 475
City/Region: White Sulphur Springs
State or Province: MT
C-Dory Year: 1999
C-Dory Model: 22 Classic
Vessel Name: Farwest II
Photos: Farwest III
|
 Posted: Thu Apr 05, 2012 12:39 am Post subject: Posted: Thu Apr 05, 2012 12:39 am Post subject: |
 |
|
Bob - On another thread I mention 1999 as the watershed year when C-Dory abandoned the tried and true lid covers. Since that year you and hundreds of other with later models have had to deal with something which should never have happened. That change was purely a penny pinching decision made by the new owners with predictable outcomes.
The old saying, the sins of the elders is visited on their offspring, applies in this case.
But I can see you are handy enough to rectify things. Take care.
Yellowstone John
_________________
hopelessly addicted C-Dory user |
|
| Back to top |
|
 |
Golerud
Joined: 22 Sep 2007
Posts: 83
City/Region: Bella Vista
State or Province: AR
C-Dory Year: 2006
C-Dory Model: 23 Venture
Vessel Name: SLOGO
Photos: SLOGO
|
| Posted: Thu Apr 05, 2012 8:16 am Post subject: hatch covers |
|
|
This thread about changing out hatch covers is really great. From what I can tell, most everyone who has changed out the covers is the owner of a 22 cruiser. I have a 2006 23' Cape Cruiser and am having the same water leakage problem with my hatch covers.
Have any owners of the 23' Cape Cruiser or the newer 23' C-Dory Venture have the same problem? Will the Imtra covers Dr.Bob is using fit the 23' boats? I haven;t been able to locate the dimensions of them.
I need all the help I can get and really appreciate it.
Gary |
|
| Back to top |
|
|
prosimedia
Joined: 01 Feb 2012
Posts: 39
City/Region: Vancouver
State or Province: BC
C-Dory Year: 2007
C-Dory Model: 22 Cruiser
Photos: prosimedia (Name TBD)
|
| Posted: Thu Apr 05, 2012 2:04 pm Post subject: |
|
|
Bob -
This has been a very helpful thread. Thank you. I am about to replace the hatches on my (new to me!) 2007 CD 22' cruiser. I've ordered new hatches (Imtra 40154) from Defender.com.
Can you please advise the process of filling in the epoxy once the core has been undercut and dried? How do you "hold" the epoxy in place on a vertical surface like this that is open on one side? So far I have been using West Systems six10 epoxy which works great, but probably isn't enough volume for this job. What do you think?
Many thanks,
Simon |
|
| Back to top |
|
|
Matt Gurnsey
Dealer
Joined: 11 Nov 2008
Posts: 1532
City/Region: Port Orchard
State or Province: WA
Photos: Kitsap Marina
|
| Posted: Thu Apr 05, 2012 2:08 pm Post subject: |
|
|
I beleive the 23 Venture used the same hatch cover, and the Imtra hatch should fit.
I'm not sure if you'll find balsa in the core of the 23 Venture, as they went to a foam core material for the hull, but balsa may still have been in the deck.
_________________
Matt Gurnsey
Kitsap Marina
www.kitsapmarina.com
360-895-2193
(888) 293-7991 |
|
| Back to top |
|
|
ferret30
Joined: 22 Mar 2011
Posts: 569
City/Region: Seattle
State or Province: WA
C-Dory Year: 2006
C-Dory Model: 22 Cruiser
Vessel Name: Lily Pad
Photos: Lily Pad
|
| Posted: Thu Apr 05, 2012 2:19 pm Post subject: |
|
|
| prosimedia wrote: | Bob -
This has been a very helpful thread. Thank you. I am about to replace the hatches on my (new to me!) 2007 CD 22' cruiser. I've ordered new hatches (Imtra 40154) from Defender.com.
Can you please advise the process of filling in the epoxy once the core has been undercut and dried? How do you "hold" the epoxy in place on a vertical surface like this that is open on one side? So far I have been using West Systems six10 epoxy which works great, but probably isn't enough volume for this job. What do you think?
Many thanks,
Simon |
Could you give a link to the hatches, or did you special order them? I can't find them on Defender. |
|
| Back to top |
|
|
prosimedia
Joined: 01 Feb 2012
Posts: 39
City/Region: Vancouver
State or Province: BC
C-Dory Year: 2007
C-Dory Model: 22 Cruiser
Photos: prosimedia (Name TBD)
|
| Posted: Thu Apr 05, 2012 4:17 pm Post subject: |
|
|
I had forgot that Defender only stocked the white, not dream white (not sure what the difference is, but the dimensions are the same. The product # is 40155:
http://www.defender.com/product.jsp?path=-1|6880|48504&id=744257
Simon |
|
| Back to top |
|
|
thataway
Joined: 02 Nov 2003
Posts: 20813
City/Region: Pensacola
State or Province: FL
C-Dory Year: 2007
C-Dory Model: 25 Cruiser
Vessel Name: thataway
Photos: Thataway
|
| Posted: Thu Apr 05, 2012 5:52 pm Post subject: |
|
|
The question is about the epoxy and what is necessary to keep it in place. I mix the epoxy and cabosil to a thick enough mixture that it will stay in place. It is peanut butter plus consistency. The reason we have not gone forward with this project is the problem of drying the core. We have had rain during the last few days, so it is cover with plastic--uncover, use the heat gun, expose to the sun, cover to prevent water intrusion. Hopefully in the next couple of days it will be dry enough to use the epoxy.
In the mean time I have put the basics of the 110 volt system in place. The previous system was a 50 foot extension cored, with 3 way splitter on the end, and two 1 amp battery chargers plugged into this cord. The new system has a "thru hull" male plug under the gunnel, a 20 amp fuse, an on/off switch, a plug for a 10 amp battery charger hard wired to the batteries, and one 20 amp/110V plug on each side of the boat, in the cabin. More details as it is finished.
_________________
Bob Austin
Thataway
Thataway (Ex Seaweed) 2007 25 C Dory May 2018 to Oct. 2021
Thisaway 2006 22' CDory November 2011 to May 2018
Caracal 18 140 Suzuki 2007 to present
Thataway TomCat 255 150 Suzukis June 2006 thru August 2011
C Pelican; 1992, 22 Cruiser, 2002 thru 2006
Frequent Sea; 2003 C D 25, 2007 thru 2009
KA6PKB
Home port: Pensacola FL |
|
| Back to top |
|
|
westward
Joined: 18 Feb 2005
Posts: 718
City/Region: Seattle
State or Province: WA
C-Dory Year: 1985
C-Dory Model: 16 Angler
Vessel Name: TBD
Photos: Steady Eddy
|
| Posted: Fri Apr 06, 2012 9:22 am Post subject: |
|
|
| Remember the lazarette hatches on the older boats? They had a coaming molded into the deck, and a solid, hinged, gasketed fiberglass hatch installed over. Everything was exactly color matched, they fit in seamlessly with the lines of that part of the boat, and they didn't leak. Their design physically limited how much they could possibly leak by providing a flashing/counterflashing situation. The factory decided to make the change (obviously to save construction costs) without making any construction modifications to account for the new pre-fab hatch installation. Heck, they didn't even select a hatch that was designed for horizontal installation! One of our members had to research and specify different hatches that were more appropriate, (which we had to buy and install ourselves) but the color still doesn't match. This is only one example of the many "changes" the factory made during that era. Maybe rather than putting so much of their resources into marketing and boat show afterparties, buyers would have been better served by having the factory put more of the budget into the boats themselves. An owner really shouldn't have to be rebuilding a lazarette installation and doing grinder work on so new a boat IMHO, and not all owners have the time and expertise that Dr. Bob has. This looks like "a grand" worth of work at a fiberglass repair shop. I'm encouraged that the current factory is reversing this trend somewhat by concentrating on build quality. Mike |
|
| Back to top |
|
|
thataway
Joined: 02 Nov 2003
Posts: 20813
City/Region: Pensacola
State or Province: FL
C-Dory Year: 2007
C-Dory Model: 25 Cruiser
Vessel Name: thataway
Photos: Thataway
|
| Posted: Tue Apr 10, 2012 7:30 pm Post subject: |
|
|
Ok, lets get the photos of this project wrapped. It took several days to dry out the balsa core. I used a heat gun and exposure to the nice warm Florida Sun, then covered the hatches with plastic at night.
After dry, I mixed up the epoxy, with cabosil and medium density filler. I filled all of the areas I had ground out with the Dremel tool, and the drilled out the old screw holes with 1/4" drill, and the new screw holes with 5/16" drill bit. This allowed me to distinguish between the new holes and old holes. The epoxy mixture was pushed up into the screw holes from below. After it began to set, I sounded each hole with a small wooden stick, and then filled enough to give the hole an over fill over the top. Then sanded flush with the Dremel vibrating sander and sanded the inner part with a drum sander.
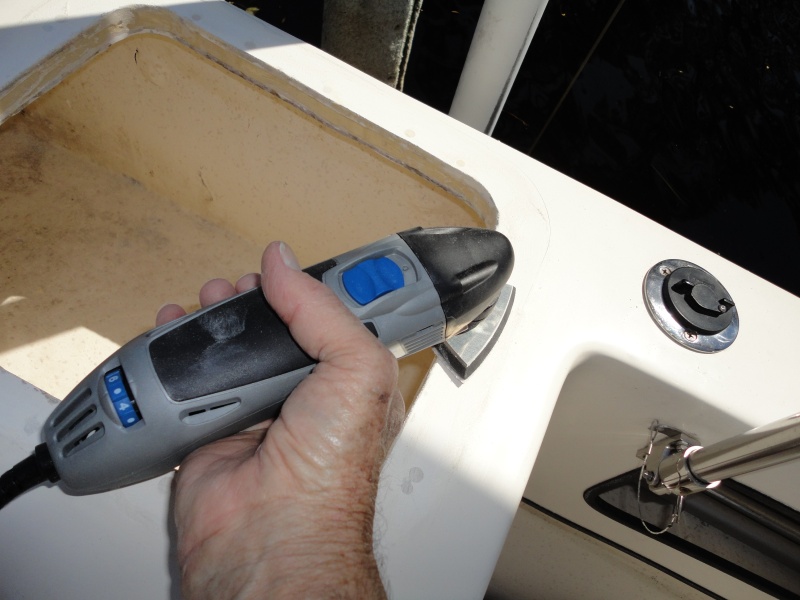
Sander removing any old caulk and sanding holes flush
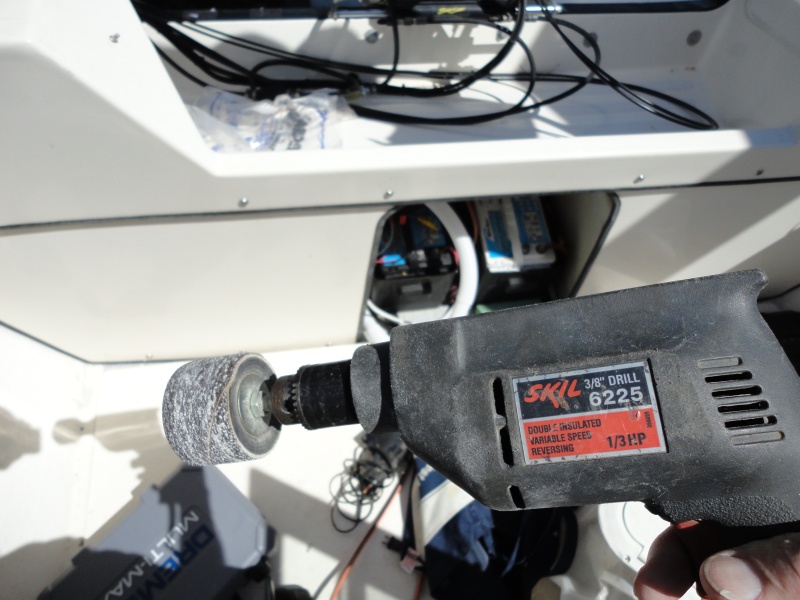
Drum sander to sand the epoxy flush to edge of the glass
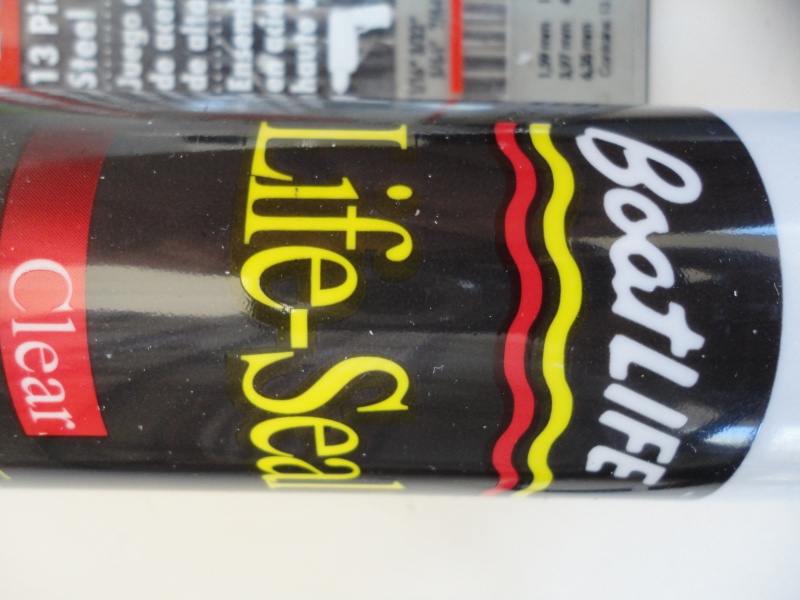
Life Seal by Boat life--proper sealant to use
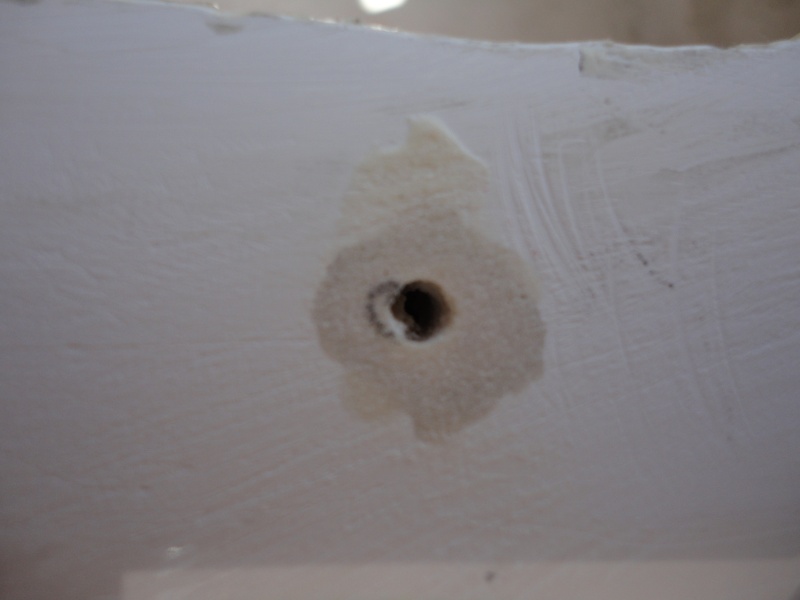
Pilot hole drilled out
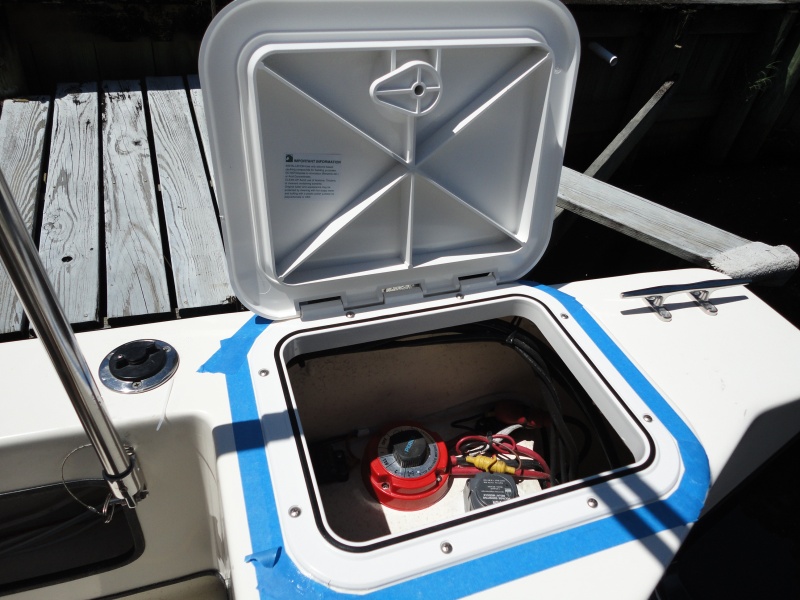
Masking tape to limit any sealant spread and new hatch screwed in place
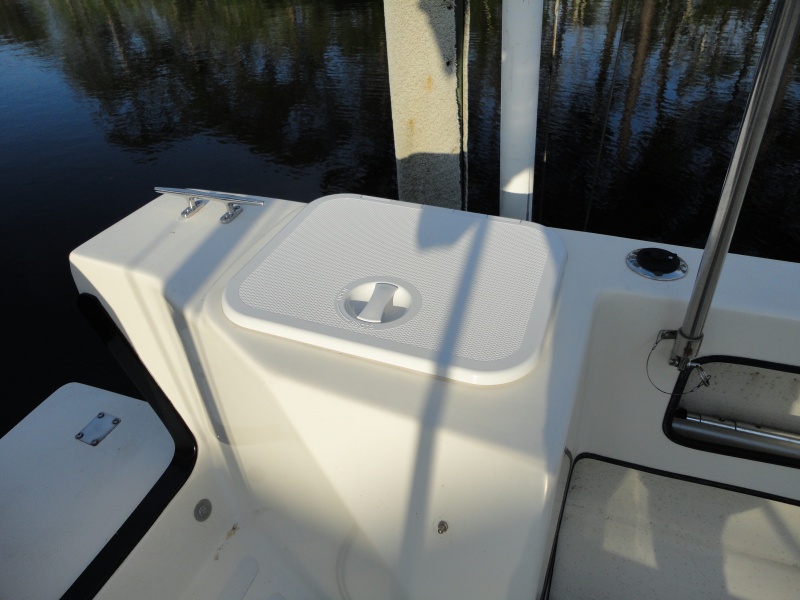
Hatch in place and dogged down--dry inside after "hose" test. |
|
| Back to top |
|
|
ferret30
Joined: 22 Mar 2011
Posts: 569
City/Region: Seattle
State or Province: WA
C-Dory Year: 2006
C-Dory Model: 22 Cruiser
Vessel Name: Lily Pad
Photos: Lily Pad
|
| Posted: Tue May 15, 2012 4:44 pm Post subject: |
|
|
I just ordered a pair of Imtra Dream White 4000 hatches (PN SPA-40154). Hopefully they are the right ones!
I could only find 3 online retailers that had the dream white color. One of them had an apartment as the address, and no BBB history. The other seemed like a real website, but had an F on the BBB website due to various unresolved complaints.
Finally, I found and bought the hatches straight from the Imtra website for $95 each.
The boat's in the marina now, so I'm not sure how people feel about dremeling, sanding gelcoat, etc. on the water... |
|
| Back to top |
|
|
thataway
Joined: 02 Nov 2003
Posts: 20813
City/Region: Pensacola
State or Province: FL
C-Dory Year: 2007
C-Dory Model: 25 Cruiser
Vessel Name: thataway
Photos: Thataway
|
| Posted: Tue May 15, 2012 8:09 pm Post subject: |
|
|
| Just use a vacuum to catch the dust. |
|
| Back to top |
|
|
ferret30
Joined: 22 Mar 2011
Posts: 569
City/Region: Seattle
State or Province: WA
C-Dory Year: 2006
C-Dory Model: 22 Cruiser
Vessel Name: Lily Pad
Photos: Lily Pad
|
| Posted: Mon Jun 25, 2012 3:28 pm Post subject: |
|
|
I did this project over the weekend, and it went pretty smoothly. I got lucky and had no moisture in the balsa, so I only undercut about 1/4".
One thing I did differently was to have the hatches swing toward the motor.
With the hinges facing out there isn't much gunnel surface for the hatch to lay flat on. Instead, it would try to open farther than 180 degrees and put a lot of stress on the hinge. By turning the hatch around, there's a couple of inches width of horizontal surface for the hatch to rest on when open.
The other thing that's kind of nice is I can easily open the hatch from the dock and check the battery switch. |
|
| Back to top |
|
|
thataway
Joined: 02 Nov 2003
Posts: 20813
City/Region: Pensacola
State or Province: FL
C-Dory Year: 2007
C-Dory Model: 25 Cruiser
Vessel Name: thataway
Photos: Thataway
|
| Posted: Mon Jun 25, 2012 3:39 pm Post subject: |
|
|
| I had considered switching the hinge position, but since we are opening it from inside the boat we retained the original configuration. I was also worried about hyper extending the covers, but it has not happened. Glad that your job went well, and no moisture! |
|
| Back to top |
|
|
ferret30
Joined: 22 Mar 2011
Posts: 569
City/Region: Seattle
State or Province: WA
C-Dory Year: 2006
C-Dory Model: 22 Cruiser
Vessel Name: Lily Pad
Photos: Lily Pad
|
| Posted: Mon Jun 25, 2012 4:39 pm Post subject: |
|
|
| thataway wrote: | | Glad that your job went well, and no moisture! |
Maybe I'll take a look at the berth hatch next! That one looks a little more difficult to remove since it's sealed on the surface and also from below. But I've had good practice from doing the back hatches! I'd imagine it's a matter of cutting the seal from below with a utility knife or sharp putty knife, and then trying to pry under the hatch flange from above. |
|
| Back to top |
|
|
Jazzmanic
Joined: 07 Feb 2005
Posts: 2231
City/Region: Seattle
State or Province: WA
Photos: C-Dancer
|
| Posted: Mon Jun 25, 2012 5:31 pm Post subject: |
|
|
Hey Sean!
So many projects, I commend you but...
It's time to use the boat. You know how short Seattle summers can be. 
Just funning' you. Have a great summer!
_________________
Peter & Caryn
C-Dancer - 2005 22' Cruiser 2005-2017
Island Time - 2018 Ranger Tug 23 2017-2022
Email: pjamero@gmail.com |
|
| Back to top |
|
|
|
 Search
 Private Messages
 Profile
 Log in
 Register
 Help
Help
