| View previous topic :: View next topic |
| Author |
Message |
thataway
Joined: 02 Nov 2003
Posts: 20813
City/Region: Pensacola
State or Province: FL
C-Dory Year: 2007
C-Dory Model: 25 Cruiser
Vessel Name: thataway
Photos: Thataway
|
 Posted: Sat Dec 03, 2011 6:06 pm Post subject: Starboard block for D S transducer and Cable Clam for cable Posted: Sat Dec 03, 2011 6:06 pm Post subject: Starboard block for D S transducer and Cable Clam for cable |
 |
|
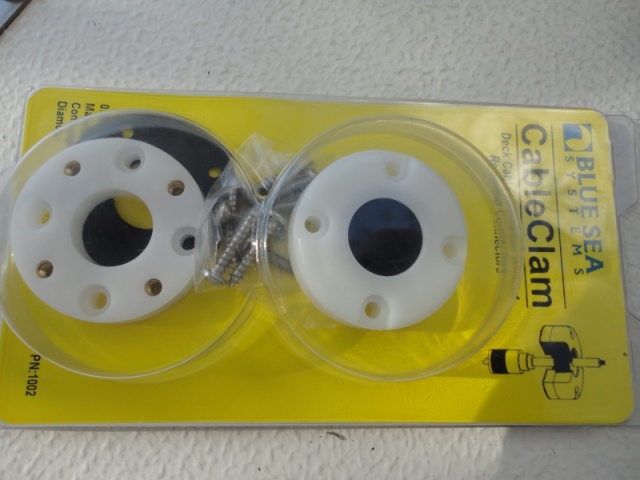
The goal is to put in place a starboard block which will allow moving of the depth sounder transducer without drilling new holes in the transom and risking water intrusion. The Cable Clam will allow a 3/4" diameter plug to pass thru the transom below the splash well. Previously the cable went over the top of the transom, and down the back side to one of several transducers which had been used on the boat. These holes were repaired by filling with epoxy and then epoxy barrier coat, with bottom paint.
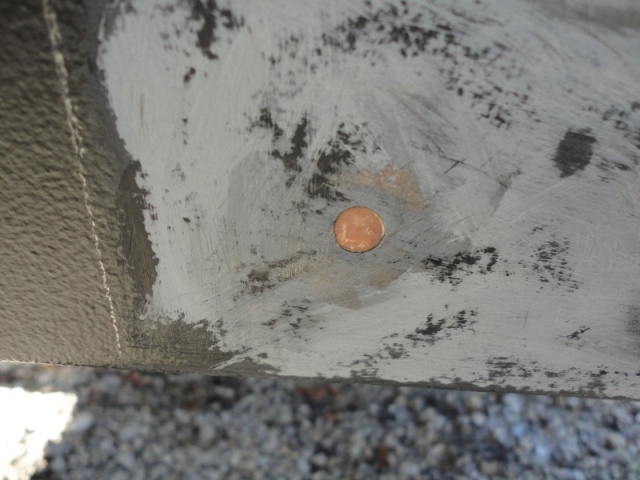
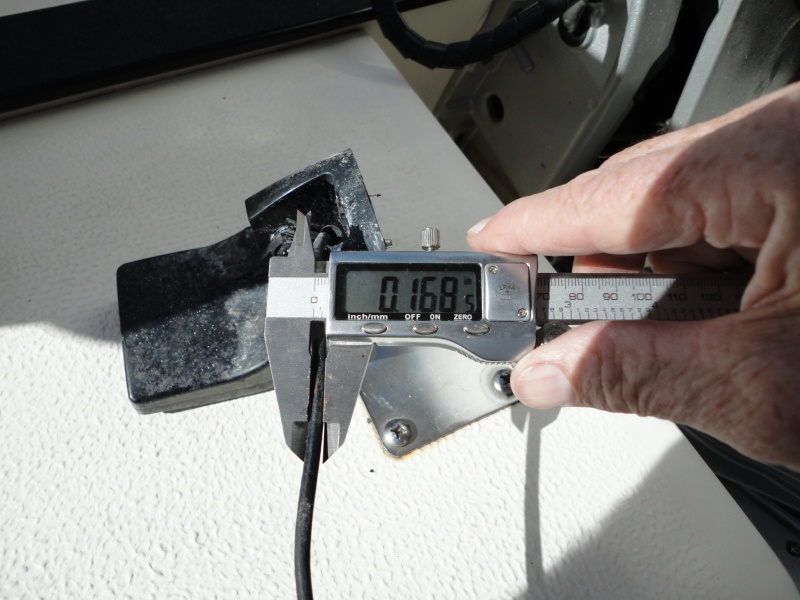
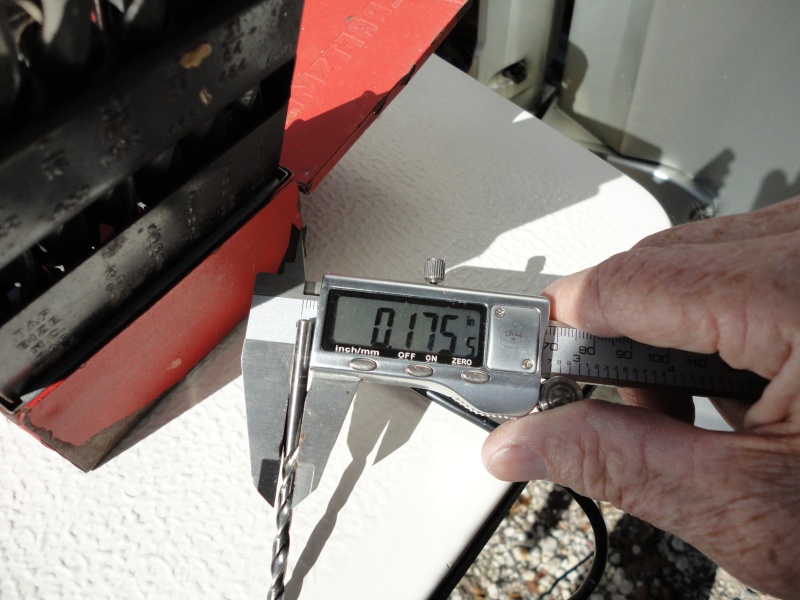
The first thing to do is measure the diameter of the plug:
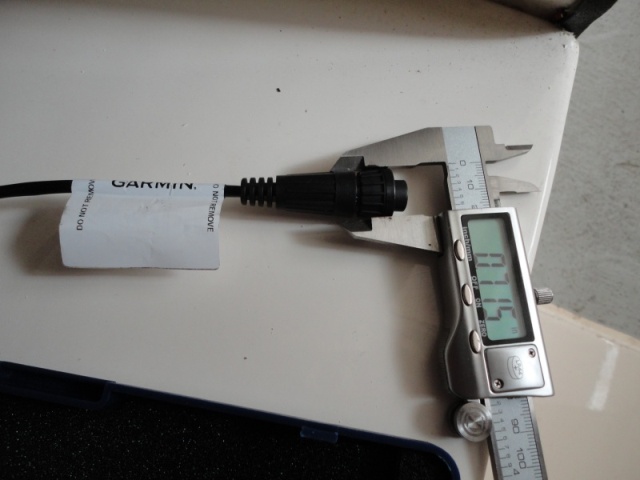
We find that is close to 3/4" and go to the 50 year collection of hole saws which are from 1/2" to 4" in diameter:
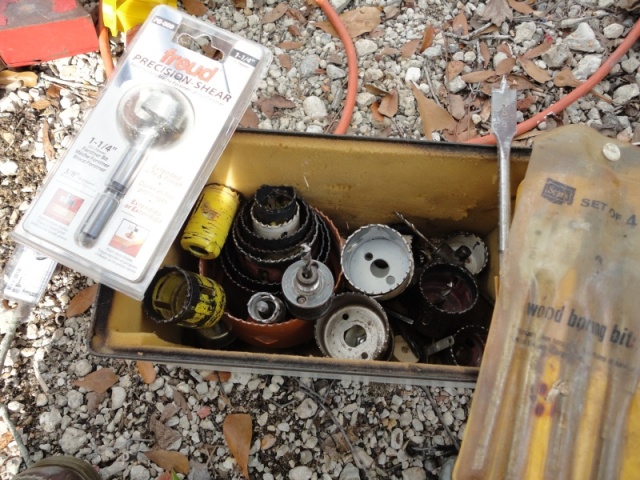
Even though this saw has seen plenty of use, it is a bimetal blade and remains sharp:

A pilot hole has already been drilled in the transom, to be sure that the final 3/4" hole will be just under the splash well, and will not interfere with any cables or the fuel tank:
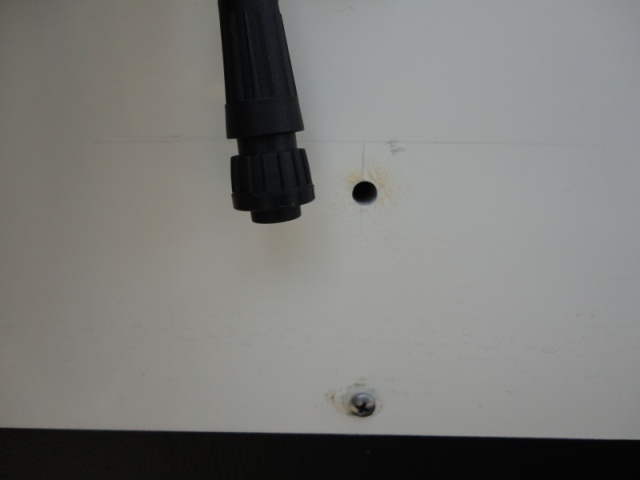
The hole saw is run "backward" to score the gel coat, and avoid any splintering:
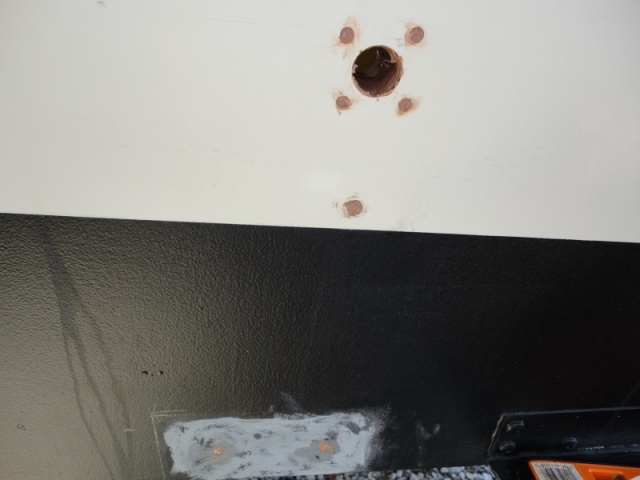
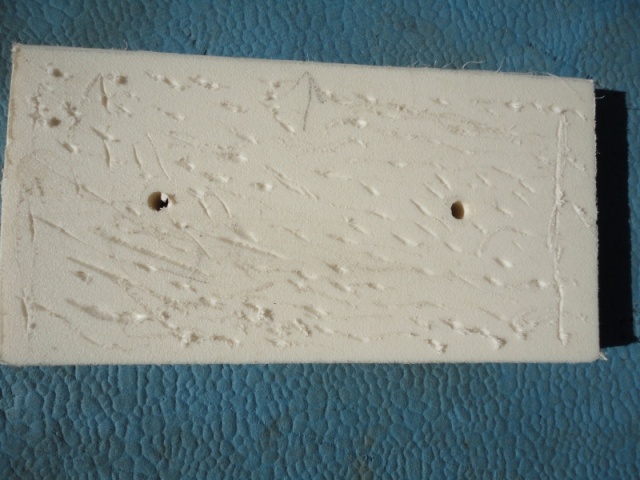
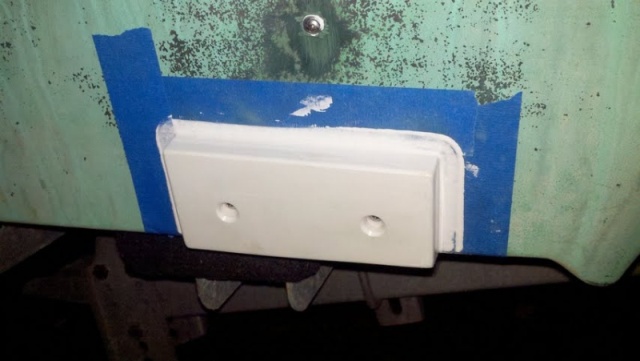
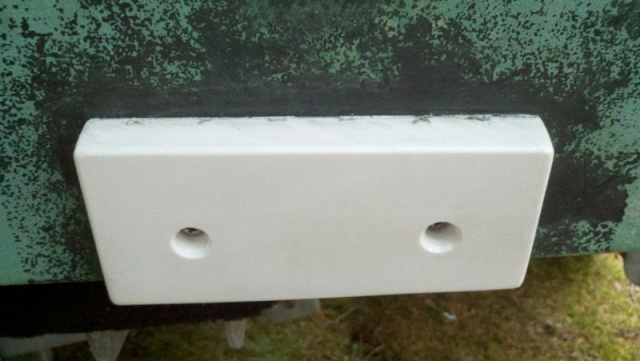
The Starboard block (6" x 3") has been prepared. Since I had only 1/2" thick Starboard, two pieces are put together. They are clamped the the holes drilled with a drill press to be sure that they are at 90 degrees.
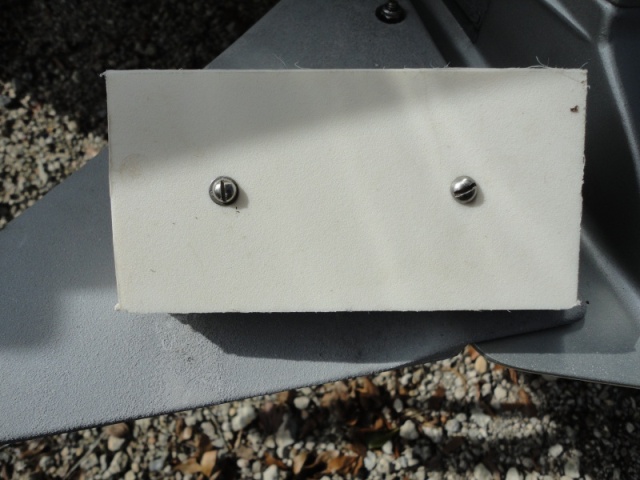
The block is held in place, while a pencil line is drawn, and straight edges are used off the bottom of the boat, to be sure that the Starboard is flush:
One hole is drilled, and a temporary screw put in place, while the second hole is drilled:
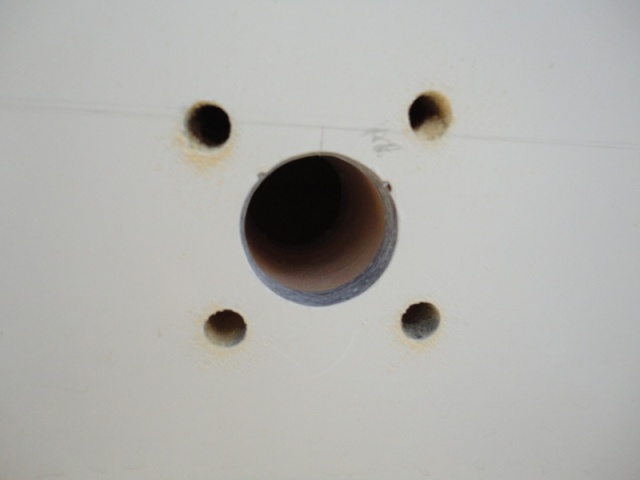
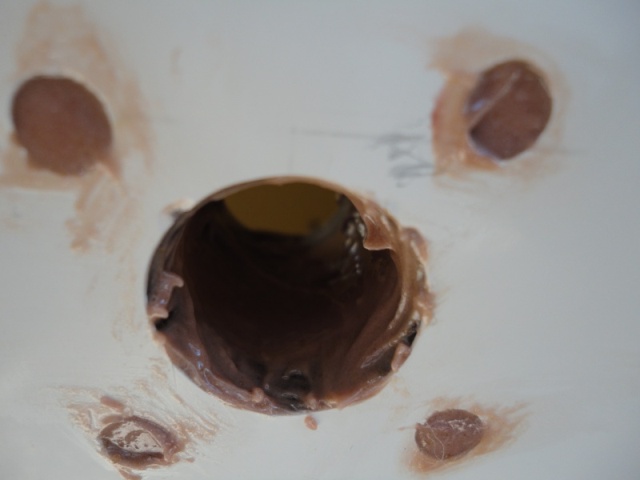
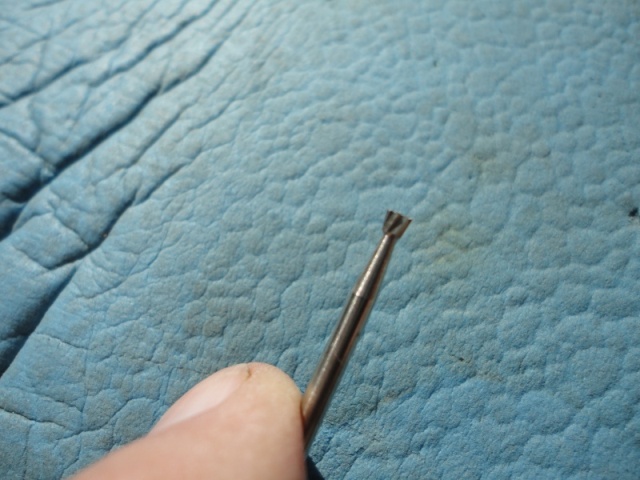
Next all of the holes for screws are drilled out to 5/16", and a Dremel bit will be used to under cut the foam behind the glass on the outside of the transom.
Here is one of the holes being undercut:
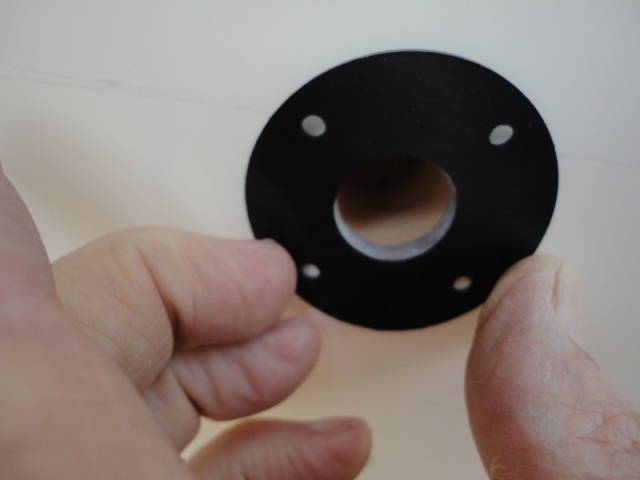
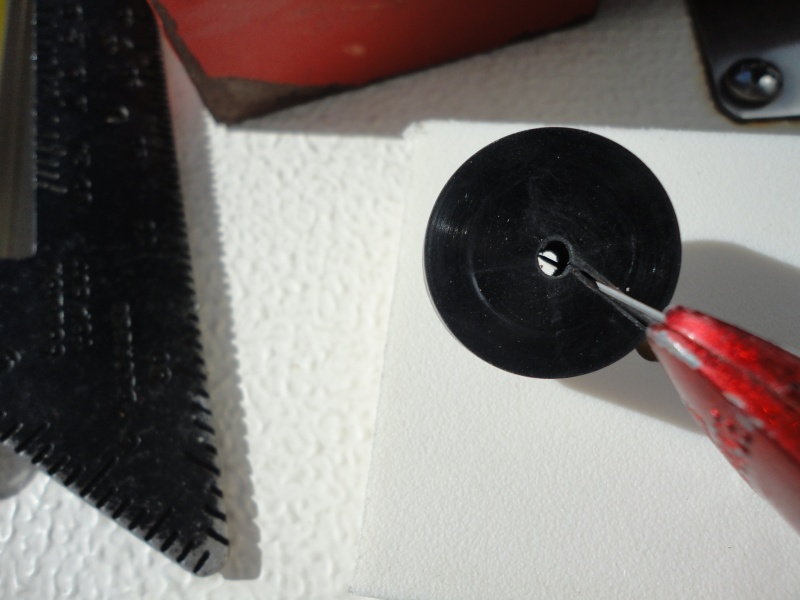
The cable clam is selected, to be slightly larger than the hole the transducer passes thru:
Next the rubber gasket is used to layout the small holes for the screws which hold the body of the Cable Clam in place:
The holes are all routed out (a smaller bit is used for these screw holes) and ready to be filled with epoxy:
The epoxy with Cabosil and medium density filler is mixed to peanut butter consistency:
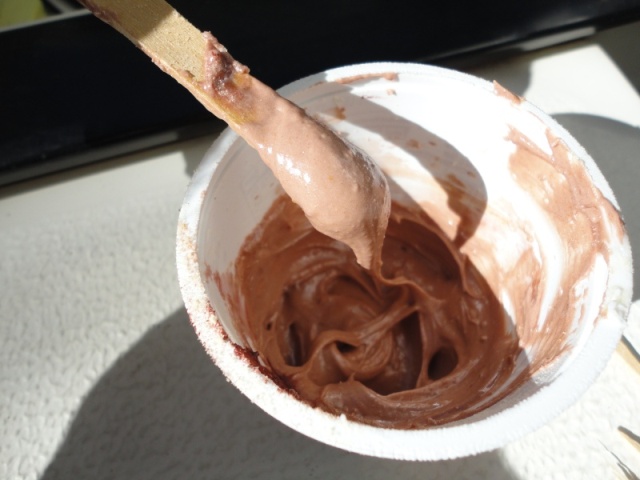
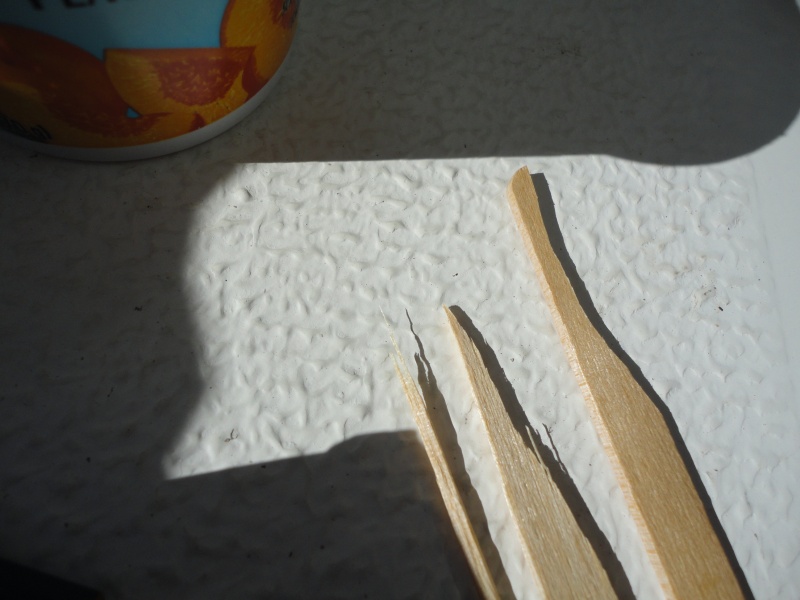
The "tools" for filling the holes are laid out--I use pop cycle sticks, from "hobby lobby" and cut to fit the job. The largest was used for 95% of these holes. I put a "glob" of epoxy into the hole, and then push it in with the stick. Work it around, twist, and air will come out. Keep doing this until no more air comes out. You can also use a syringe filled with epoxy and filler.
After the holes are filled, then scrap off any excess epoxy, and then wire clean with lacquer thinner. After the epoxy has set up, then drill new pilot holes for the screws into the epoxy. When you drill the initial holes, be sure they are deeper than the screws will penetrate.
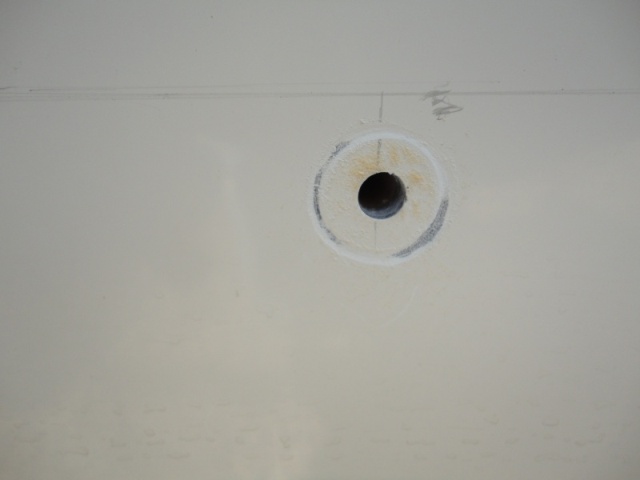
Here is one of the holes for the Starboard, filled, note that all bottom paint has been removed.
Here are all of the holes, and the passage for the cable, coated with epoxy:
The top of each hole will be cleaned and lightly sanded, plus the passage will be sanded to smooth out the epoxy.
Finally the starboard block is undercut with a small dove tail bit, so 5200 will get a "grip" on its surface.
Next installment will be the "easy part"--putting the block and screws in place, and using the "Cable Clam"--plus properly securing the transducer cable as it is put back in the boat.
_________________
Bob Austin
Thataway
Thataway (Ex Seaweed) 2007 25 C Dory May 2018 to Oct. 2021
Thisaway 2006 22' CDory November 2011 to May 2018
Caracal 18 140 Suzuki 2007 to present
Thataway TomCat 255 150 Suzukis June 2006 thru August 2011
C Pelican; 1992, 22 Cruiser, 2002 thru 2006
Frequent Sea; 2003 C D 25, 2007 thru 2009
KA6PKB
Home port: Pensacola FL |
|
| Back to top |
|
 |
Adeline
Joined: 03 Nov 2003
Posts: 985
City/Region: Vancouver
State or Province: WA
C-Dory Year: 1989
C-Dory Model: 22 Cruiser
Vessel Name: Adeline
Photos: Adeline
|
| Posted: Sat Dec 03, 2011 6:44 pm Post subject: |
|
|
Thanks for that Bob,
Your instructionals are always thorough and complete.

_________________
Pete
 |
|
| Back to top |
|
|
ferret30
Joined: 22 Mar 2011
Posts: 569
City/Region: Seattle
State or Province: WA
C-Dory Year: 2006
C-Dory Model: 22 Cruiser
Vessel Name: Lily Pad
Photos: Lily Pad
|
| Posted: Sun Dec 04, 2011 4:33 am Post subject: |
|
|
| This is excellent! Thank you for the great photos and detailed description. |
|
| Back to top |
|
|
thataway
Joined: 02 Nov 2003
Posts: 20813
City/Region: Pensacola
State or Province: FL
C-Dory Year: 2007
C-Dory Model: 25 Cruiser
Vessel Name: thataway
Photos: Thataway
|
| Posted: Sun Dec 04, 2011 4:22 pm Post subject: |
|
|
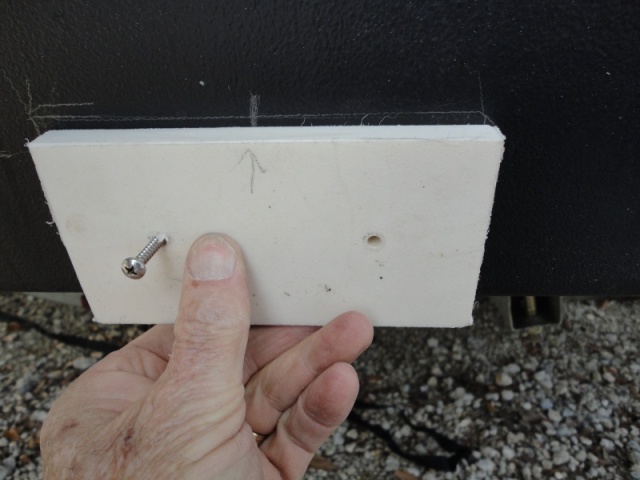
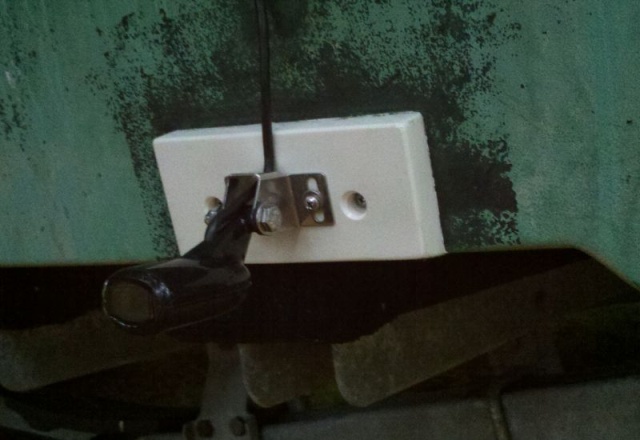
This portion will review the smoothing of the interior of the 3/4" cut out, to allow the cable and to pass to the inside of the transom, the use of the Cable Clam and securing the Starboard block.
The one photo I left out yesterday was of the "tools" for putting the epoxy in place. The one on the right did 90% of the work:
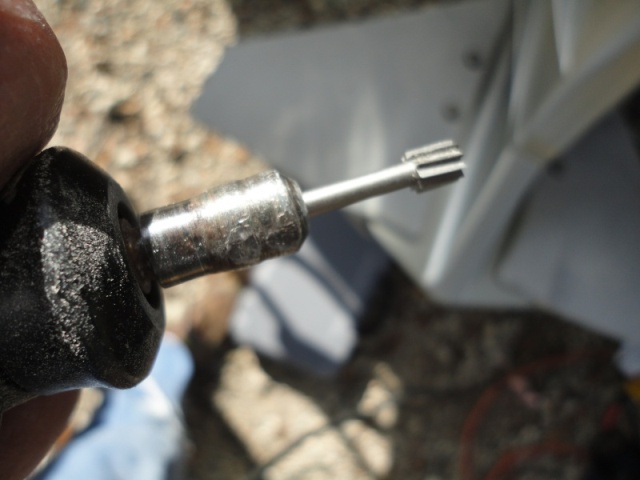
First we measure the diameter of the cable:
Then we find a bit which is close--since when drilling in hard rubber, the hole ends up a little smaller, than the bit, we choose one slightly smaller than the cable"
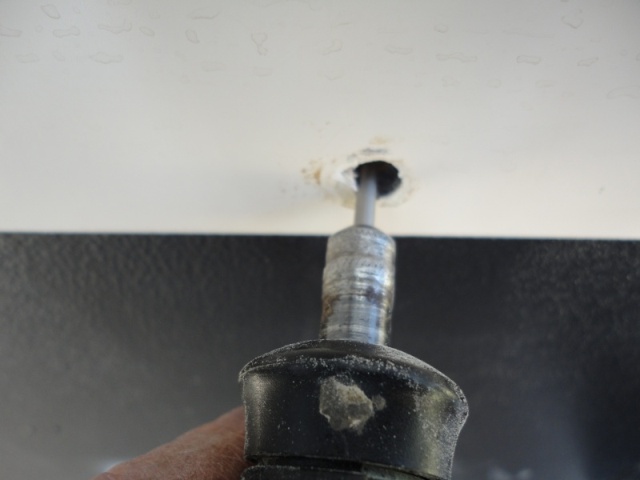
After the hole is drilled in the solid center core of the rubber (using a drill press, again to be sure it is straight and at 90 degrees to the surface), then a slit is cut into the rubber, so it will fit over the cable. Then the cable is passed thru this slit into the hole. The slit and hole will compress because of the tapered plastic outer piece and tapered rubber center plug.
Next the plug is passed thru the two plastic pieces and gasket.
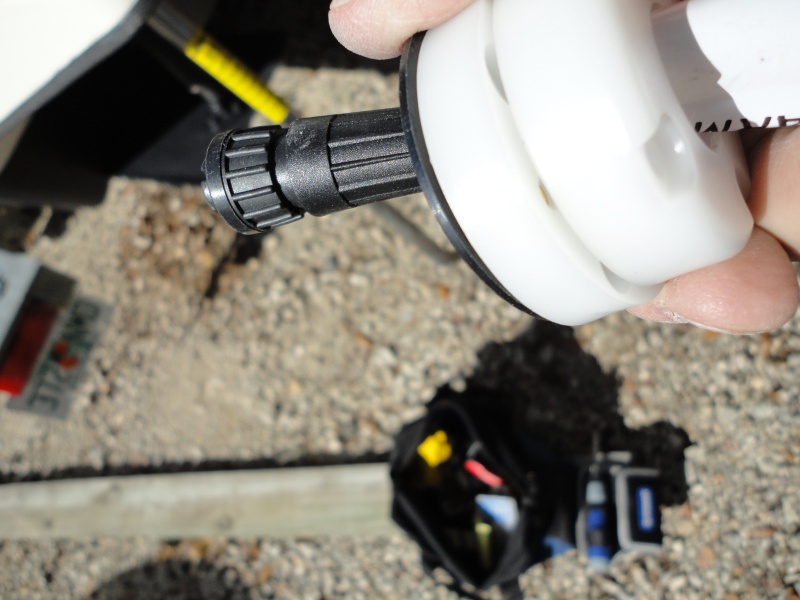
Then thru the transom 3/4" hole. After the cable has been pulled all of the way thru, then the center rubber core will be added, by passing over the cable between the two plastic pieces:
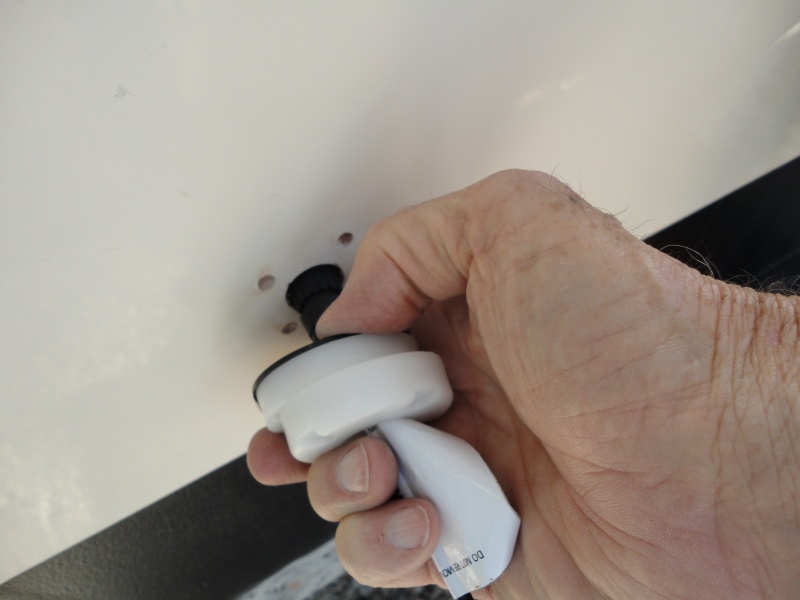
Finally, the four screws which hold the rubber gasket and the inner plastic run in place are screwed into the holes. I use Boat Life, Life Seal under the gasket--this is best between rubber, plastics and fiberglass. I dip the end of the screws in 5200, just to be sure they don't back out (and a small amount of 5200 into the hole. If you want to put a second cable thru this opening, you can still do it by drilling a second hole along the "slit". But yo don't have to remove the inner plastic rim (as long as the new plug is as small or smaller than the one in place. (There is enough "room" to pass a second plug this size, with the single cable)
The last photo shows one screw holding the transducer with the core of the "Cable Clam" over the cable. The Starboard is put in place with 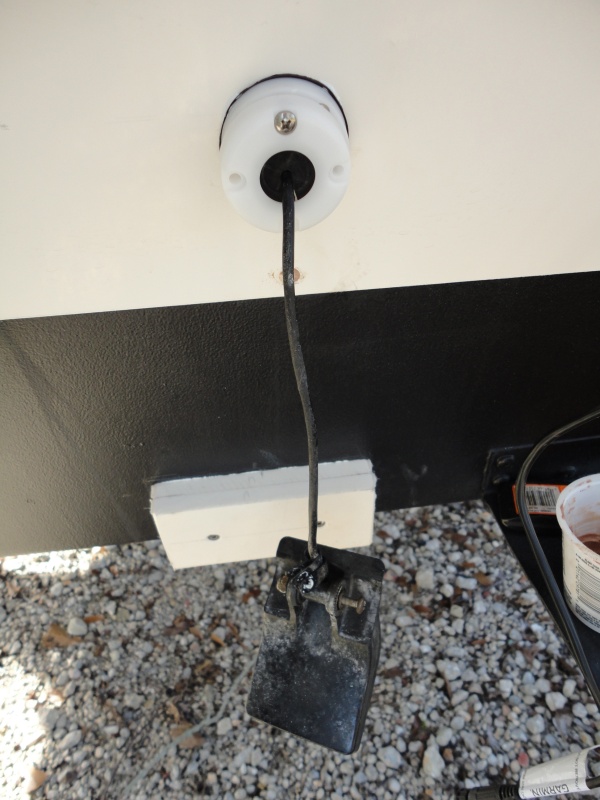
We will let the Starboard which is screwed and "glued" with 5200, set for a day or two before we do any final shaping (to be sure it is fair with the boat bottom, and to screw in the transducer mount. We will then pull the cable to the right position for the transducer position, and the screwed in clips to hold the cable--one in the transom, one on the Starboard. We will also fill this
"hole" in the transom, with silicone sealer--this will avoid any water from the inside as well as any potential leaks (which will not get to the core because of the epoxy lining of walls. |
|
| Back to top |
|
|
Wandering Sagebrush
Joined: 21 Jan 2005
Posts: 2770
City/Region: Northeast Oregon
State or Province: OR
C-Dory Year: 2005
C-Dory Model: 22 Cruiser
Vessel Name: Constant Craving
Photos: Constant Craving
|
| Posted: Sun Dec 04, 2011 9:59 pm Post subject: |
|
|
Bob, that is a good tutorial. Thanks!!!
_________________
"And in the end, it's not the years in your life that count. It's the life in your years." - Abraham Lincoln |
|
| Back to top |
|
|
ferret30
Joined: 22 Mar 2011
Posts: 569
City/Region: Seattle
State or Province: WA
C-Dory Year: 2006
C-Dory Model: 22 Cruiser
Vessel Name: Lily Pad
Photos: Lily Pad
|
| Posted: Wed Dec 07, 2011 7:30 pm Post subject: |
|
|
I have a couple of questions now that I've had a chance to digest this.
You undercut the holes for the screws that hold the block, not just the clamshell holes, right? When you drilled/undercut for the block, did you go all the way to the back of the core like this:

or did you just do a partial plug like this?:

This is just my guess as to what a cross section of the transom looks like  . I haven't drilled yet so I don't know what the material's like at the bottom of the transom, or if there's even core there. . I haven't drilled yet so I don't know what the material's like at the bottom of the transom, or if there's even core there.
I can't seem to find a dovetail bit to fit the Dremel, so I'm thinking of using a table saw with the blade way down and tilted and making several shallow cuts in one surface of the block. Sound like a plan? |
|
| Back to top |
|
|
JGrider
Joined: 26 Feb 2010
Posts: 93
City/Region: Laplace
State or Province: LA
C-Dory Year: 2006
C-Dory Model: 22 Cruiser
Vessel Name: Jeannie's VOO DOO
Photos: Jeannies VOO DOO
|
| Posted: Thu Dec 08, 2011 12:31 am Post subject: |
|
|
Hello Ferret30, I really like the pictures and drawings. I am looking at the same areas on my boat. When I go to add some trim tabs and am wondering if the transom is solid that low or am I going to find balsa core? Maybe Bob is looking in that area even though I believe Thisaway already has trim tabs.
_________________
John & Jeannie Grider
Jeannie's VooDoo
Home port: LaPlace, Louisiana |
|
| Back to top |
|
|
thataway
Joined: 02 Nov 2003
Posts: 20813
City/Region: Pensacola
State or Province: FL
C-Dory Year: 2007
C-Dory Model: 25 Cruiser
Vessel Name: thataway
Photos: Thataway
|
| Posted: Thu Dec 08, 2011 11:31 am Post subject: |
|
|
Ferret30--nice graphics!
I only go into the core about 1/4 to 1/2" more than the depth of the screw (Piece of masking tape on the drill bit to limit depth.)
I don't know for certain in the 22, but in the 25 where we did have water intrusion, there was a void between the back of the balsa on the bottom, and the plywood of the transom. We glassed this in, solid, before putting the screws of the trim tabs back in. There was some water intrusion in the 25 in this area from depth finder and trim tab screws.
I don't know of any of the 22's with a balsa core, but it is very possible that some of the pre 1987 boats may have had balsa cored transoms.
On Thisaway, we pulled one screw on each side--and there was no moisture. We put the screw back in with sealant. However the boat will be lift or trailer kept. If the boat was to have been water kept, we would have pulled all of the screws on the trim tabs, done the epoxy plug and then reset the screws.
Hope that answers the questions.
Regards, |
|
| Back to top |
|
|
ferret30
Joined: 22 Mar 2011
Posts: 569
City/Region: Seattle
State or Province: WA
C-Dory Year: 2006
C-Dory Model: 22 Cruiser
Vessel Name: Lily Pad
Photos: Lily Pad
|
| Posted: Thu Dec 08, 2011 8:28 pm Post subject: |
|
|
Would 4200 be up to the task as well, or is there a risk that it would allow water behind, or fall off after some amount of time? I was thinking with the undercut and epoxied holes, and screws reinforcing the adhesive, could be enough, you know in case I make some sort of 'unforeseen' mistake.
If 5200 is used, even though it says it is "permanent" and has no removal instructions, can anyone confirm that it's stubborn but removable with a cutting wire to separate glued faces (i.e. swim step or StarBoard)?
PS - if anyone wants more crude sketches for a thread like this, I may be able to help! |
|
| Back to top |
|
|
thataway
Joined: 02 Nov 2003
Posts: 20813
City/Region: Pensacola
State or Province: FL
C-Dory Year: 2007
C-Dory Model: 25 Cruiser
Vessel Name: thataway
Photos: Thataway
|
| Posted: Thu Dec 08, 2011 9:08 pm Post subject: |
|
|
I have removed 5200 a number of times. You can cut it with a hot wire. You can use a hot putty knife/heat gun. You can use "Debond" or "Anti Bond" both are solvents for cured 5200 and will loosen it.
I stick with the 5200....Starboard is difficult to get adhesives or sealants to stick to. That is why I like to have undercut/not just notch, in the back of the 5200 block.
Could you use 4200--sure. Might not adhere quite as well or be as strong. But the screws alone are plenty to keep the block in place. |
|
| Back to top |
|
|
akc-dory
Joined: 09 Jul 2011
Posts: 26
City/Region: Fairbanks
State or Province: AK
C-Dory Year: 1993
C-Dory Model: 16 Angler
|
| Posted: Thu Dec 08, 2011 10:33 pm Post subject: |
|
|
| Bob, nice write up with pics. Would like to do the same when boat thaws. Was wondering what kind of epoxy you used , what filler used, and ratios of filler and cabosil. thanks much Dan |
|
| Back to top |
|
|
thataway
Joined: 02 Nov 2003
Posts: 20813
City/Region: Pensacola
State or Province: FL
C-Dory Year: 2007
C-Dory Model: 25 Cruiser
Vessel Name: thataway
Photos: Thataway
|
| Posted: Fri Dec 09, 2011 12:35 pm Post subject: |
|
|
| I use West Systems epoxy--just what I have used for years--and there are plenty of others. In this case I used the normal hardener. In the summer I use the slow hardener. I put the cabosil in until it is thick enough to "stand up", then add a few globs of the West Systems 404 filler to give it Peanut butter consistency. The gal who does the major glass work for me, uses West Systems, with equal amounts of cabosil and micro balloons and places this in a syringe and squirts it into the hole, until it runs out--then slowly backs out the syringe, while applying pressure. |
|
| Back to top |
|
|
ferret30
Joined: 22 Mar 2011
Posts: 569
City/Region: Seattle
State or Province: WA
C-Dory Year: 2006
C-Dory Model: 22 Cruiser
Vessel Name: Lily Pad
Photos: Lily Pad
|
| Posted: Thu Jan 05, 2012 9:34 pm Post subject: |
|
|
I finally took some pictures of recent projects and uploaded them. I took a few during the installation of my transducer block.
I used 3/4" Starboard (you can buy as small as 12"x12" pieces on eBay) and cut it to 3"x6". I used one hole that was already there from the old transducer and drilled another hole for the other side. All 3 holes were undercut and filled with thickened epoxy.
I positioned the block and traced its shape on the transom, then measured to the holes and marked the holes on the block. I drilled the block and then used the block as a template to drill pilot holes into the epoxy filled transom holes. The pilot holes (and screw penetration) are of course shallower than the plugs themselves! I traced the hull profile onto the back of the block, and used a straight edge to transfer the hull contour onto the sides of the block. I used a jigsaw with the foot tilted to match the angle drawn on the sides of the block and cut the block. It seems to extend the shape of the hull smoothly!
I used a drill bit larger than the screw head of the screw I used to countersink the screw holes. I also used a countersink to bevel the hole edges. The block holes were drilled larger than the screw thread size so that the block could be tightened against the transom. I used a dremel router bit and cutting wheel to 'score' the back of the block.
I masked around the block's footprint on the transom using painters tape. White 5200 was squeezed into the cuts on the back of the block first, then liberally applied to the whole block area on the transom. The block was attached to the transom with screws that would penetrate shallower than the epoxy plug depth. 5200 oozed out continously as I tightened down the block.
After full cure (7 days), I came back and used razor blades to cut the 5200 ooze flush with the block edges and peeled away the tape. It seems pretty solid, and with this much care I hopefully won't get any moisture in the transom! |
|
| Back to top |
|
|
Salmon Fisher
Joined: 07 Aug 2009
Posts: 809
City/Region: Arlington
State or Province: WA
C-Dory Year: 2004
C-Dory Model: 25 Cruiser
Vessel Name: Kim Christine
Photos: Kim Christine
|
| Posted: Thu Jan 05, 2012 10:20 pm Post subject: |
|
|
Nice job! I should do that on my boat, too!
_________________
Patrick and Kim Walker
2004 25 Cruiser-Present
2000 22 Cruiser 2009-2014 (Sold)
2006 25 Cruiser 2014-2019 (Sold)
1985 22 Classic -2019 (Sold)
1991 19 Arima Sea Ranger-2019-2021 (Sold)
2015 27 Ranger Tug-2019-2023 (Sold)
1987 22 Cruiser -2021-2023 (Sold)
Honey, this REALLY will be my last boat, honest! |
|
| Back to top |
|
|
starcrafttom
Joined: 07 Nov 2003
Posts: 7882
City/Region: marysville
State or Province: WA
C-Dory Year: 1984
C-Dory Model: 27 Cruiser
Vessel Name: to be decided later
Photos: Susan E
|
|
| Back to top |
|
|
|
|
You cannot post new topics in this forum
You cannot reply to topics in this forum
You cannot edit your posts in this forum
You cannot delete your posts in this forum
You cannot vote in polls in this forum
You cannot attach files in this forum
You cannot download files in this forum
|
|
 Search
 Private Messages
 Profile
 Log in
 Register
 Help
Help
