| View previous topic :: View next topic |
| Author |
Message |
Pat Anderson
Joined: 02 Nov 2003
Posts: 8553
City/Region: Birch Bay, WA
State or Province: WA
C-Dory Year: 2005
C-Dory Model: 25 Cruiser
Vessel Name: Daydream
Photos: Daydream and Crabby Lou
|
 Posted: Mon Aug 30, 2010 10:00 am Post subject: Pat and Patty's Great New Galley Countertop Project Posted: Mon Aug 30, 2010 10:00 am Post subject: Pat and Patty's Great New Galley Countertop Project |
 |
|
Photos are here. Will write up details soon, but it DID involve power tools! Here is the final result:
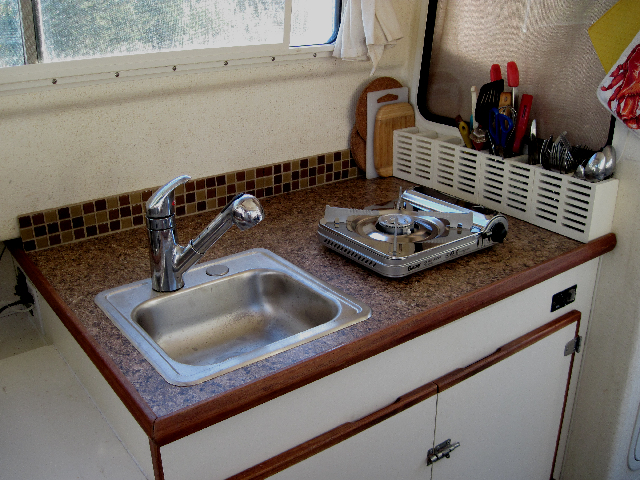
You will notice the Wallas is NOT installed, it is working fine, but have not decided whether to put it back in or not.
_________________
DAYDREAM - CD25 Cruiser
CRABBY LOU - CD16 Angler (sold 2020)
Pat & Patty Anderson, C-Brat #62!
http://daydreamsloop.blogspot.com

Last edited by Pat Anderson on Mon Aug 30, 2010 10:11 am; edited 1 time in total |
|
| Back to top |
|
 |
rogerbum
Joined: 21 Nov 2004
Posts: 5922
City/Region: Kenmore
State or Province: WA
C-Dory Year: 2008
C-Dory Model: 255 Tomcat
Vessel Name: Meant to be
Photos: SeaDNA
|
| Posted: Mon Aug 30, 2010 10:10 am Post subject: Re: Pat and Patty's Great New Galley Countertop Project |
|
|
Pat and Patty,
The results look great! I especially like the Formica counter top. I do wonder a bit about the tile back splash - it looks great but I am concerned that it make crack easily as tile and grout have no give at all and I think there may be flexing in that area when one drives over rough water.
_________________
Roger on Meant to be |
|
| Back to top |
|
|
Don and Brenda
Joined: 22 Feb 2009
Posts: 588
City/Region: Camano Island, Wa
State or Province: WA
C-Dory Year: 2011
C-Dory Model: R-27 Tug
Photos: C-Quest
|
| Posted: Mon Aug 30, 2010 10:11 am Post subject: |
|
|
| Very nice work! Really brightens up the cooking area. |
|
| Back to top |
|
|
JamesTXSD
Joined: 01 Mar 2005
Posts: 7445
City/Region: from island boy to desert dweller
State or Province: AZ
C-Dory Year: 2007
C-Dory Model: 25 Cruiser
Vessel Name: "Wild Blue" (sold 9/14)
Photos: Wild Blue
|
| Posted: Mon Aug 30, 2010 10:14 am Post subject: |
|
|
Looks good, Pat! If you don't re-install the Wallas, what are you considering for heat?
The countertop really adds some warmth to the plain interior. 
Best wishes,
Jim |
|
| Back to top |
|
|
Mike...
Joined: 13 Dec 2008
Posts: 470
State or Province: VA
C-Dory Year: 2008
C-Dory Model: 255 Tomcat
Photos: Accelerando
|
| Posted: Mon Aug 30, 2010 10:21 am Post subject: |
|
|
That came out very nice. Why did you switch to a shallower sink?
Love the idea of a portable burner. Putting it away really gives you lots of usable counter space.
---
mike |
|
| Back to top |
|
|
Pat Anderson
Joined: 02 Nov 2003
Posts: 8553
City/Region: Birch Bay, WA
State or Province: WA
C-Dory Year: 2005
C-Dory Model: 25 Cruiser
Vessel Name: Daydream
Photos: Daydream and Crabby Lou
|
| Posted: Mon Aug 30, 2010 10:31 am Post subject: |
|
|
The Wallas MAY go back in, short term the Mr Heater Buddy works great (used it this weekend), long term Espar or Webasto would be my preference, but it is about the $$$.
Next up per Patty - we re-do the dinette to match. It was pretty easy actually, it is Wilsonart laminate over 3/4" plywood.
Roger - we will just have to see on the tile, it is glass tile not ceramic.
| JamesTXSD wrote: | Looks good, Pat! If you don't re-install the Wallas, what are you considering for heat?
The countertop really adds some warmth to the plain interior.
Best wishes,
Jim |
|
|
| Back to top |
|
|
Pat Anderson
Joined: 02 Nov 2003
Posts: 8553
City/Region: Birch Bay, WA
State or Province: WA
C-Dory Year: 2005
C-Dory Model: 25 Cruiser
Vessel Name: Daydream
Photos: Daydream and Crabby Lou
|
| Posted: Mon Aug 30, 2010 10:36 am Post subject: |
|
|
The sink is shallower and moved a bit to the left to give more room below and turned 90 degrees to give more space behind. No need for the deep sink.
So far, big thumbs up on the GasOne butane stove.
| Mike... wrote: | That came out very nice. Why did you switch to a shallower sink?
Love the idea of a portable burner. Putting it away really gives you lots of usable counter space.
---
mike |
|
|
| Back to top |
|
|
Sneaks
Joined: 06 Jun 2004
Posts: 2020
City/Region: San Diego (Encinitas)
State or Province: CA
C-Dory Year: 1993
C-Dory Model: 16 Angler
Vessel Name: C-Brat
Photos: Jenny B and C-Brat
|
| Posted: Mon Aug 30, 2010 10:36 am Post subject: |
|
|
Excellent job, nephew. Couple of comments:
Roger, I don't know if Pat's installer used it but there is a silicon grout product that remains slightly flexible after it's used. It's also far more stain resistant than typical grout and doesn't need sealing/resealing and constant grout cleaning. Expensive but worth it.
Back to you, Pat. Come on, fess up. Who did the sink cutout for you? If you did it all yourself, my sincere apologies and a huge congratulations for a job well done, especially without the loss of any appendages. I didn't know you even owned dangerous power tools....
Don
_________________
Mary & Don Anderson
Brat #483
"Jenny B" 2005 C-22/F75 sold, Oct. 2008
"C-Brat" 1993 C-16 angler/50 hp |
|
| Back to top |
|
|
Pat Anderson
Joined: 02 Nov 2003
Posts: 8553
City/Region: Birch Bay, WA
State or Province: WA
C-Dory Year: 2005
C-Dory Model: 25 Cruiser
Vessel Name: Daydream
Photos: Daydream and Crabby Lou
|
| Posted: Mon Aug 30, 2010 10:39 am Post subject: |
|
|
NEW GALLEY COUNTERTOP PROJECT
STEP ONE.
We cut a half sheet of ¾ plywood to 42 x 33 the measured dimensions of the existing countertop in place (correct method would have been to pull sink and Wallas, remove the old countertop, remove trim, and then measure the old piece - my dimensions are NOT correct, we have a bit more gap on the head end than desired). We marked the rear side, put painters tape on the front side, and cut from the back side. Very clean cut. Then we cut a piece of Wilsonart laminate to the same size, and used Wilsonart contact cement to fasten the laminate to the plywood. Patty did an excellent job on the laminate, looks very good.
STEP TWO.
We removed the sink and the Wallas from the existing countertop, unscrewed the countertop from all the L brackets holding it in place, and removed it. There were some fasteners holding the cable bundle that we did not see, and inadvertently broke the rear brace. Will either glue it or replace it. Finally we carefully removed the existing teak molding pieces, they came off intact they are held in place by a small bead of some kind of adhesive like 4200 and a couple of brads. We removed it by starting with a wide chisel very carefully tapped down between the molding and the plywood, and when we had it started, we used a long piece of angle aluminum tapped down to separate and pry it off. We sanded, stained and re-oiled the molding. It looks new.
STEP THREE.
Bought a nifty new sink, quite a bit shallower than the old one, carefully cut out the hole for it with a sabre saw, and put it in. The sink is now oriented the way most sinks are and was moved forward and to the left, giving us quite a bit more room behind and under the sink. It is held in place with some fasteners that ride in a channel on the underside of the sink and then screw down clamping tight to the underside of the countertop, very clever. This time we put the painters tape on the laminate, drilled a hole and cut through from the top side, also very clean cut. Put in the strainer and tailpiece with some putty, not sure we did this well enough. Put in the single handled Moen faucet. Reattached the molding. This part was harder than we thought it would be, but in the end, we got it almost right, it looks good as well.
STEP FOUR
Tried to replace the countertop, realized that there was one more cut to make on the right rear corner so the countertop could slide under the cabin wall. If I had used the old countertop as a template, I would have done this back in the garage, not in the boat! Made the cut, and replaced the countertop. Fastened it down with the L brackets. Reattached the sink drain and water supply lines, which are now re-routed along the back wall. With the shallower sink moved forward and to the left, the re-routing of the water supply lines and no Wallas, the area under the galley in now much more open and unobstructed. It is now sitting in place with no backsplash.
STEP FIVE
Now we need the backsplash. Patty attached some glass tile that nicely matches the Wilsonart laminate to a thin board I had cut to length for the backsplash. There is a double-stick product called SimpleMat tile setting mat that makes this much easier than using mortar. She glued the board in place and grouted the tile. Very good job, we are very pleased with the backsplash.
STEP SIX
The price paid for guessing at the measurement instead of using the old countertop as a template is that we are just a wee little bit off on the edge that sits against the wall of the head, and it is too wide to cover with caulking. We could put a molding here, but instead decide put the little Ikea wood storage containers that we used to have behind the sink along this side. The Wallas is not back in, but we are holding off on that decision for now.
|
|
| Back to top |
|
|
Papillon
Joined: 31 Mar 2005
Posts: 949
City/Region: DeBary, Fl. *On the St. John's River*
State or Province: FL
C-Dory Year: 1993
C-Dory Model: 22 Angler
Vessel Name: Papillon
Photos: Papillon
|
| Posted: Mon Aug 30, 2010 11:02 am Post subject: |
|
|
Cool Job Pat & Patty
I love to see folks get out the drills and saws and make their boats into an extension of themselves. You did a great job and it appears Patty was very much in charge of this project which is most likely a very good thing. 
Now...guess we will have to have new drapes....
_________________
Mike Taylor
330-936-1030
1993 Angler-02' 115 Suzuki 4 Stroke |
|
| Back to top |
|
|
lloyds
Joined: 02 Aug 2005
Posts: 1724
City/Region: sublimity
State or Province: OR
C-Dory Year: 1996
C-Dory Model: 22 Cruiser
Vessel Name: undecided
Photos: 1996 22 Cruiser (Lloyds)
|
| Posted: Mon Aug 30, 2010 11:21 am Post subject: |
|
|
| That's perfect, looks great. It is what I have planned for this winter. Now I know how, sort of. |
|
| Back to top |
|
|
Captains Cat
Joined: 03 Nov 2003
Posts: 7313
City/Region: Cod Creek>Potomac River>Chesapeake Bay
State or Province: VA
C-Dory Year: 2005
C-Dory Model: 22 Cruiser
Vessel Name: Captain's Choice II
Photos: Captain's Cat
|
| Posted: Mon Aug 30, 2010 12:04 pm Post subject: |
|
|
Where is the new REC ROOM going?? 
Great job both of you! Pat, guess the secret is to let Patty help!! 
Charlie
_________________
CHARLIE and PENNY CBRAT #100
Captain's Cat II 2005 22 Cruiser
Thataway (2006 TC255 - Sold Aug 2013)
Captain's Cat (2006 TC255 - Sold January 2012)
Captain's Kitten (1995 CD 16 Angler- Sold June 2010)
Captain's Choice (1994 CD 22 Cruiser- Sold Jun 2007)
Potomac River/Chesapeake Bay
K4KBA |
|
| Back to top |
|
|
rogerbum
Joined: 21 Nov 2004
Posts: 5922
City/Region: Kenmore
State or Province: WA
C-Dory Year: 2008
C-Dory Model: 255 Tomcat
Vessel Name: Meant to be
Photos: SeaDNA
|
| Posted: Mon Aug 30, 2010 2:59 pm Post subject: |
|
|
| Sneaks wrote: | Excellent job, nephew. Couple of comments:
Roger, I don't know if Pat's installer used it but there is a silicon grout product that remains slightly flexible after it's used. It's also far more stain resistant than typical grout and doesn't need sealing/resealing and constant grout cleaning. Expensive but worth it.
<stuff clipped>
Don |
I'm aware of the silcon grout product and have even seen color matched silicon caulk. I'm hoping they used the flexible grout and if not, I'm hoping the board doesn't flex much. The glass tiles I had installed in my bathroom at home were actually glued to the wall with a silicone product but the grout was a non-sanded silconized grout the dries pretty rigid. When the installer did the slate tile around my jacuzzi tub, he used regular grout except for one tile section over an access panel. In this section he used a color matched silcone caulk so that it could easily be sliced out with a razor knife in the future. I can't see the difference between it and the regular grout. So Pat and Patty, if you have a problem with the grout cracking, you can always redo it with a flexible material. |
|
| Back to top |
|
|
Pat Anderson
Joined: 02 Nov 2003
Posts: 8553
City/Region: Birch Bay, WA
State or Province: WA
C-Dory Year: 2005
C-Dory Model: 25 Cruiser
Vessel Name: Daydream
Photos: Daydream and Crabby Lou
|
| Posted: Mon Aug 30, 2010 3:33 pm Post subject: |
|
|
Thanks, Uncle. I did indeed do the sink cutout all by myself. "Pat's installer" (Patty) will have to say what kind of grout she used, I just cut the backing board, she put the tile on it, grouted it and attached it to the boat.
| Sneaks wrote: | Excellent job, nephew. Couple of comments:
Roger, I don't know if Pat's installer used it but there is a silicon grout product that remains slightly flexible after it's used. It's also far more stain resistant than typical grout and doesn't need sealing/resealing and constant grout cleaning. Expensive but worth it.
Back to you, Pat. Come on, fess up. Who did the sink cutout for you? If you did it all yourself, my sincere apologies and a huge congratulations for a job well done, especially without the loss of any appendages. I didn't know you even owned dangerous power tools....
Don |
|
|
| Back to top |
|
|
rogerbum
Joined: 21 Nov 2004
Posts: 5922
City/Region: Kenmore
State or Province: WA
C-Dory Year: 2008
C-Dory Model: 255 Tomcat
Vessel Name: Meant to be
Photos: SeaDNA
|
| Posted: Mon Aug 30, 2010 4:17 pm Post subject: |
|
|
| Pat - one more thing on laminate. Generally, one cuts the laminate oversize and glues it down. Then a special router bit is used to trim the laminate to size. The router bit has a roller on it that follows the edge and trims the laminate very precisely. I believe I still have such a bit for my router and could loan it and the router to you when you do the table. It's particularly useful for rounded corners. Also, if you laminate both the edges and the top, one does the laminate on the edges first and then applies the top. That way the top laminate overhangs the edge laminate and it doesn't catch when you slide something off the counter/table. |
|
| Back to top |
|
|
|
|
You cannot post new topics in this forum
You cannot reply to topics in this forum
You cannot edit your posts in this forum
You cannot delete your posts in this forum
You cannot vote in polls in this forum
You cannot attach files in this forum
You cannot download files in this forum
|
|
 Search
 Private Messages
 Profile
 Log in
 Register
 Help
Help
