| View previous topic :: View next topic |
| Author |
Message |
RichardW
Joined: 13 Oct 2005
Posts: 110
City/Region: Huntsville
State or Province: AL
C-Dory Year: 2000
C-Dory Model: 22 Cruiser
Vessel Name: C Eagle
Photos: C Eagle
|
 Posted: Fri May 22, 2009 12:55 am Post subject: The Honda 90 Blues Posted: Fri May 22, 2009 12:55 am Post subject: The Honda 90 Blues |
 |
|
About 6 weeks ago, we went out for a cruise on the Tennessee. As usual, he engine started and ran perfectly all day and we clocked about 40 miles before overnighting. The next morning, we headed out into the channel and opened the throttle but the Honda would not get above 3500 RPM and had a vague miss that felt somewhat like ignition and somewhat like fuel delivery. This is the first problem with the engine in 3 years. We spent 7 days cruising in Apalachicola running in degraded mode but at least we were out on the water. Apalachicola is a FANTASTIC town and cruise area. Superb oysters, bay scallops and shrimp available at several eateries. We will be returning soon.
What could have happened over night? The bulb was firm so I switched tanks with no change. I also connected a separate fresh tank with no change. My strategy was to eliminate everything before taking the carbs down.
I tested the secondary ignition, inspected the plugs (and changed them eventhough they were OK. Checked the valve timing, throttle linkage to ensure throttles were opening; they were good. I checked the almost new internal fuel filter and the water separator filter. The separator did have some new rust particles but the internal filter was clean;but I changed them anyway. If the engine has an overtemp or oil pressure condition, the ECU will cut the RPM; but I eliminated this as the cause.
After much flailing to get all of the correct carb parts I removed the Intake / Carb / Silencer assembly and carefully took them apart. I found two anomalies; a chipped main discharge nozzle and two cracked emulsifier tubes (slow jets) but do not think that these caused the problem. I replaced them anyway. These carbs run very lean and have tiny passages and jets so they must be thoroughly cleaned with professional carb cleaner and compressed air. My conclusion is that the passages and jets were clogged in the medium speed and /or high speed circuit of one or more carbs. This is confounding for a well maintained, frequently used engine with new filters.
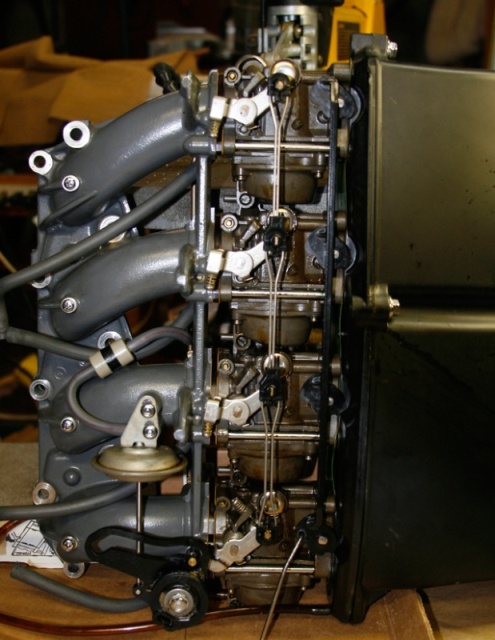
For the mechanically inclined, here are some photos showing primary components of the Intake Assembly:
Manifold / Carb / Silencer Assy:
Damaged Discharge Nozzle:

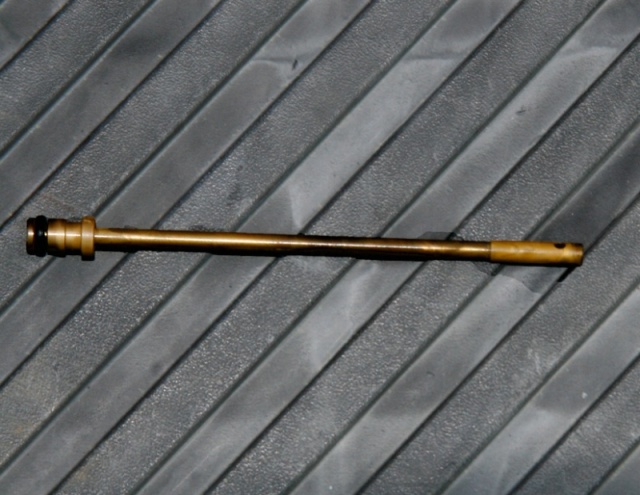
Emulsifier Tube:Hairline cracks cannot be seen in this photo
Carb Jets Accessed from Float Bowl:

Carb Jets Accessed from Float Bowl: You may bugger (scientific term) the tips of these caps and jets without proper screwdrivers. My gunsmith screwdrivers worked well. The previous rebuilder did hose up one of the caps.
DIY Manometer:
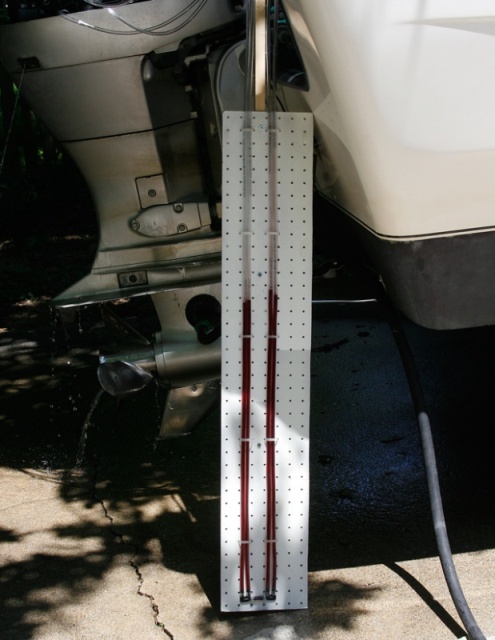
I designed this homemade Manometer to Sync the Carbs:This measures the differential intake vacuum between cylinders to allow the throttle screw on each carb to be set precisely. The space between each hole in the peg board is only 1/16th In. Hg. The manometer is constructed with 3/16 clear tubing using 2 cycle oil as the liquid. Water could be used but motor oil provides much better damping. Vacuum restrictors are insterted in each of the 4 lines near the intake manifold vacuum port. This setup allows vacuum to be balanced to within a couple of sixteens In. Hg; I believe Honda specs .5 in. Hg balance. This photo was taken after the throttles and mixture screws were adjusted; the levels in each tube were way off at the start of the setup and the engine hacked like a sick cat at first.
The carbs must be synced VERY carefully or it will run like DoDo. I can provide details for anyone interested OR you can just take it to your Honda Marine dealer; this is my recommendation but I do not have one nearby.
Yippee: WE ARE BACK IN FULL CRUISE MODE ; after gagging along like a 1.25 HP Waterwitch, she now purrs like a kitten and screams like a banshee.
I have a little more info in the C Eagle album but I suspect that this is already way too much info; hope I did not make your hair hurt but I wanted to share the pain.
_________________
Richard and Cheryle Porter |
|
| Back to top |
|
 |
snal
Joined: 13 Aug 2006
Posts: 524
City/Region: Asheville
State or Province: NC
C-Dory Year: 1994
C-Dory Model: 22 Angler
Vessel Name: Thelma Lou
Photos: Thelma Lou
|
| Posted: Fri May 22, 2009 7:13 am Post subject: |
|
|
I'd like to see the details for carb sync! I have no problem rebuilding the carbs, but have never worked with multiples that require the sync, much less build my own manometer.
I'd really like to learn how to do this myself!
_________________
Snal~
(Larry and Jo)
1994 C Dory 22 Angler (sold 2012)
Currently looking for a steal of a deal on a 25' "Thelma Lou II" |
|
| Back to top |
|
|
tomherrick
Guest
|
| Posted: Fri May 22, 2009 7:17 am Post subject: |
|
|
Thanks Richard,
I've printed this out and will place it in my Honda Service Manual as an Appendix.
I've got a manometer that I use to test my woodshop dust collection system. I too would like to know how to sync up the carbs.
Your post was very clear and helpful, and my hair feels fine.
Tom |
|
| Back to top |
|
|
teflonmom
Joined: 16 May 2004
Posts: 415
City/Region: Red Lion
State or Province: PA
C-Dory Year: 2005
C-Dory Model: 22 Cruiser
Vessel Name: Snickers AUG 08
|
| Posted: Fri May 22, 2009 11:46 am Post subject: The Honda 90 blues |
|
|
The only problem we had with our Honda 90(2005) was due to aluminum chips in the carbs. Cutter Marine did just about the same as you before takeing the carbs apart. Cleaning them up solved the problem and it never reappeared.
Fred, Pat, and Mr. Grey(the cat)
_________________
Pat & Fred Messerly |
|
| Back to top |
|
|
Captains Cat
Joined: 03 Nov 2003
Posts: 7313
City/Region: Cod Creek>Potomac River>Chesapeake Bay
State or Province: VA
C-Dory Year: 2005
C-Dory Model: 22 Cruiser
Vessel Name: Captain's Choice II
Photos: Captain's Cat
|
| Posted: Fri May 22, 2009 12:31 pm Post subject: |
|
|
There were full details on the synching of the carbs in the full service manual for my 45s. Probably is for the 90 also. Maybe someone can .pdf those pages and post them in the document section?
Charlie
_________________
CHARLIE and PENNY CBRAT #100
Captain's Cat II 2005 22 Cruiser
Thataway (2006 TC255 - Sold Aug 2013)
Captain's Cat (2006 TC255 - Sold January 2012)
Captain's Kitten (1995 CD 16 Angler- Sold June 2010)
Captain's Choice (1994 CD 22 Cruiser- Sold Jun 2007)
Potomac River/Chesapeake Bay
K4KBA |
|
| Back to top |
|
|
thataway
Joined: 02 Nov 2003
Posts: 21421
City/Region: Pensacola
State or Province: FL
C-Dory Year: 2007
C-Dory Model: 25 Cruiser
Vessel Name: thataway
Photos: Thataway
|
| Posted: Fri May 22, 2009 12:44 pm Post subject: |
|
|
Beautiful write up of the problem and the solution.
Although this does not account to the damage to the buggered discharge nozzel and the hairline cracks, would not ethanol, and some disloved "gunk" account for the fouling of the medium/high speed circuits?
This has been reported a number of times on other forums, and I have seen a different type of fouling of jets than in the past in several carburated engines I own.
Thanks!
_________________
Bob Austin
Thataway
Thataway (Ex Seaweed) 2007 25 C Dory May 2018 to Oct. 2021
Thisaway 2006 22' CDory November 2011 to May 2018
Caracal 18 140 Suzuki 2007 to present
Thataway TomCat 255 150 Suzukis June 2006 thru August 2011
C Pelican; 1992, 22 Cruiser, 2002 thru 2006
Frequent Sea; 2003 C D 25, 2007 thru 2009
KA6PKB
Home port: Pensacola FL |
|
| Back to top |
|
|
Wefings
Dealer
Joined: 29 Nov 2005
Posts: 2086
City/Region: Panhandle
State or Province: FL
Photos: Cruise Ship #4
|
| Posted: Fri May 22, 2009 3:17 pm Post subject: |
|
|
Nice writeup Richard !Have you ever considered going into engineering ? Really enjoyed spending time with you when you were here with Cheryle , look forward to having you back. Ill show this post to Alan , he will appreciate it.
Marc
_________________
Wefings Marine Website
Since 1909 |
|
| Back to top |
|
|
tomherrick
Guest
|
| Posted: Fri May 22, 2009 3:25 pm Post subject: |
|
|
There is a pretty good description of how to synch the carbs in the manual. But Honda has copyrighted the manual or I'd scan the pages and post 'em here. Anyone know about fair use doctrine in regard to copyright law? The carb synch topic covers a page and a half.
Tom |
|
| Back to top |
|
|
RichardW
Joined: 13 Oct 2005
Posts: 110
City/Region: Huntsville
State or Province: AL
C-Dory Year: 2000
C-Dory Model: 22 Cruiser
Vessel Name: C Eagle
Photos: C Eagle
|
| Posted: Sat May 23, 2009 3:14 pm Post subject: |
|
|
Sorry, I would have replied sooner but we have been having too much fun on the river with our newly revived engine. I have cancelled my order for 90 each 1 HP Waterwitch outboards to replace the Honda.
Thanks for the thoughtful comments and questions.
Larry and Jo - Here is a cut at the procedure that I used to sync the carbs using the poor man's (this excludes Byrdman) manometer:
I can PM a Word version to you if you like..... I threw in some thoughts on cleaning because it is especially important on these carbs.
Carb Cleaning
I know that many of you know how to clean a carburetor (and I have cleaned many) BUT, Honda designed these engines to meet stringent EPA emissions standards and to get excellent fuel economy. To accomplish these goals, these lean running carbs were designed with VERY tiny passages and jets that must be absolutely clean. Otherwise, your syncing and mixture adjustments will be for naught.
Recommendations: (There are many other techniques but this is what works for me)
Use a combination of professional carb cleaner (in a large can with a basket) plus Chemtool B12 with a spray can / straw available from most auto part stores to cut the contaminants. What works for me is the following:
-Remove the bowl, bowl drain screw, float / needle assy, emulsifier tube, main discharge nozzle and jets and place them in the basket to soak with the carb body for 15 to 20 minutes. Do not soak the float assembly. Examine the needle valve for damage and replace if needed.
-Remove and replace all o rings and gaskets; do not soak or spray any rubber or plastic parts in cleaner.
-Pilot Screw - NOTE: Before removing the Pilot Screw (Idle mixture screw), carefully determine the number of turns originally set by screwing the needle clockwise to seat it and record the # of turns for reassembly. DO NOT TIGHTEN with force or damage could result.
- Thoroughly wash the carb body with water, forcing water through all passages including the three holes of the inlet face of the carb where the silencer mounts.
- Dry the body with compressed air forcing air through all passages.
- Use the spray can and straw to force this concentrated cleaner through all body passages again and check to see that the cleaner exists all of the passages. Follow up with compressed air.
- Use the spray to clean each jet, the emulsifier tube, the bowl drain screw and the pilot screw thoroughly. Blow dry with compressed air and carefully wipe the screws clean with lint free cloth.
- I recommend keeping the carbs and their parts separated and clean them one at a time to ensure that parts stay with their carbs and the carbs stay with their cylinder.
Synchronizing the carbs
The OBJECTIVE of synchronizing the carbs is to exactly balance the intake manifold vacuum for each carb so each cylinder is generating the same amount of power.
Even tiny differences in vacuum balance between carbs can make a big difference in the smoothness and power of the engine. Honda specifies that all 4 cylinders should be within .5 In. Hg of each other. It will run noticeably smoother if you get them closer than that and you can.
The value of the vacuum reading is not important for this procedure but the differential in vacuum between cylinders is critical to smooth performance across the RPM range.
Instrumentation
I know of 3 alternative gauges for syncing carbs but to me, the manometer is superior to others because it allows you to easily see the interaction between the carbs at a glance and without studying the small graduations of a typical vacuum gauge.
They are:
1.Dial type vacuum gauges (one per cylinder) independently connected to the intake manifold port of each cylinder. Honda sells a Hondaline Vacuum gauge kit with 4 large dials mounted on a plate; a restrictor valve for each gauge is included to dampened the needle fluctuations. These cost several hundred bucks new but can sometimes be found on Ebay for under $200. Auto parts store test gauges and vacuum pump gauges are too small to be read to the resolution needed and are not calibrated.
2. Manometer vacuum gauges using Mercury: These work well and are the choice of many motorcycle tuners but are around $100. They are breakable and contain mercury which is toxic. They have a significant advantage in that they are connected to a common reservoir of Hg and therefore measure the differential vacuum between cylinders which is what we want.
a. DIY Manometer gauge using a less dense liquid such as water or motor oil all fed from a common reservoir. This setup can be easily made using plastic tubing, tubing fittings (Ts, elbows or F connectors), off the shelf vacuum restrictors and motor oil. I chose 3/16 tubing because the vacuum restrictors are made for that tubing ID. The restrictors are not absolutely required but they help dampen perturbations and slow the movement of the liquid which is a real advantage. Another real advantage is that the motor oil is highly visible, more viscous than water and about 16 times less dense that mercury which gives approximately 16 times the resolution of mercury. This allows very high resolution of the vacuum differential. If mounted on standard peg board, the space between holes (1 inch} is equivalent to 1/16 in. Hg providing very high precision not obtainable by typical dial gauges. My manometer is about 36 inches of pegboard with an extra foot of tubing above; do not make the columns too short or oil could be sucked into the intake when you first start up. It is also CHEAP
.
3. Manometer gauges using calibrated solid rods in a tubes are directly connected to each intake manifold port. These also are easy to read, compact and work well but cost around $ 100. One such set is made by Carbtune.
Connecting vacuum hoses to the engine
Locate (downstream of each carb on the intake manifold) the 4 vacuum ports which are plugged by a screw and washer. Connect cone shaped vacuum test adapters into each hole from each manometer tube. The vacuum restrictor should be inserted into each tube close to where it is connected to the intake. These adapters can usually be found at auto parts stores and are commonly made by vacutite.
Sync Procedures:
This how I do it but I make no claims that other methods may not be better. This procedure assumes a manometer and not dial gauges are being used.
1. Ensure that the pilot screws for each carb are set to their original # of turns.
2. After reassembly of the intake/carbs/ silencer to the engine, Squeeze the fuel hose bulb and check for and fix any fuel leaks prior to start up. Look closely at the 4 fuel hoses, the carb bowl gaskets and fuel bowl drain screws for any leakage.
3.Connect a suitable water source (hose muffs for example) and check that adequate water is being supplied.
4. Crank the engine and expect it to run somewhat rough. Ensure the tell tale stream flows from the water pump. Listen for any obvious vacuum leaks; if you suspect any leaks, you can use starter fluid spray to locate any leak where gaskets seal the air flow or vacuum hoses connect ( such as the accel/ decal dashpot hoses).
5. If all is well, take an initial cut at the pilot screw adjustments for each carb just to get an idle stable enough to proceed.
6. Check the idle speed on the tach and adjust the bottom (master) carb to set the idle below the ideal 950 RPM while maintaining a relatively stable idle. The reason is that once the mixtures are fine tuned and the carbs are synced, the idle speed will increase; so you start at a lower idle to end up close to 950 for best shifting and smooth idling.
7. Shut off the engine.
8. Now connect the manometer to each intake vacuum port with the adapters. They should be snug enough to stay put during test and adjustment.
9. The OBJECTIVE is to match carbs1, 2 and 3 to #4 which is the master carb for setting idle speed. Start the engine and observe the 4 columns of the manometer. If one of the columns starts to rapidly drop to the bottom of the reservoir or rise to the top of the column ( approx 36 inches) stop the engine and allow the columns to equalize. If a column is too high, turn the throttle adjusting screw for that carb CCW about 1/8 turn and if a column is dropping to the bottom, turn the throttle screw CW 1/8 turn before retesting. This setup will show the high sensitivity of the throttle plates to adjustment and allow you to get the throttles very close to ideal.
10. Once all columns stay somewhere on the pegboard, you can easily adjust the throttle screws to get the columns at the same height as #4.
11. Make VERY small adjustments and allow the columns to settle. An adjustment of less than the slot width of a screw will cause the columns to move.
12. Observe the 4 columns before starting adjustments and have a strategy to save time. For example, if 4 is higher than the others, 1 and 2 are close to the same and 3 is the lowest:
Leave 4 alone, turn 3 slightly CW to increase vacuum and let them settle. 3 will rise, 1&2 will rise and 4 will drop lower. Turning the throttle screw CW opens that throttle and increases vacuum (higher column) while turning CCW creates the opposite result. You will quickly develop a feel for how much to tweak each screw. Make small adjustments and allow settling time before making any other changes.
You should be able to get the columns easily to within 2 inches of each other in the tubes (1/8 in. Hg equivalent). This would be 4 times closer than Honda specs but you will be able to tell the difference in the way the engine runs.
13. When you are satisfied with the throttle sync, go through the mixture screws again to get the smoothest idle. You may need to go back and tweek the throttles but often this may not be needed.
14. Check the idle RPM and adjust #4 to get to ~950 RPM. If needed, tweak 1-3 for sync balance.
15. Iterate the process as needed until you are satisfied with idle speed, idle smoothness (mixture pilot screw adjustments) and vacuum balance of the throttles.
I am sure that I forgot something.............
My engine has never idled, cruised or accelerated as smooth as it does now with the carbs closely synced.
Dr Bob - I am not sure about ethanol being the clogging culprit, but it is certainly possible. I use Stabile for every fll up and the carb bowls were incredibly clean on each carb at take down. Since you cannot, in this area, find gasoline without some ethanol, I do not know how to eliminate that possibility.
As for the damaged nozzle, I talked with Alan at Wefings and he said that often these nozzles are hard to remove. We think that the previous rebuilder of these carbs used a screw driver and chipped the end. The erosion looks to be chemical in nature. Interesting, but likely not the problem since the carb ran perfectly for at least 3 years after the work was done by the previous owner.
The emulsifier tubes , to me are at worst a design defect and at best a needed compromise to achieve the small orifice sizes to lean the carbs down at idle to meet EPA standards. I may get flamed by the Honda loyalists, but is my opinion.
Marc - It is a little late to go into serious engineering, I already retired......RATS.....
Thanks again for the great hospitality shown by you and Anita during our visit to Apalachicola. We will definitely be back to explore the Apalachicola River and the bay.
Thanks also to Alan for putting up with my questions and Jeff for such great customer service. You have an outstanding staff there.......
I can provide manometer details for anyone interested. Did I mention that you should have your dealer do this?
 |
|
| Back to top |
|
|
thataway
Joined: 02 Nov 2003
Posts: 21421
City/Region: Pensacola
State or Province: FL
C-Dory Year: 2007
C-Dory Model: 25 Cruiser
Vessel Name: thataway
Photos: Thataway
|
| Posted: Sat May 23, 2009 4:01 pm Post subject: |
|
|
Unfortunately the Stabil does not solve the ethanol problem. It is mainly that there are varnishes and asphentines etc which have precepitated and coat the inner part of the fuel tank over the years. The ethanol is a solvent for these materials, and bring them back into suspension, then they deposit in some of the carburator passages.
I did a little google research on the subject and it confirms above--maybe even more than I realized: The ethanol actually picks up these gums etc all along the line, including the storage tanks, lines, tanker trucks as well as fuel tanks.
On one thread, the symptoms were exactly as your described, but more severe. Some suggestions (some from Honda rep) Don't run ethanol in older engines (how old?). Drain the carbs each time you will not run the boat for a week (not really practical). Replace the fuel every 2 weeks (this is the average for cars' turnover of a fuel tank. Also it was pointed out that under no circumstances should more than 10% ethanol be run in an outboard (and that many times the gasoline is "cut" more than 10%).
Unfortunately there is no product which is a cure all. (Although some will take your money and promise to resolve the ethanol problem).
The good news is that you fixed it, and did a great job, plus your back on the water! |
|
| Back to top |
|
|
flrockytop
Joined: 04 Oct 2006
Posts: 502
City/Region: Pensacola
State or Province: FL
C-Dory Year: 2007
C-Dory Model: 22 Cruiser
Vessel Name: The Last One (to date)
Photos: C-LOVER
|
| Posted: Sun May 24, 2009 6:56 pm Post subject: |
|
|
Richard,
What fantastic instructions. You made me want to go out and get a Honda just so I can follow your instructions. 
I just have one question. You say "Use a combination of professional carb cleaner .... " What's a good brand of professional cleaner and the best place to get some?
Thanks
Roger
_________________
2007 22 Cruiser
Track Me HERE
NA4RR
Roger Rockwell
Pensacola, Fl |
|
| Back to top |
|
|
RichardW
Joined: 13 Oct 2005
Posts: 110
City/Region: Huntsville
State or Province: AL
C-Dory Year: 2000
C-Dory Model: 22 Cruiser
Vessel Name: C Eagle
Photos: C Eagle
|
| Posted: Sun May 24, 2009 8:14 pm Post subject: |
|
|
Dr. Bob - Thanks for the good research and information on ethanol. I hate the stuff and I will not get into the idiotic reasons that we a stuck with it. I may know of one local station not using it but I will need to fillup in the middle of the night to get the boat trailer in and out.
Roger,
The carb cleaners that I have confidence in are:
1. Berryman's Chemdip - this is the size of a paint can, has a dip basket and must be flushed with water after soaking for 15 to 20 minutes
2. Berryman Chemtool B12 Carb Cleaner has a spray straw for getting jets and passages and works well.
Do not expose plastic or rubber parts to these cleaners.
There may be others but I know that these work well and can be commonly found at auto parts stores like Autozone, Advanced Auto Parts and others.
This stuff will work on a Honda, Yamaha, Suzuki or even a Waterwitch......
|
|
| Back to top |
|
|
Byrdman
Joined: 06 Nov 2003
Posts: 3329
City/Region: Cumberland River, Clarksville,
State or Province: WA
Vessel Name: " ? " After Rename Ceremony
Photos: FreeByrd and C-Byrd
|
| Posted: Wed Jul 29, 2009 4:38 pm Post subject: |
|
|
Richard.... Enough already about your carb job.....
How did the hot tub work out with Cheryle on Da Riva?
You do not have to send Pics with this answer...as I know you do go to sleep with Cheryle in the same home. 
Thanks for showing up at Mom's B-Day dinner a while back. A real surprise for her and we enjoyed your very quick trip thru.
Byrdman
_________________
Patrick Byrd "Byrdman"
Cumberland River TN home waters Puget Sound Summers.
Miss B - CD22A, Aug 2018
C-Byrd, CD18A, Hull #14 sold again.. May 2020
C-Byrd, CD18A, Hu #14 - Bought her again - May16
Aloysius, Sold to Brother Mike Mar16
Aloysius, Hull # 440 RF-246
C-Byrd, CD18A, Hull #14 Sold May09
TC24, Hull #51, Sold Feb06
CD16A, Sold Dec03
Never Deny Yourself The Pleasure of Helping Others. |
|
| Back to top |
|
|
RichardW
Joined: 13 Oct 2005
Posts: 110
City/Region: Huntsville
State or Province: AL
C-Dory Year: 2000
C-Dory Model: 22 Cruiser
Vessel Name: C Eagle
Photos: C Eagle
|
| Posted: Wed Jul 29, 2009 7:49 pm Post subject: |
|
|
Mr Byrdman,
One of the primary reasons for the stronger, more reliable windlass was to perform MOB rescues such as an inebriated skipper falling off the pilot roof of a 24 ft Tom Cat; as just an example.
As for the hot tub, I would be happy to set one up in the cockpit of your Signature Rosie Sedan. You would not need to send photos of folks basking in it................ A rubber ducky would be provided............ The bride really likes hers.
Richard |
|
| Back to top |
|
|
bmacpiper
Joined: 03 Jun 2007
Posts: 211
City/Region: Bainbridge Island
State or Province: WA
C-Dory Year: 2007
C-Dory Model: 22 Cruiser
Vessel Name: Big Blue
|
| Posted: Sat Nov 21, 2009 1:07 am Post subject: |
|
|
Hey Richard,
Thanks again for the great article and the help on pmail. I've added a new post on this same topic, with additional part numbers, etc. It's here:
http://www.c-brats.com/viewtopic.php?p=153776#153776
The engine is like a Swiss watch now--can't tell you how thrilled I am to have things finally dialed in. It was made much much easier with your experiences and photos.
best,
bmc
_________________
bmc
"Do it today, you may not pass this way again!"
2005 16 Cruiser, "Natural Blue", sold 2009
2004 19 Angler, "Crush", sold 2012
2007 22 Cruiser, "Big Blue", purchased 2012 |
|
| Back to top |
|
|
|
|
You cannot post new topics in this forum
You cannot reply to topics in this forum
You cannot edit your posts in this forum
You cannot delete your posts in this forum
You cannot vote in polls in this forum
You cannot attach files in this forum
You cannot download files in this forum
|
|
 Search
 Private Messages
 Profile
 Log in
 Register
 Help
Help
