| View previous topic :: View next topic |
| Author |
Message |
CDory23
Joined: 23 Nov 2011
Posts: 227
State or Province: CA
Photos: CDory23
|
 Posted: Wed Feb 11, 2015 4:39 am Post subject: Sealing Starboard for transducers Posted: Wed Feb 11, 2015 4:39 am Post subject: Sealing Starboard for transducers |
 |
|
I have been off the forum for a while doing other projects but finally getting back to the boat!
Of course after I have completed my project of adding Starboard to the transom for new trandsducers I have read a variety of opinions on the forum.
A few months I mounted a piece of starboard bought from Tap Plastics to the transom.
Process: Removed old transducer and filled holes with 5200. Drilled 2 new holes in hull to mount starboard but did NOT countersink. Used 5200 around perimiter and back of scarred up starboard to be mounted and also used 5200 to seal the 2 panhead screws securing starboard to hull. Screws are countersunk on starboard to be flush.
After reading other threads I'm considering removing it and drilling/undercutting all holes and first filling with smiths CPES, and then Tap plastics marine epoxy.
(https://www.google.com/calendar/embed?src=lawslndg99%40gmail.com&ctz=America/Los_Angeles)
After that drilling into epoxy (no sense in undercutting epoxy?) and attaching starboard using the 5200 as a sealant as I did the first time.
Maybe I'm overthinking this and I'm fine. Have people used the tap plastics marine epoxy below the waterline? Any experience helpful.
I do like the idea of the epoxy really being a backup seal, just in case water gets passed the 5200.
Thanks |
|
| Back to top |
|
 |
BrentB
Joined: 15 Jul 2006
Posts: 4420
City/Region: Greenwood
State or Province: IN
Photos: BrentB
|
|
| Back to top |
|
|
Crenity
Joined: 16 Oct 2012
Posts: 2
|
| Posted: Wed Feb 11, 2015 11:00 am Post subject: |
|
|
Long time lurker... Just thought I would mention a product I used to affix my transducer to the stern of an aluminum boat- Sternsaver. I mounted it last season and so far, so good. I would use it in a heartbeat on my next boat (22' C-Dory  ). http://www.sternsaver.com/ ). http://www.sternsaver.com/
Disclaimer- I have no affiliation with the company. |
|
| Back to top |
|
|
lloyds
Joined: 02 Aug 2005
Posts: 1724
City/Region: sublimity
State or Province: OR
C-Dory Year: 1996
C-Dory Model: 22 Cruiser
Vessel Name: undecided
Photos: 1996 22 Cruiser (Lloyds)
|
| Posted: Wed Feb 11, 2015 11:12 am Post subject: |
|
|
| Sternsaver looks like a great way to go. Will get one and apply it in the spring. Has anyone supplied a measurement for where the best spot is for the transducer relative with the outer edge of the bottom? I have twin hondas on my 1996 22' cruiser. |
|
| Back to top |
|
|
thataway
Joined: 02 Nov 2003
Posts: 21507
City/Region: Pensacola
State or Province: FL
C-Dory Year: 2007
C-Dory Model: 25 Cruiser
Vessel Name: thataway
Photos: Thataway
|
| Posted: Wed Feb 11, 2015 8:21 pm Post subject: |
|
|
TAP PLASTICS is a re-seller of epoxy resins (and other materials). Nothing magical about their "marine" epoxy. When we were buuilding boats, we bought epoxy in bulk for Shell Chemical. The last several decades I have used West Systems. I am used to the products, easy to use with pumps and a good variety of epoyx for applications.
The only issue I would see is using 5200 to fill an old screw hole. 5200 is a sealant and adhesive, not a filler. The issue is adhesion --often it s excellent, but at times especially with a screw hole, it will work loose, and allow water intrustion. Properly you should drill it out, and fill with epoxy--I undercut to be sure that the core is completely sealed. Same with drilling into an epoxy plug. You want to be sure that you do not drill or put a screw outside of that epoxy plug,.
Flame treating the starboard, may help various adhesives to the Starboard (or HDPE) 7540- AB or Scotchweld DP 8005 are used with Starboard. Not sure what SternSavers uses. Also dove tailing with a small bit will help. I personally have not trusted HDPE alone with an adhesive for expensive transducers. But many have, and I have only heard of a limited number of failues of adhesion.
I have also used G Flex with HDPE in some experiments, along with large reverse tapered holes and had good adhesionn.
As for location. I select the transducers (today we have CHRIP and Down Scan--and make a template which shows me where the block of HDPE needs to be mounted. I may even shape the under side of the HDPE block to allow clean flow and to be flush with the bottom of the Transom. Be sure the transducers are outside an area where you get prop disturbance. You want to be to the Starboard of a Right hand turning prop. So clear of the prop and near the bottom to allow best mounting of the transducer. I like my transducer to be parallel with the bottom of the boat, and about 1/16 to 1/8" below the bottom of the boat. I use a straight edge on the bottom of the hull to locate this.
_________________
Bob Austin
Thataway
Thataway (Ex Seaweed) 2007 25 C Dory May 2018 to Oct. 2021
Thisaway 2006 22' CDory November 2011 to May 2018
Caracal 18 140 Suzuki 2007 to present
Thataway TomCat 255 150 Suzukis June 2006 thru August 2011
C Pelican; 1992, 22 Cruiser, 2002 thru 2006
Frequent Sea; 2003 C D 25, 2007 thru 2009
KA6PKB
Home port: Pensacola FL |
|
| Back to top |
|
|
Sunbeam
Joined: 23 Feb 2012
Posts: 3990
City/Region: Out 'n' About
State or Province: Other
C-Dory Year: 2002
C-Dory Model: 22 Cruiser
Photos: Sunbeam
|
| Posted: Wed Feb 11, 2015 11:07 pm Post subject: |
|
|
Personally, I don't think it's ever silly or overkill to think about properly sealing off core - especially beneath the waterline. But then I've done a few re-core jobs (not C-Dory), and hope to never do that again. In comparison, closing out the core before problem happens is easy and cheap!
I don't think Starboard can really be trusted to keep a seal (i.e. to unprotected core under it) both because it is rather sealant resistant, and because it tends to "creep."
As always, there are many effective ways to go about it, but here is how I prepped and mounted the Starboard transducer mounting block on my boat:
1) I overdrilled (with much undercutting and core removal, such that the hole that actually showed was just "the tip of the iceberg") four holes in my transom, then treated them with neat epoxy, then completely filled them with thickened epoxy. I planned these to be in a suitable location for the Starboard block.
2) I then drilled and tapped holes into the new epoxy "plugs."
3) Drilled countersunk clearance holes in the Starboard, used some butyl sealant as bedding (although core is completely closed out), and then mounted the block with bronze, flat-headed machine screws into the tapped holes. I prefer bronze in holes that will be oxygen-derprived such as these.
I made the four holes at a spacing that would allow a larger block to be attached in future, should I want to change the one I have (which will fit two transducers). Then I tapped the Starboard and attached the transducer.
Interestingly, I decided to remove the Starboard block to slightly adjust the angle on the bottom edge, and MAN, that butyl hung onto the Starboard like crazy. I wasn't really expecting that since Starboard is typically hard to bond to (and really I only used the butyl as bedding - in small "rings" around the fasteners - since I did not need any adhesive quality).
This photo shows the nearly finished product (hadn't cleaned up squeeze-out or secured transducer wire yet).
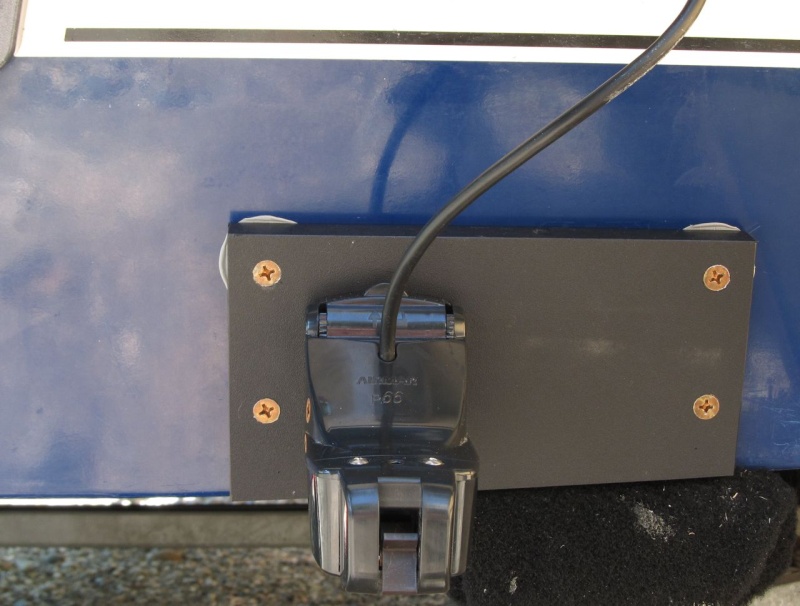
Again, there are many good ways to go about it. The one constant for me is that I don't trust any caulk (or similar) to protect the core, especially below the waterline. The reality is that a trailered boat stored undercover may never absorb enough water to be a problem; but my specific brain could never relax at anchor that way, and I didn't want to be thinking "Gosh, I could stay out another week.... but.... hmm, what about the core...." |
|
| Back to top |
|
|
localboy
Joined: 30 Sep 2006
Posts: 4673
City/Region: Lake Stevens via Honolulu
State or Province: WA
C-Dory Year: 2007
C-Dory Model: 25 Cruiser
Vessel Name: 'Au Kai (Ocean Traveler)
Photos: 'AU KAI
|
| Posted: Thu Feb 12, 2015 7:22 am Post subject: |
|
|
$50 for a piece of plastic and some epoxy?!  I think I'll go w/ Dr Bob's process. I think I'll go w/ Dr Bob's process.
_________________
"We can go over there...behind the 'little one'....."
Wife to her husband pointing @ us...from the bow of their 50-footer; Prideaux Haven 2013 |
|
| Back to top |
|
|
Sunbeam
Joined: 23 Feb 2012
Posts: 3990
City/Region: Out 'n' About
State or Province: Other
C-Dory Year: 2002
C-Dory Model: 22 Cruiser
Photos: Sunbeam
|
| Posted: Thu Feb 12, 2015 12:18 pm Post subject: |
|
|
I realize you were referring to a different product mentioned above, but I figured I'd mention that I got the Starboard at McMaster-Carr (www.mcmaster.com). They have a good selection of thicknesses, and sheet sizes down to 6" x 6" (albeit only in white or back). As a bonus (unless you live in an "unlucky" area), their UPS ground shipping often arrives the next day. I used 3/4" for this, since I wanted plenty of depth for the transducer fasteners without them contacting the transom.
For larger pieces (especially if 1/2" thickness is what you want), I have bought scraps from eBay. They typically seem to come from Florida, where they apparently use a lot of 1/2" for cabinets and such. Often it's in bright colors. |
|
| Back to top |
|
|
BRAZO
Joined: 29 Jul 2008
Posts: 650
City/Region: Full-time Travel
State or Province: NV
C-Dory Year: 2008
C-Dory Model: 22 Cruiser
Vessel Name: Meyer Meyer
Photos: BRAZO
|
| Posted: Thu Feb 12, 2015 7:46 pm Post subject: |
|
|
We successfully mounted our transducer directly to the hull in 2008 and no problems at all. We used JB Weld - simple and easy.
Many many hours later and all is still good. No holes.
_________________
2008 CD22 Twin 50hp
Full-time Travel - Sprinter4x4, International, C-DORY 22 |
|
| Back to top |
|
|
Sunbeam
Joined: 23 Feb 2012
Posts: 3990
City/Region: Out 'n' About
State or Province: Other
C-Dory Year: 2002
C-Dory Model: 22 Cruiser
Photos: Sunbeam
|
| Posted: Thu Feb 12, 2015 10:16 pm Post subject: |
|
|
Another "no holes" option would be to adhere a block of fiberglass to the transom (can be purchased at McMaster-Carr, for example).
I went with the screws tapped into epoxy method because I wanted the option of exchanging for a larger block (I now have two transducers on it, but what if I want more?  ). So this way the existing block can be removed without much trouble and I could mount a larger block using the same holes (which will remain sealed by the epoxy). If I hadn't wanted that option, I might have adhered an FRP block instead. ). So this way the existing block can be removed without much trouble and I could mount a larger block using the same holes (which will remain sealed by the epoxy). If I hadn't wanted that option, I might have adhered an FRP block instead.
Main thing (to my mind) is to not have any core exposed to water (e.g. just having caulk or bedding compound between the water and the holes into the core). |
|
| Back to top |
|
|
CDory23
Joined: 23 Nov 2011
Posts: 227
State or Province: CA
Photos: CDory23
|
| Posted: Wed Aug 05, 2015 2:59 pm Post subject: |
|
|
This is an update to my original post and a question.
Update: It kept bothering me thinking of the 5200 coming loose and not keeping a seal with all of the old original transducer holes I filled with it when I mounted the starboard. Because of this I removed everything and decided to overdrill/undercut, epoxy all of the older holes originally filled with 5200 and then reattach the starboard the correct way. Although its only been 6 months since I did this I have had the boat in the water may times and a lot of overnighters, and I found no water intrusion.
Question: Upon reattaching the starboard into the new epoxy "plugs" I misaligned a hole when screwing in. This created around 1/8th inch deep of damage near where the screw was supposed to be embedded. I will be buying a new piece of starboard to correct hole location but wanted to know what others think about the damage. I am not concerned about aesthetics as it will be covered by the starboard. My common sense says it is fine since its superficial and that area has been undercut but I just wanted to confirm that with others. I get very paranoid about any potential water intrusion below the waterline.
There is a picture in my album labeled starboard mounting error of the damage.
Thanks |
|
| Back to top |
|
|
Sunbeam
Joined: 23 Feb 2012
Posts: 3990
City/Region: Out 'n' About
State or Province: Other
C-Dory Year: 2002
C-Dory Model: 22 Cruiser
Photos: Sunbeam
|
| Posted: Wed Aug 05, 2015 5:01 pm Post subject: |
|
|
C-Dory 23,
First of all, good on you for eliminating a worry by going back and sealing the core there. I'll post your photo here, then some commentary below:

Let me ask: Is the white stuff in the holes thickened epoxy? If so, and presuming your erroneous "dimple" isn't on the verge of breaking through to core (it doesn't look like it would, but then I don't know what you have behind it so I'm asking), I don't think it's anything to worry about. But... I can't see exactly how deep it is.
If you are going to worry about it, and if it were me, I'd likely just give a moment's sanding to the erroneous hole and then re-fill it flush again with epoxy. That's easier than wondering, if it's leaving you feeling slightly unsettled.
Another comment is that I typically fill the holes flush with the outer surface, that is, presuming the filled hole is larger than the ultimate hole (maybe those are the ultimate hole diameters, in which case nevermind!
Then I'll drill the new hole and then slightly chamfer it, just to give a little place for bedding compound to collect into a sort of ring. If the chamfer goes into the gelcoat, then that's fine too as it will help to keep it from cracking or spidering out from the hole.
Main thing is, you went back and did it in a way you're going to feel good about 
BTW, if you catch the epoxy in the green stage (slightly rubbery but not sticky wet), then you can slice flush pretty easily with a chisel. Too soon and it will be gummy and "smear around"; too late and it will tend to chip (too hard).
Sunbeam |
|
| Back to top |
|
|
CDory23
Joined: 23 Nov 2011
Posts: 227
State or Province: CA
Photos: CDory23
|
| Posted: Wed Aug 05, 2015 5:33 pm Post subject: |
|
|
Thanks for the response. Yes, the white fill is thickened epoxy. I do always fill the holes flush but it seems sometimes they don't end up completely flush after curing, leavings some dimples as you see in the pic. The hole in question I don't think is even 1/8" deep and also probably has epoxy behind it due to my undercutting, but I think your right about worrying. I'll just sand quickly and fill a little dab flush to the surrounding area.
How thick is the gel coat and fiberglass on our transoms? |
|
| Back to top |
|
|
Sunbeam
Joined: 23 Feb 2012
Posts: 3990
City/Region: Out 'n' About
State or Province: Other
C-Dory Year: 2002
C-Dory Model: 22 Cruiser
Photos: Sunbeam
|
| Posted: Thu Aug 06, 2015 4:35 pm Post subject: |
|
|
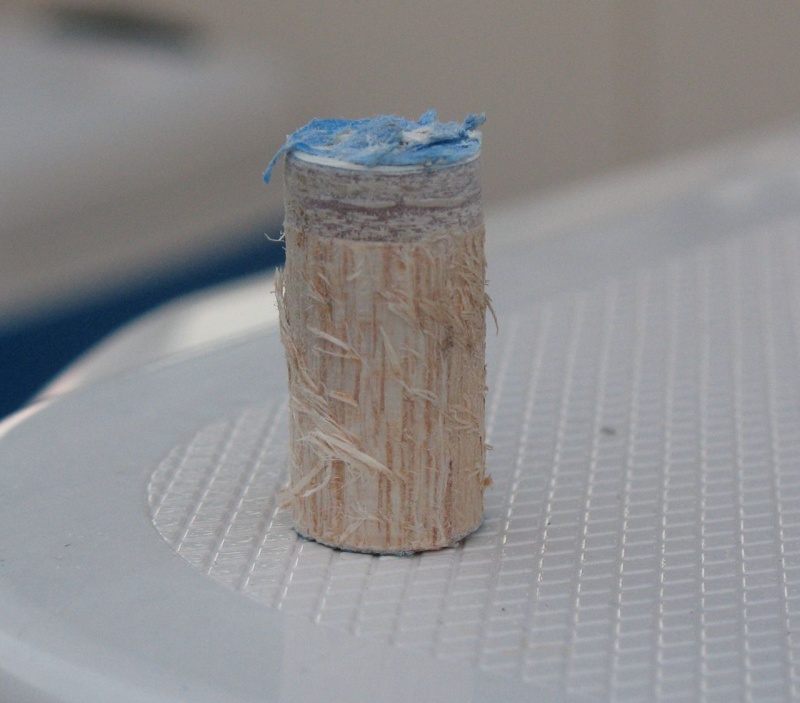
It's possible that trapped air is slowly coming out as the epoxy cures and that's making the filler "shrink." Trapped air is often a bugaboo, especially if you are filling "blind" holes (no other exit). I've used various ways to reduce or eliminate it, depending on the situation:
1) Drill a small hole higher up and fill from below like a lower unit.
2) Run a small tube (say, 1/8" shrink tube) into the hole so it can evacuate air as you fill (makes a lot of epoxy slop-over, but you can re-capture it).
3) Try to fill starting from the "bottom" of the hole by using a long-snouted syringe or similar.
Or just go back while it's in the green stage and "top it off" - if you do it then you don't need to sand or etc. -- just wash off any blush that may have accumulated with plain water (feels waxy, although it's not wax).
I was looking back in my photos and I'm 99% sure this plug came from my transom when I was overdrilling the holes for the Mini-jacker mount. I have a 2002 22 Cruiser and the transom core is vertical grain balsa. This would be the outer transom skin plus the core (inner skin stayed on boat). I realize there is no scale, but I think the fiberglass layer you see is around 3/8" or so. At any rate, the transom is around 1-1/2" thick.
If you get up into the splashwell area, then there is an additional "layer" of white filler and another inside skin (molded splashwell). But the inner transom skin is still there, only sandwiched in the middle like the middle bun on a Big Mac.
 |
|
| Back to top |
|
|
|
 Search
 Private Messages
 Profile
 Log in
 Register
 Help
Help
