| View previous topic :: View next topic |
| Author |
Message |
Sunbeam
Joined: 23 Feb 2012
Posts: 3990
City/Region: Out 'n' About
State or Province: Other
C-Dory Year: 2002
C-Dory Model: 22 Cruiser
Photos: Sunbeam
|
 Posted: Sat Aug 03, 2013 7:54 pm Post subject: Question on changing rectifier on Yamaha F80 Posted: Sat Aug 03, 2013 7:54 pm Post subject: Question on changing rectifier on Yamaha F80 |
 |
|
I could use a little outboard mechanicin' help on my Yamaha F80.
After talking to Chris (Rana Verde) last year at Powell, and reading a bit on the forum/web, I decided it would be a good idea to pre-emptively change the rectifier on my engine, a Yamaha F80. The original rectifier had burned out on not only Chris's engine, but Roy & Dixie's and one of Dora~Jean's. There is a newer rectifier that supersedes the original one and that is beefier -- this is what all three of the other Brats installed after theirs went out. I planned to fit the new one and keep my not-burned-out-yet original as a spare.
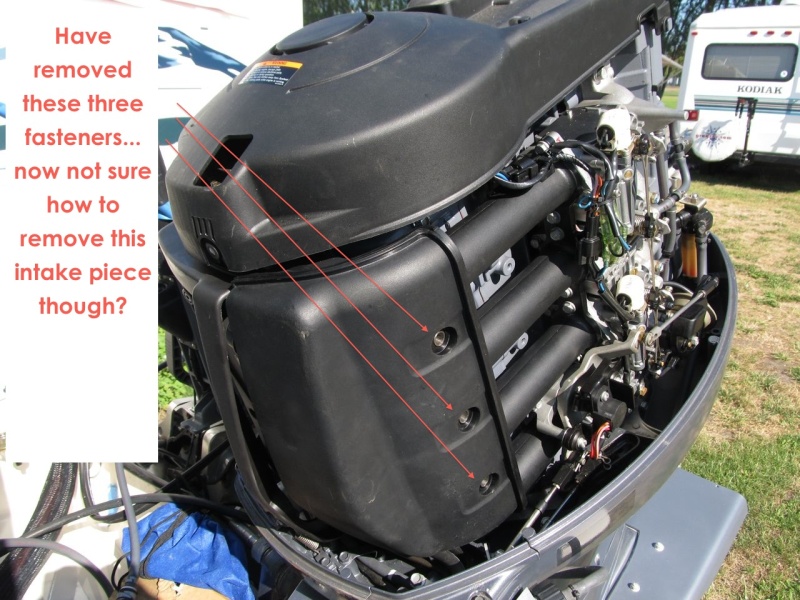
So, the new rectifier arrived yesterday, and it looks like it should be an easy change-out... once I get to it!  Getting to it is why I'm writing here. For those who have done it, what did you have to take apart to get to the fasteners on the rectifier? I have removed the plastic covering to the left (starboard side), but the one on the right didn't come off after removing the three obvious bolts, and looking at the parts diagram it almost looks like I'd have to remove the whole intake manifold, but.... from casual conversation with Chris and from reading the other thread I just got the sense that they would have mentioned that if it were required. Getting to it is why I'm writing here. For those who have done it, what did you have to take apart to get to the fasteners on the rectifier? I have removed the plastic covering to the left (starboard side), but the one on the right didn't come off after removing the three obvious bolts, and looking at the parts diagram it almost looks like I'd have to remove the whole intake manifold, but.... from casual conversation with Chris and from reading the other thread I just got the sense that they would have mentioned that if it were required.
Here are a couple of parts diagrams which may help someone to help me.
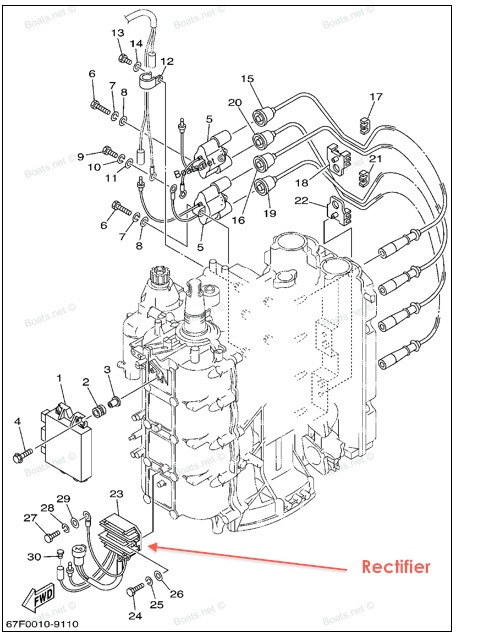
1) This is an electrical diagram - the rectifier is part #23, at the bottom/forward of the engine. I can see how this removes/replaces, but there are other parts in front of it which I'm not sure how to remove.
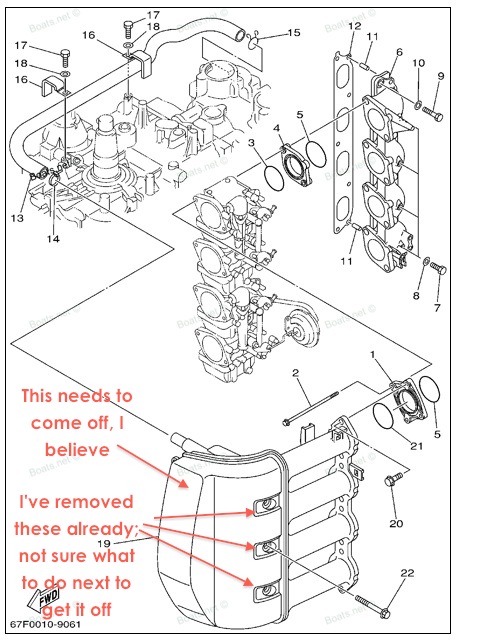
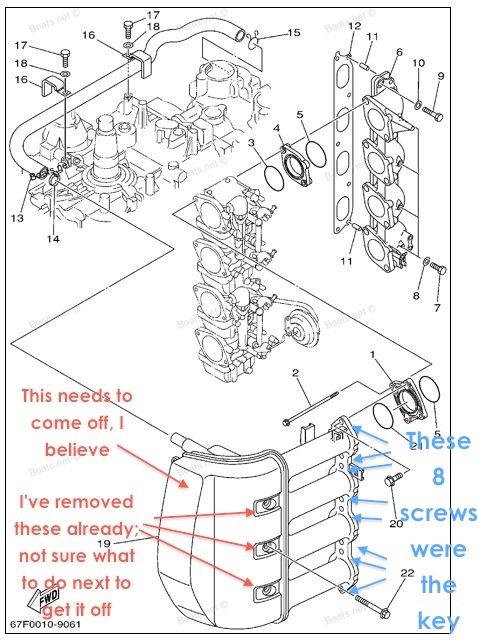
2) Here is the intake diagram. Part #19 needs to come off to access the rectifier, from what I can tell. I have removed the three bolts on the right (port) side, but... there seems to be more holding it on. Looking at the parts diagram, "more" seems like it might get into the intake manifold/gaskets.... and that just doesn't seem right. I'm hoping one of the folks who has done this before might have a memory jog looking at this diagram. You know how it's scary to "force" something (plastic) when you aren't sure if you are doing it right...
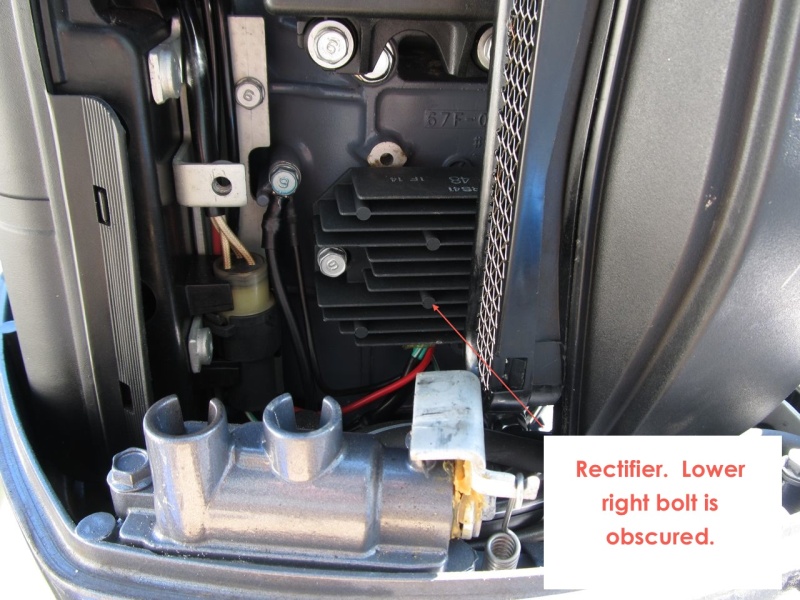
Here are photos of my engine. This is probably something super-obvious, but I'm not outboard-mechanics savvy (probably obvious by now) 

Thanks!
Sunbeam  |
|
| Back to top |
|
 |
Chris
Joined: 16 Dec 2004
Posts: 227
City/Region: Bend
State or Province: OR
C-Dory Year: 2003
C-Dory Model: 22 Cruiser
Vessel Name: Rana Verde
|
| Posted: Sat Aug 03, 2013 9:07 pm Post subject: |
|
|
Well...it's been a while...replaced mine on the water in Craig, Alaska...so not a huge job...but that air cowling needs to come off. There are about 8 bolts holding the black plastic cowling to the cast aluminum intakes. Not a big deal...you are not getting into anything complicated. As I remember it didn't need to come all the way off...just enough to gain clearance for that mount bolt on the rectifier. Also...I remember a bolt low on that air cowling on the front of the motor that was a challenge...needed a u joint for my socket drive...didn't have one aboard...had to walk up to the Napa in town to get one.
Biggest danger on this job is over torqueing the bolts and breaking those plastic pieces...go easy on those when you go back together.
_________________
Chris
Rana Verde |
|
| Back to top |
|
|
Sunbeam
Joined: 23 Feb 2012
Posts: 3990
City/Region: Out 'n' About
State or Province: Other
C-Dory Year: 2002
C-Dory Model: 22 Cruiser
Photos: Sunbeam
|
| Posted: Sat Aug 03, 2013 9:23 pm Post subject: |
|
|
Hi Chris,
Thanks for digging into your memory bank and responding  Okay, I had a feeling that air intake needed to come off (and I knew you had done it on the dock in Alaska, so figured it couldn't be super "deep" into the engine). I guess that when I saw the O-rings on either side of the intake flanges (on the aft end of that piece) I got nervous. Like.... was I supposed to get new O-rings, is my whole engine going to be open to the world, are certain torques required to put it back, etc. I'm not much of a mechanic Okay, I had a feeling that air intake needed to come off (and I knew you had done it on the dock in Alaska, so figured it couldn't be super "deep" into the engine). I guess that when I saw the O-rings on either side of the intake flanges (on the aft end of that piece) I got nervous. Like.... was I supposed to get new O-rings, is my whole engine going to be open to the world, are certain torques required to put it back, etc. I'm not much of a mechanic 
Thanks for the tip on the bolts into the plastic. I thought it was interesting how those three on the port side that I did remove were so beefy and "serious" looking, and yet they go through plastic.
I put it back together for today but will try again tomorrow. Perhaps Roy/Dixie will remember more, too, because they just replaced theirs a month or so ago.
The good thing is mine hasn't burnt out yet, so I could just leave it; but having poked around on the web I would feel a lot better having the new one on - it sounds like it was a real weak point. I guess the good thing is that the rest of it sounds pretty reliable and tried-and-true.
Thanks again,
Sunbeam |
|
| Back to top |
|
|
Sunbeam
Joined: 23 Feb 2012
Posts: 3990
City/Region: Out 'n' About
State or Province: Other
C-Dory Year: 2002
C-Dory Model: 22 Cruiser
Photos: Sunbeam
|
| Posted: Mon Aug 05, 2013 2:25 am Post subject: |
|
|
Just thought I would follow up and say that the new regulator/rectifier is on, and the original is a labeled spare Chris, thanks for the tips and encouragement. I'm impressed you got it done on the dock - some of those fasteners (on the intake) were a bear to get to and I had to come up with some creative tool combos.
Here is the intake diagram with some added notes, in case anyone else can use the info.
Sunbeam
 |
|
| Back to top |
|
|
|
|
You cannot post new topics in this forum
You cannot reply to topics in this forum
You cannot edit your posts in this forum
You cannot delete your posts in this forum
You cannot vote in polls in this forum
You cannot attach files in this forum
You cannot download files in this forum
|
|
 Search
 Private Messages
 Profile
 Log in
 Register
 Help
Help
